
Introduction
We will go over NodeJS WordPress Guide.
Did you know that you can use Javascript/NodeJS to manage your WordPress posts?
We will break down this in the following sections:
- Why Javascript is suitable for managing your WordPress Posts
- How to setup your environment to post articles
- How to get, post and delete new articles
I have used this successfully in various projects, and it works very well and has saved me a ton of trouble and time debugging things.
We will go point by point on getting you up and running in less than 5mins; having some background programming knowledge in Javascript is helpful if you want to fine-tune our code to manage your WordPress Posts.
This complete guide should cover all your questions on using Javascript to manage WordPress Posts.
All code and examples of how to do this can be found in the Github link.
Why Use Javascript To Manage WordPress
In this section, I’d like to cover some reasons to manage your WordPress site using Javascript. This may or may not apply to your use case, so feel free to skip this section if you know what you are doing and want to get into the coding part.
- Javascript allows you to programmatically perform operations on your WordPress site
- You can setup conditional events in your code and filter out WordPress posts as needed
- You can perform bulk operations across your WordPress sites
- You can perform bulk operations within your WordPress site on multiple articles
- You can set up alerting and other triggers based on what gets posted
- You can perform automated article classification with tags and categories based on keywords found in your posts
- You can do automatic checks for grammar
The list above is by no means complete, but it explains why some people may want to use Javascript programmatically.
How To Setup Javascript For Managing WordPress
How To Install Node and Yarn
The first step we will be doing is to set up the NodeJS environment that we will use to run our application. If you don’t have NodeJS and Yarn installed in your system I recommend checking these links to get started with those in your system:
If you have those installed in your system you can check the versions that you have by running the following commands:
$ node -v
v18.7.0

$ yarn -v
1.22.19
In order to ensure compatibility with this guide I recommend you use at least the versions listed above or greater than them. This will allow you to work by copying directly the things from the Git repo and this article.
How To Install Libraries For WordPress
The first step we need to do is make a directory and initialize our yarn packages there. In order to do this we will be calling the yarn init command and passing -2 so it uses version 2 structure which is faster and can parallelize package installation.
$ yarn init -2
➤ YN0000: Retrieving https://repo.yarnpkg.com/3.2.2/packages/yarnpkg-cli/bin/yarn.js
➤ YN0000: Saving the new release in .yarn/releases/yarn-3.2.2.cjs
➤ YN0000: Done in 0s 330ms
{
  name: 'nodejs-wordpress',
  packageManager: '[email protected]'
}
This initializes our repo and creates a baseline from which now we can start installing packages that we will be using in this project. So the next step is to install two packages we need here:
- Typescript
- WordPress Library
This can be shown in the command below:
$ yarn add typescript wordpress
➤ YN0000: ┌ Resolution step
➤ YN0000: └ Completed in 0s 676ms
....
➤ YN0000: └ Completed
➤ YN0000: ┌ Link step
➤ YN0000: └ Completed
➤ YN0000: Done in 0s 796ms
How To Install Development Dependencies For NodeJS
As it can be seen above we successfully installed both package dependencies, now we can proceed into installing our development dependencies that we will use in our app. The most important one is our node types so we code completion works in Visual Code alongside we will also use ts-node compiler to produce Javascript files from Typescript files.
This can be seen in the command below:
$ yarn add -D @types/node ts-node
➤ YN0000: ┌ Resolution step
➤ YN0000: └ Completed in 2s 565ms
...
➤ YN0013: │ yn@npm:3.1.1 can't be found in the cache and will be fetched from the remote registry
➤ YN0000: └ Completed in 0s 586ms
➤ YN0000: ┌ Link step
➤ YN0000: └ Completed
➤ YN0000: Done in 3s 179ms
How To Configure TSC For NodeJS
Finally we also need to do a final step and this is initialize the Node Typescript pseudo compiler system with some options that are good to have. Also we will be defining our source and binary directories in the command below.
$ yarn tsc --init --rootDir src --outDir ./bin --esModuleInterop --lib ES2022 --module commonjs --noImplicitAny true
Created a new tsconfig.json with:                                                                                                       TS
  target: es2016
  module: commonjs
  lib: es2022
  outDir: ./bin
  rootDir: src
  strict: true
  esModuleInterop: true
  skipLibCheck: true
  forceConsistentCasingInFileNames: true
If you notice above we also specified our default Typescript library version which in this case the latest one is ES2022, depending on which year you are seeing this on you can adjust accordingly. For now the output defaults to ES2016 so it’s compatible with various versions of Javascript.
Now that all of our dependencies and libraries are installed we can proceed into implementing some code.
How To Get WordPress Posts Using JavaScript
The first thing we will be demonstrating is how to get a list of the articles you have posted on your website. To do this we will be implementing some code that uses the library we previously installed along with some logic around it.
The code for this is shown below:
(async () => {
    var WP = require('wordpress');

    var client = WP.createClient({
        url      : 'localhost:8001',
        username : 'unbiased',
        password : 'coder'
    });
    client.getPosts(function(error: any, posts: any ) {
        posts.forEach((post: any) => {
            console.log('Found post titled: ', post.title, 'With link: ', post.link);
        });
    });
})();
The code above has the following the steps:
- First we import and load the WordPress library
- Then we create a client object that we will use to interact and send WordPress commands to our site. This takes three important attributes:
- URL: This is the url of the WordPress server, in our case we are testing locally so this runs in a docker container. If you would like to learn more about this you can check this article that I wrote here on how to run WordPress docker locally.
- User/Pass: These are the credentials of a user that has access to the WordPress site
- Once we run the client command this connects to the WordPress site and gives us a valid client back or an error if it fails due to authentication or other reasoning.
- Finally using the client we run a function called getPosts that gives us a listing for all the WordPress articles in our site. For simplicity we iterate and print out the title and the link of each of those.
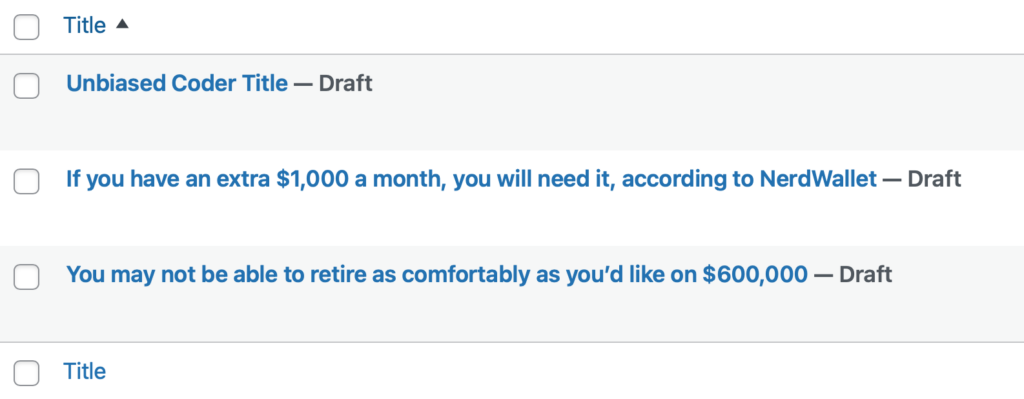
To demonstrate how this works we will be executing the code in our local WordPress site that we previously setup.
$ yarn ts-node nodejs-wordpress-get-post.ts
Found post titled:  If you have an extra $1,000 a month, you will need it, according to NerdWallet With link:  http://127.0.0.1:8001/?p=127
Found post titled:  You may not be able to retire as comfortably as you'd like on $600,000 With link:  http://127.0.0.1:8001/?p=125
We invoke the ts-node command to run our typescript code without having to compile it. Note in production you probably want to compile it into JS code first. If we check the output we can see clearly two articles printed out with the titles shown above and the URLs that each has accordingly.
To do an extra verification of this we will be going to WordPress admin interface and checking if the posts really exist on the site.

The screenshot above verifies that our code worked successfully and was able to find all the articles posted in our site.
How To Make A New Post In WordPress Using JavaScript
The next thing we will be demonstrating here is how to post a new article to the WordPress site using Javascript. This will help us automate posting if it has to be used in the future for any purpose programmatically.
The code we will be implementing here is very similar to what we did earlier so let’s proceed and see how that looks:
(async () => {
    var WP = require('wordpress');

    var client = WP.createClient({
        url      : 'localhost:8001',
        username : 'unbiased',
        password : 'coder'
    });
    let new_post: any = {
        'title': 'Unbiased Coder Title',
        'content': '<h2>Fun section 1</h2><p>content for section1</p><h2>Fun section 2</h2><p>content for section2</p>',
    };
    client.newPost(new_post,
                            function(error: any, post_id: number ) {
                                console.log('Successfully created post with id: ', post_id);
                            });
})();
As shown above the main difference here is that once we acquire the client object like we did before we will be calling the newPost function. This routine basically lets us make a new post to the site with the title, content and whatever other attribute we provide to it. In the example above we will be using the following properties:
- Title: This is the title of our article, in this case Unbiased Coder Article
- Content: This is the html content of the article itself that will get posted
One further thing that needs to get noted here is that our second argument besides the post we assemble is a function wrapper that captures the results of the call, more like callback. It gives us an important piece of information which is the post ID number which we will be using later on for deletion so keep a note of that.
So lets go ahead and execute our code to see what will happen.
$ yarn ts-node nodejs-wordpress-new-post.ts
Successfully created post with id:  129

$ yarn ts-node nodejs-wordpress-get-post.ts
Found post titled:  Unbiased Coder Title With link:  http://127.0.0.1:8001/?p=129
Found post titled:  If you have an extra $1,000 a month, you will need it, according to NerdWallet With link:  http://127.0.0.1:8001/?p=127
Found post titled:  You may not be able to retire as comfortably as you'd like on $600,000 With link:  http://127.0.0.1:8001/?p=125
Executing the code shows us that the article was successfully posted into the WordPress site with the ID number of: 129.
To verify if this worked we will be calling the get posts function we implemented earlier to ensure our article got posted to the site. As you can see from the listing above the article is listed there with the title aforementioned.
Finally we do a last sanity check by logging into the web admin panel of WordPress to see the contents and if the article posted there.
From the screenshot above it’s visible that WordPress now has our new article. But how does this look is it consistent with the html code we gave it earlier?
All we have to do to verify this is to actually click and open the article to see how it looks.
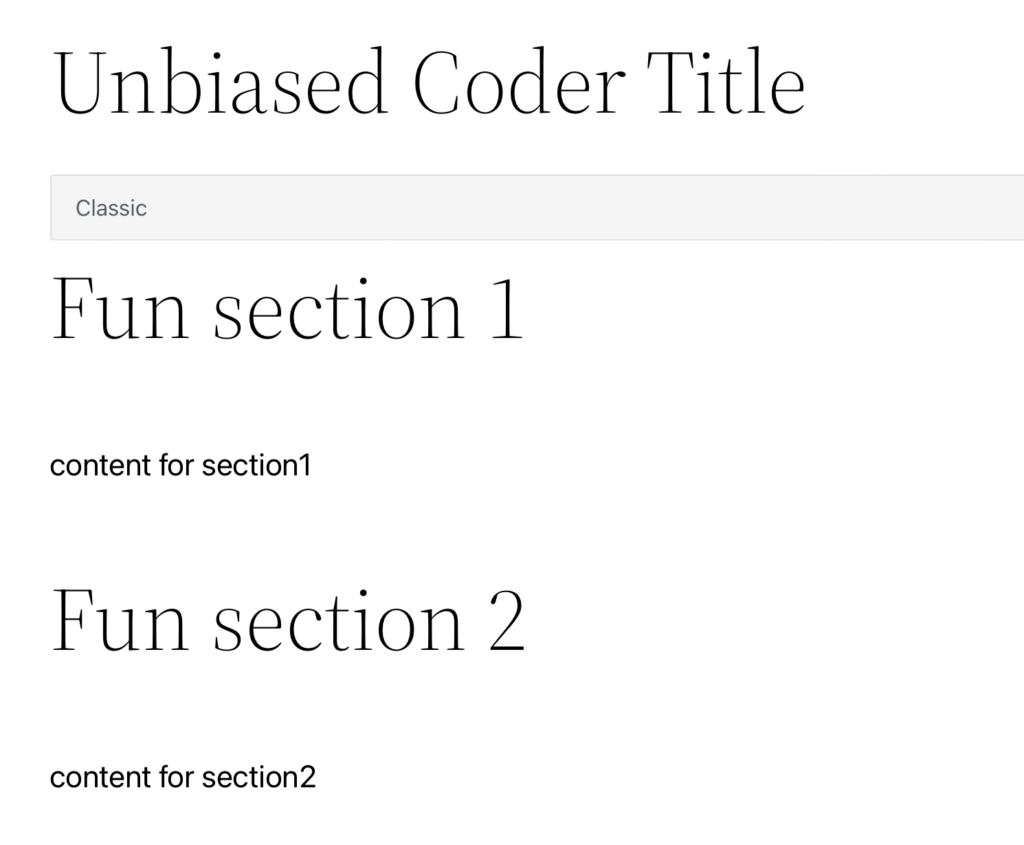
As you can see in the screenshot above this is consistent with the headings and paragraphs we gave in the sample html argument of the new post object we created in the code. This successfully verifies that our article got posted into the site.
How To Delete A WordPress Post Using JavaScript
The last thing we will be demonstrating here is how to delete a WordPress post using Javascript. The code here again is very similar and builds upon the previous examples we presented.
(async () => {
    var WP = require('wordpress');

    var client = WP.createClient({
        url      : 'localhost:8001',
        username : 'unbiased',
        password : 'coder'
    });

    client.deletePost(129,
                            function(error: any) {
                                console.log('Any errors set are: ', error);
                            });
})();
A few things to note about this code:
- The initializing stub is the same as the previous ones
- We add a call to deletePost which basically is responsible for removing the post from the site and this takes two arguments:
- The post ID that we previously found (it was 129)
- A call back function that tells us if there were any errors during the operation of execution
Similarly to before we will go ahead and execute this to see what results we get back.
$ yarn ts-node nodejs-wordpress-delete-post.ts
Any errors set are:  null

$ yarn ts-node nodejs-wordpress-get-post.ts
Found post titled:  If you have an extra $1,000 a month, you will need it, according to NerdWallet With link:  http://127.0.0.1:8001/?p=127
Found post titled:  You may not be able to retire as comfortably as you'd like on $600,000 With link:  http://127.0.0.1:8001/?p=125
When running it you can see that the errors flag is set to null which means that the code was executed successfully and nothing failed. To verify this we follow the same process as before by running again our get posts code to see if the article is really good. As shown above once the delete function gets executed the post is no longer there and has been successfully deleted from our system.
Checking further the WordPress admin panel also verifies this.

With this we successfully demonstrated how to create, delete and get all the WordPress Posts in your site using Javascript.
Conclusion
We were able to go over this NodeJS WordPress Guide in an easy to explain manner with examples. Hopefully, I answered any questions you may have and helped you get started on your quest to managing your WordPress sites using JavaScript.
Please drop me a cheer below if you found this helpful and think it may have helped you. I would appreciate it.
If you have any questions or comments, please post them below or send me a note on my Twitter. I check periodically and try to answer them in the priority they come in. Also, if you have any corrections, please let me know, and I’ll update the article with new updates or mistakes I made.
Would you consider using NodeJS to manage WordPress?
I use this extensively for many projects to perform automation and article management in my WordPress sites. I often automate big parts of filtering my articles and doing some classification of my tags.
If you would like to find more articles related to WordPress you can check the list below:
- Fix Cannot Find Namespace NodeJS
- How to make a Trivia Game in PHP WordPress
- How To Setup WordPress In Docker
You can find information about relevant projects referenced in this article in the list below: