
Introduction

We will go over this Python WordPress Guide.
Did you know that you can use Python to get and post and delete articles to your WordPress site programmatically?
We will break down this in the following sections:
- Why Python is suitable for programmatically posting to your WordPress site
- How to post, get and delete articles to your WordPress site
I have used this successfully in various projects, and it works very well and has saved me a ton of trouble and time debugging things.
We will go point by point on getting you up and running in less than 5mins; having some background programming knowledge in Python is helpful if you want to fine-tune our code, but you don’t need to get, post, and delete articles from your WordPress site.
This complete guide should cover all your questions on using Python to post articles to your WordPress.
All code and examples of how to do this can be found in the Github link.
Why Use Python To Post Articles Into WordPress
In this section, I’d like to cover why it’s helpful to use Python to control your WordPress site programmatically. This may or may not apply to your use case, so feel free to skip this section if you know what you are doing and want to get into the coding part.
- Python allows you to introduce automation to your WordPress posts
- Using automation, you can quickly and programmatically set filters and conditions on which posts you want to publish
- You can build your post and article repository and use Python to select articles from it
- You can implement logic that adds and removes items from your posts automatically before it posts them
- You can monitor your posts if you have multiple authors for specific keywords and, based on that, delete or ask for updates from them
- You can perform bulk operations on your WordPress article posts, such as appending or prefixing things into them
- You can perform bulk functions across multiple WordPress sites that you control and own
The list above is incomplete, but it explains why some people may want to use Python to control their WordPress posts programmatically.
How To Setup Python To Access WordPress
The first step we will be doing is to set up the Python environment that we will use to run our application.
The commands below take care of this process for you.
$ virtualenv venv
created virtual environment CPython3.9.12.final.0-64 in 192ms
  creator CPython3Posix(dest=/Users/alex/code/unbiased/python-wordpress/venv, clear=False, no_vcs_ignore=False, global=False)
  seeder FromAppData(download=False, pip=bundle, setuptools=bundle, wheel=bundle, via=copy, app_data_dir=/Users/alex/Library/Application Support/virtualenv)
    added seed packages: pip==22.1.2, setuptools==63.2.0, wheel==0.37.1
  activators BashActivator,CShellActivator,FishActivator,NushellActivator,PowerShellActivator,PythonActivator

$ source venv/bin/activate

$ pip install -r requirements.txt
Collecting python-dotenv
  Using cached python_dotenv-0.20.0-py3-none-any.whl (17 kB)
Collecting python-wordpress-xmlrpc
  Using cached python_wordpress_xmlrpc-2.3-py3-none-any.whl
Installing collected packages: python-wordpress-xmlrpc, python-dotenv
Successfully installed python-dotenv-0.20.0 python-wordpress-xmlrpc-2.3

$ python
Python 3.9.12 (main, Mar 26 2022, 15:44:31)
[Clang 13.1.6 (clang-1316.0.21.2)] on darwin
Type "help", "copyright", "credits" or "license" for more information.
>>> import wordpress_xmlrpc
>>
There are three steps that we are following above:
- Create and initialize a virtual environment
- Install the Python dependencies from the requirements file (also in Github, as shown below)
- Test to ensure our dependencies got installed by importing the module
All the steps were completed successfully in the terminal output above, and we installed everything needed to run our Python WordPress Post library.
How To Manage Posts In WordPress With Python
First, we must review a helper library we will leverage across our scripts. To do this, we will leverage two libraries from the PIP store referenced below.
- Dov: This library helps us load environment variables that store important information about our code flow
- WordPress XMLRPC: This is a library that abstracts the XMLRPC made to the WordPress site for you
For this, we first need to define an environment file that has some information for our code to connect to the WordPress site; ‘let’s take a look at what we describe on it:
WORDPRESS_USER=USERNAME
WORDPRESS_PASS=PASSWORD
WORDPRESS_HOST=localhost
WORDPRESS_PROTO=http
WORDPRESS_PORT=8001
The file above is in the standard environment file format, with a key-value pair separated by the equal sign. The variables we will be using here are the following:
WORDPRESS_USER/PASS: These two variables are the credentials we will be logging into the site to get an authentication token so we can send the XML RPC request to WordPress.
WORDPRESS_HOST/PROTO/PORT: These three variables are used to assemble the full HTTP address of the WordPress site. The port is always optional and defaults to 443 if the proto is HTTPS and 80 if it’s HTTP (non-encrypted).
Now that we have the basic environment details setup and using the two libraries aforementioned, we can start implementing some code wrapper for WordPress accessing our posts.
The initial code library is listed below, so let’s go ahead and analyze it to see what each function does.
import os
from wordpress_xmlrpc import Client, WordPressPost
from wordpress_xmlrpc.methods.posts import NewPost, GetPosts, DeletePost
from dotenv import load_dotenv

load_dotenv()

class WordPressHelper:
    def __init__(self) -> None:
        self.user = os.getenv('WORDPRESS_USER')
        self.passwd = os.getenv('WORDPRESS_PASS')
        self.host = os.getenv('WORDPRESS_HOST')
        self.port = os.getenv('WORDPRESS_PORT')
        self.proto = os.getenv('WORDPRESS_PROTO')
        self.wp_url = f'{self.proto}://{self.host}:{self.port}'

    def delete_article(self, article_id):
        wp_url = f'{self.wp_url}/xmlrpc.php'
        print(f'Connecting to: {wp_url}')
        self.client = Client(wp_url, self.user, self.passwd)

        print(f'Deleting post {article_id} from wordpress')
        res = self.client.call(DeletePost(article_id))
        print(f'Successfully deleted post: {article_id} from server')
        return res

    def get_articles(self):
        wp_url = f'{self.wp_url}/xmlrpc.php'
        print(f'Connecting to: {wp_url}')
        self.client = Client(wp_url, self.user, self.passwd)

        print('Getting Posts from wordpress')
        res = self.client.call(GetPosts())
        print('Successfully received posts from server')
        return res

    def post_article(self, title, content, tags, categories):
        wp_url = f'{self.wp_url}/xmlrpc.php'
        print(f'Connecting to: {wp_url}')
        self.client = Client(wp_url, self.user, self.passwd)

        print(f'Creating wordpress post using title: {title}')
        post = WordPressPost()
        post.title = title
        post.content = content
        post.term_names = {
            'post_tag': tags,
            'category': categories
        }

        res = self.client.call(NewPost(post))
        print('Successfully sent post to server')
        return res
Initially, we assemble the WordPress URL using the host, port, and protocol and also set up the credential information for authentication
- post_article: This function leverages a few helper calls from the WordPress XML RPC library to post an article to the WordPress site you provided in the environment file. It does this by the following process:
- A connection must be initialized using the Client helper from the WordPress XMLRPC library that we imported and allows us to interact with WordPress
- WordPress object using the WordPressPost helper, which you can define for it a title, content, tags, and categories
- Using the client, we post this as a NewPost into our WordPress host
- Finally, we check the response to ensure it has been accepted for publishing.
- get_articles: Similar to the previous function, here we leverage code to let us get a list of posts on the WordPress site. This works as follows:
- First, we initialize the connection to the WordPress site using the Client Interface
- We then issue the GetPosts command using the client we previously initialized
- Finally, we get the result of the posts or an error if the power failed
- delete_article: Similar to the previous functions, this code lets you delete an article from your WordPress site. This works as follows:
- First, we initialize the connection to the WordPress site using the Client Interface
- We then issue the DeletePost command using the client we previously initialized
- Finally, we get the result of the posts or an error if the power failed
As you can see, the above interfaces are helper wrapper functions for the code that will implement below.
How To Post WordPress Articles Using Python
The first thing we will be demonstrating here is how to Post into WordPress articles using Python. In this section, we will go over the code that posts an article to a WordPress site hosted locally on our computer with the following characteristics:
- Title: Unbiased Coders Test Article
- Content: As shown below, an HTML strip
- Tags/Categories: WordPress and Coding
This code will make use of the helper WordPress we implemented earlier. This can be seen below:
import pprint
from wordpress_helper import WordPressHelper

wph = WordPressHelper()
title = 'Unbiased Coders Test Article'
content = '<h1>Welcome To <b>Unbiased Coders</b> Blog</h1><p>Enjoy your stay</p>'
tags = ['Coding']
categories = ['Wordpress']
res = wph.post_article(title, content, tags, categories)
pprint.pprint(res)
If we analyze the code, we will make the following observations on how it works:
- First, we import the WordPress helper library we discussed in the previous section
- We will initialize an object to it so we can start using the functions and initialize the environment
- The process we will leverage here is post_article which essentially lets us post to the WordPress site using Python
- Finally, we print out the result of what executed
Next, we will try to run the code and see what happens to our WordPress site.
$ python ./python-post-wordpress-article.py
Connecting to: http://localhost:8001/xmlrpc.php
Creating wordpress post using title: Unbiased Coders Test Article
Successfully sent post to server
'103'
As you can see above, the code first connects to the XMLRPC interface WordPress offers for clients to administrate and post articles remotely. In our case, as mentioned earlier, it’s just WordPress running locally in a Docker container. If you want to know more about how to do this, please send me a note below, and I’ll be happy to help you.
Once the code connects, it assembles the article with the mentioned characteristics and finally posts it to the site using our helper code.
The result we got back from the server is 103, this basically refers to a successful post, and it also told us the article ID for the newly created WordPress post we did with Python is 103. Please note this ID as we will later be using it to delete the post, and it would be required.
To further validate, we will connect to our WordPress server’s web interface to see if the post was made and was successful. The screenshot below illustrates the post we made with the characteristics we gave to it.
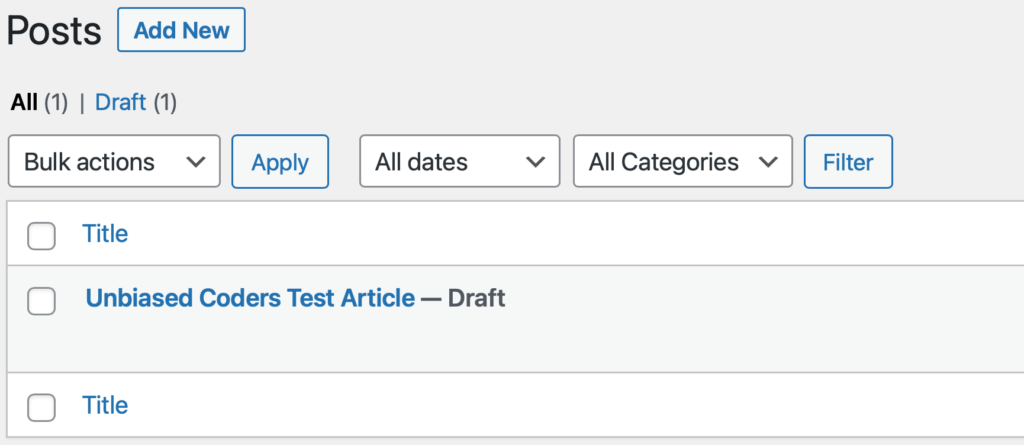
As you can see above, the title of the Unbiased Coders Test Article is displayed in the list, but what about the contents? Do those also reflect what we sent to it? We will be opening the article and investigating its contents to find out. This clicks on it, and it will open.
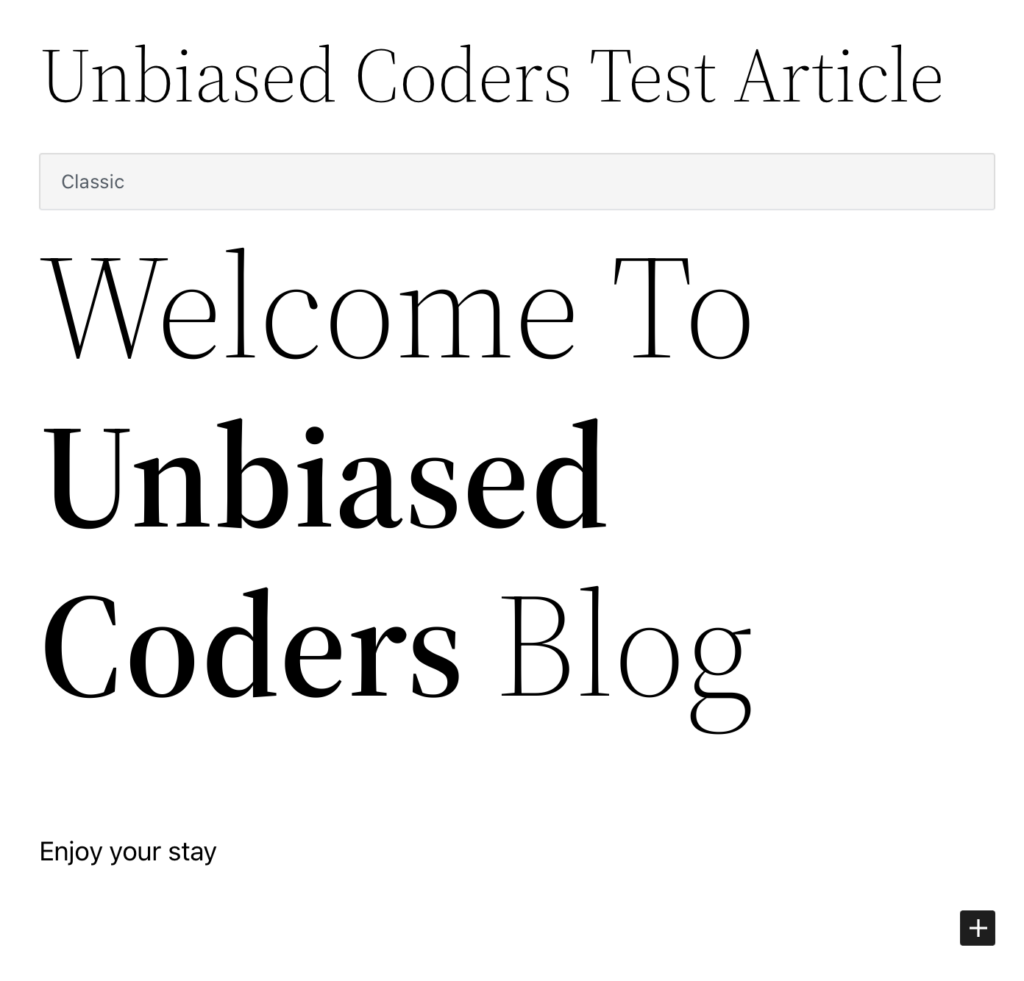
As shown above, the article was created with the contents we gave it in our code earlier. So this successfully demonstrates how we programmatically posted an article on our WordPress site using Python.
How To Get WordPress Articles Using Python
In this next step, we will demonstrate how to get all WordPress articles using Python. First, we will review the code retrieving all Posts from the WordPress site hosted locally on our computer. It must be noted here that we have not made any new posts, and we have the one we created earlier in the example we provided.
This code will make use of the helper WordPress we implemented earlier. This can be seen below:
import pprint
from wordpress_helper import WordPressHelper

wph = WordPressHelper()
articles = wph.get_articles()
pprint.pprint(articles)
If we analyze the code, we will make the following observations on how it works:
- First, we import the WordPress helper library we discussed in the previous section
- We will initialize an object to it so we can start using the functions and initialize the environment
- The process we will leverage here is get_articles which essentially lets us get all the WordPress posts using Python
- Finally, we print out the list of Posts we retrieved from the WordPress server
We will try to execute the code and see what happens to our WordPress site.
$ python ./python-get-wordpress-articles.py
Connecting to: http://localhost:8001/xmlrpc.php
Getting Posts from wordpress
Successfully received posts from server
[<WordPressPost: b'Unbiased Coders Test Article'>]
As you can see above, the first thing the code does is connect to the server, as discussed in the previous section.
Once the code connects, it sends a command to get a list of all the articles in our WordPress Posts section.
The result we get back is a list of objects. Each object is a WordPress post that has the same characteristics as every other post, such as the following ones:
- Title
- ID
- Categories / Tags
- Content
- Author
There’s more to this list, but these are the most important ones you want to work with. First, the output correctly shows that currently, we have 1 WordPress post available in our server titled Unbiased Coders Test Article, which is essentially what we created earlier and was illustrated in the screenshot of our WordPress site listing of the Posts section.
How To Delete WordPress Articles Using Python
Finally, we will show how to delete a WordPress article using our Python code interface. This can be done similarly to what it was before so let’s go over the code quickly and see how it works.
import pprint
from wordpress_helper import WordPressHelper

wph = WordPressHelper()
res = wph.delete_article(103)
pprint.pprint(res)
The split up is very similar to what we did earlier:
- First, we initialize and import our WordPress helper library
- We then use the delete_article function, but we also have to give it the ID of the post we will delete. If you recall from the earlier section, when we created a new position whose ID was 103, we will pass it into our delete article function here.
- Finally, we print out if the result was successful or if it failed
So we go ahead and execute the code to see what the result will be:
$ python ./python-delete-wordpress-article.py
Connecting to: http://localhost:8001/xmlrpc.php
Deleting post 103 from wordpress
Successfully deleted post: 103 from server
Result: True

$ python ./python-get-wordpress-articles.py
Connecting to: http://localhost:8001/xmlrpc.php
Getting Posts from wordpress
Successfully received posts from server
Result: [] (empty)
As you can see above, the code connected successfully and issued the delete command for the WordPress post with ID: 103. The result was True, which signifies a successful execution, and the article has been deleted.
To further validate, we execute the get all articles code we implemented earlier to see if we will return any articles. Running this shows that the result, in this case, is empty, meaning that the post has disappeared and was successfully deleted.
As the last step, we also check our web interface in WordPress to ensure the article doesn’t exist there anymore.
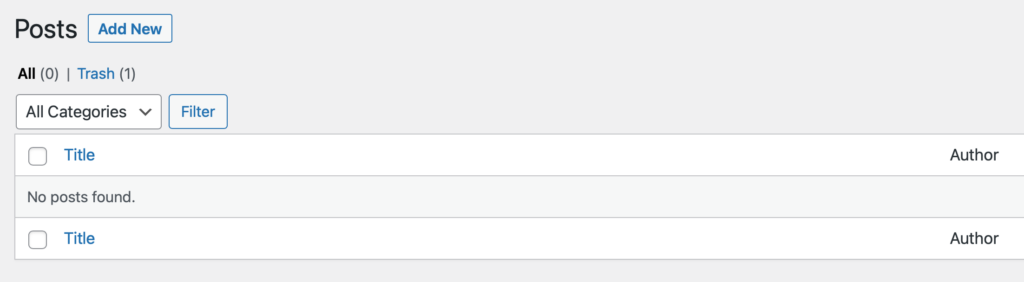
As shown above, no articles are in the list, meaning the post was deleted.
Conclusion
We were able to go over this Python WordPress Guide successfully. Hopefully, I answered any questions you may have and helped you get started on your quest to post on your WordPress sites programmatically.
Please drop me a cheer below if you found this helpful and think it may have helped you. I would appreciate it.
If you have any questions or comments, please post them below or send me a note on my Twitter. I check periodically and try to answer them in the priority they come in. Also, if you have any corrections, please let me know, and I’ll update the article with new updates or mistakes I made.
Would you consider using Python to manage your WordPress posts?
I use this extensively for many projects when I want to perform bulk operations on my WordPress sites. For example, I recently had a case where I wanted to add a reference in all my posts to my Twitter account handle in my Conclusion paragraph, as shown below. I used code to do this across all of my articles with great success and no manual effort.
If you would like to find more articles related to Python, you can check the list below:
- How To Setup WordPress In Docker
- NodeJS WordPress Guide
- How To Find All Images In Page Using Python
- How To Find All Links In Page Using Python
- Is GUI Programming Hard In Python
You can find information about relevant projects referenced in this article in the list below: