Introduction

We will go over How To Stress Test REST API Using Python.
Did you know that you can use Python to perform your load testing without any external tools or libraries?
We will break down this in the following sections:
- Why is stress testing important to perform in your API
- How to do performance and load testing in your API using Python code
- Testing The Code With Various Pages
I have used this successfully in various projects and it works very well and has saved me a ton of trouble and time debugging things.
We will go point by point on getting you up and running in less than 5mins, having some background programming knowledge in Python is useful if you want to fine tune our code but it’s not necessary for you to run your stress testing.
This is a complete guide and should cover all your questions on using Python to load test your API.
All code and examples on how to do this can be found in the Github link here.
Why Is Performance And Stress Testing Important

Before you start any load testing on your API you probably have the valid question on if it’s important and if you really need it. Below I’m going to list a few reasons as to why you may need it. Keep in mind that performance and stress testing is very dependent on the use of your application. For example if you have an API that is only internal and does not have any impact if it goes down then you don’t really need to do load testing.
Furthermore if your user base hitting the API is minimal like below 1000 users then your use case is does not warrant to go through that process. However below I’m going to list a few reasons as to why you may want to do it and how load testing can be beneficial for your server setup.
- Allows you to test your application under heavy traffic and identify potential issues your code has
- Similar to above but it also lets you identify any potential misconfigurations or architecture problems
- You can easily execute this in a lower environment such as QA or Development without disrupting your production server
- You can simulate various scenarios that you know your app may be running into while being in production
- It gives you insights on places where you can improve certain things
- It triggers use-cases that you usually wouldn’t find if you were to do simple function and unit testing
- It lets you fine tune server side settings by re-running the test until it’s optimal
- Prevent repetitional damage
- Prevent certain denial of service attacks
- Stop potential data loss in the event of a server overload
The list above signifies I think some important parts, if your application is going to serve a lot of concurrent users and it’s high availability I believe it will greatly benefit from doing the occasional performance testing.
How To Load/Performance Test An API Using Python

Performance and load testing is typically run with the following things into consideration:
- Run in a lower environment such as QA or Development with a setup that resembles as close as possible your production setup. Ideally it will be close to 90% of what production runs.
- Implement all the use cases in your code base that simulate the stress testing you want to do. Some typical scenarios are the following:
- Run a lot of concurrent web requests to your API
- Simulate requests that open multiple database connections at the same time (if you are using a database backend)
- Run a lot of half open connections (connections that activate an API but leave it hanging there)
- Once you run your first tests and fine tune repeat the same thing in a production environment
- Schedule your code to run periodically when you do a new release or before an audit. Doing this at scheduled intervals lets you integrate it as part of your quality assurance process and keep your standards high in case something slips from one release to another.
- Since performance and load testing is an intensive operation it’s better run in off peak hours when you are testing against a production instance.
In this case we are going to cover how we have implemented a general performance and load testing for your REST API.
How To Implement A Stress Test For Your API
In this section we will demonstrate an initial piece of code that does performance testing in your API. This same code can be fine tuned to work against a REST API or any API for that instance as long as you have the payload ready to go. More specifically the code above will demonstrate two specific tests:
- Run a lot of concurrent API connections
- Test half open connections to your server (let them timeout)
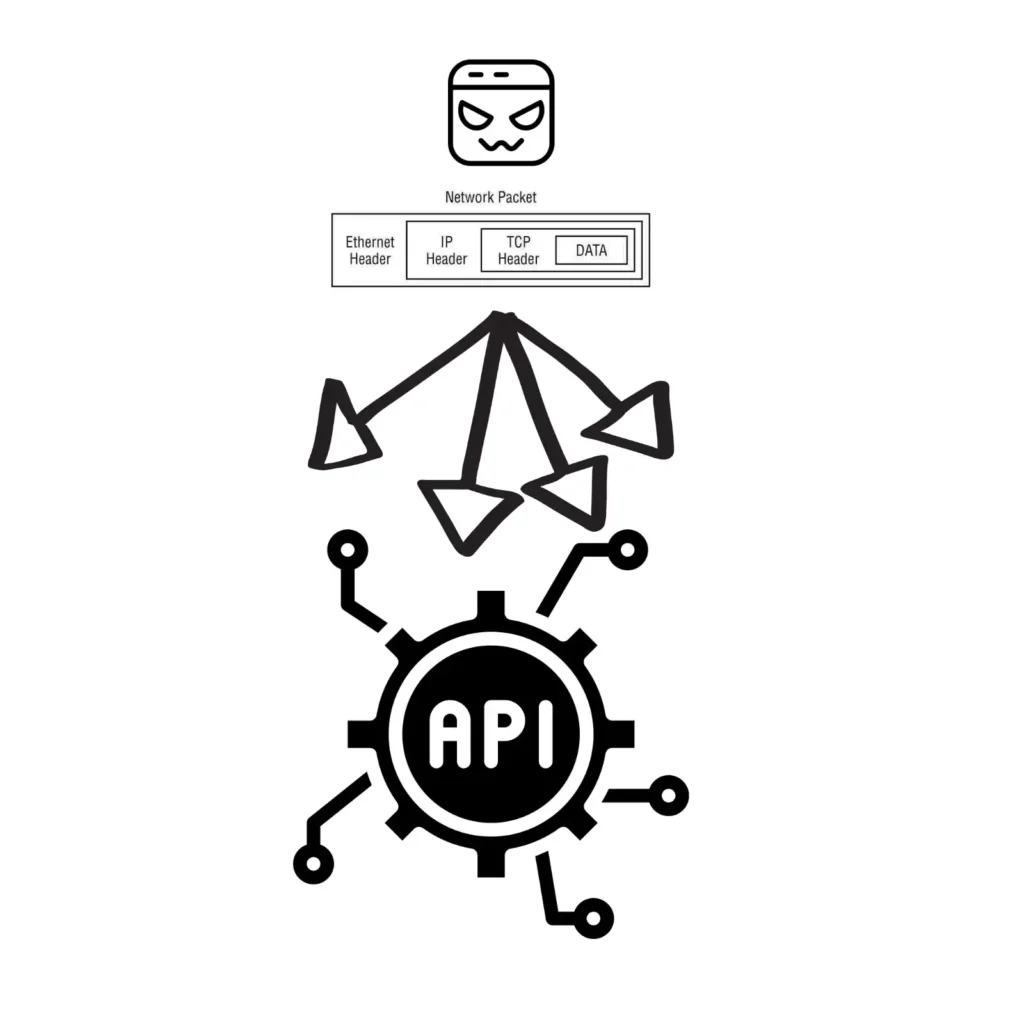
To better understand this concept I have created a diagram below that shows what we will be doing with our code to load test your API.

As you can see above the ‘malicious’ end user basically assembles the network packets in this case that’s us performing the stress test. In this case the network packet is basically just an HTTP or HTTPS network request that does the REST API negotiation. Since we are performing this in parallel in many threads the packet gets sent out simultaneously in a very fast pace resulting to put a stress/load on the API endpoint we are performing the test on.
How To Setup Environment For Stress Testing
Before we dive into a code let’s quickly setup the environment so we can start running our code. To do this we will be using the requirements packages that are in the GitHub repo referenced below.
To do this run the following commands so we can execute our Python code.
$ virtualenv venv
created virtual environment CPython3.9.12.final.0-64 in 297ms
  creator CPython3Posix(dest=/Users/alex/code/unbiased/python-stress-test-api/venv, clear=False, no_vcs_ignore=False, global=False)
  seeder FromAppData(download=False, pip=bundle, setuptools=bundle, wheel=bundle, via=copy, app_data_dir=/Users/alex/Library/Application Support/virtualenv)
    added seed packages: pip==22.1.2, setuptools==62.6.0, wheel==0.37.1
  activators BashActivator,CShellActivator,FishActivator,NushellActivator,PowerShellActivator,PythonActivator
$ source venv/bin/activate
$ pip install -r requirements.txt
Collecting requests
  Downloading requests-2.28.1-py3-none-any.whl (62 kB)
     ━━━━━━━━━━━━━━━━━━━━━━━━━━━━━━━━━━━━━━━━ 62.8/62.8 kB 1.3 MB/s eta 0:00:00
Collecting certifi>=2017.4.17
  Downloading certifi-2022.6.15-py3-none-any.whl (160 kB)
     ━━━━━━━━━━━━━━━━━━━━━━━━━━━━━━━━━━━━━━━━ 160.2/160.2 kB 3.0 MB/s eta 0:00:00
Collecting idna<4,>=2.5
  Using cached idna-3.3-py3-none-any.whl (61 kB)
Collecting charset-normalizer<3,>=2
  Downloading charset_normalizer-2.1.0-py3-none-any.whl (39 kB)
Collecting urllib3<1.27,>=1.21.1
  Downloading urllib3-1.26.10-py2.py3-none-any.whl (139 kB)
     ━━━━━━━━━━━━━━━━━━━━━━━━━━━━━━━━━━━━━━━━ 139.2/139.2 kB 3.7 MB/s eta 0:00:00
Installing collected packages: urllib3, idna, charset-normalizer, certifi, requests
Successfully installed certifi-2022.6.15 charset-normalizer-2.1.0 idna-3.3 requests-2.28.1 urllib3-1.26.10
What we did above was the following:
- Created a virtual environment where we will be running our code from
- Installed the appropriate pip package dependencies for the load testing code
How To Implement Stress Testing For API In Python
Having said that the code shown below implements this. This can also be found in the GitHub repo here.
import time
import requests
import datetime
import concurrent.futures

HOST = 'http://localhost'
API_PATH = '/api/get_users/'
ENDPOINT = HOST + API_PATH
MAX_THREADS = 4
CONCURRENT_THREADS = 3

def send_api_request():
    print ('Sending API request: ', ENDPOINT)
    r = requests.get(ENDPOINT)
    print ('Received: ', r.status_code, r.text)

start_time = datetime.datetime.now()
print ('Starting:', start_time)

with concurrent.futures.ThreadPoolExecutor(MAX_THREADS) as executor:
    futures = [ executor.submit(send_api_request) for x in range (CONCURRENT_THREADS) ]
time.sleep(5)
end_time = datetime.datetime.now()
print ('Finished start time:', start_time, 'duration: ', end_time-start_time)
Let’s go step by step and explain what the code above does.
- As a first step we define a few variables that we will be using in our app:
- ENDPOINT: This is the server (in our case locally) and the api endpoint in our case we have an api that returns the users
- MAX/CONCURRENT Threads: Here we define the maximum threads allow to run at once and the concurrent ones within that max pool of threads
- Once we have these in place we implement a simple get request using the requests Python library to our API and report the status code that we get back from the server.
- Next we initialize our thread pool and start executing the job and at the same time we are recording the start and end time of the execution
- Before we finish we put a small sleep to allow all the threads to finish gracefully, in some cases you may not need this as older versions of the Python concurrency thread pool waits automatically for you.
Once the code executes we will see the following output:
python ./load-test-api.py
Starting: 2022-07-22 22:50:03.988642
Sending API request:  http://localhost/get_users/
Sending API request:  http://localhost/get_users/
Sending API request:  http://localhost/get_users/
Received:  200 [
  {
    "userId": 1,
    "id": 1,
    "name": "Unbiased Coder"
  },
  {
    "userId": 2,
    "id": 2,
    "name": "Alex"
  },
....
From the execution above we make the following observations:
- Our code immediately spawned 3 concurrent threads to the end point we provided
- We received the code from each request as long as the status code which is 200 (success)
One thing to note here is that we could have spawned a lot more just by fine tuning the value of the max and concurrent threads. So in a normal test you will want to keep this number fairly high once you verify it works with a lower thread count.
Typically I like to use values in the range of 5-10k requests and execute this same code multiple times like 4-5 times to give me a total of close to 50k requests. In order to execute this code multiple times you can leverage the background & in UNIX as shown below.
$ python ./load-test-api.py &
How To Check The Results For Load Testing
I recommend you do this at a scaled approach meaning do not immediately start spawning so many requests and bring your server down. Instead start doing it slowly and progressively go up in time until you see potential failures.
One thing you can do is pipe the output of this application to look for error codes coming back from http such as: 40x, 50x which signify something went bad on the API. You can also look for complete failures such as timeouts and such. I generally like to wrap this in my Python code in order to keep things simpler when I’m working with the stress test.
To do this we need to make a small adjustment such as adding a few Python conditions for the HTTP status code. This can be shown below.
if r.status_code >= 400 || r.status_code <= 550:
  print ('Request has failed')
  sys.exit(-1)
Note how I added the exit value at the end of my code this is to stop all executing threads from continuing for that process. By doing this I prevent further load to the server and breaking more things and allowing a rather cleaner exit of my application rather than getting repeated errors or timeouts.
Another way of checking the results is to setup the whole process in a monitoring thread. So instead of verifying the results directly from the client which makes the request you can connect to your server and implement some code that parses the logs. Once you see the error log starting to populate with data and 400 or 500’s appear you can also know things are failing and your API is trashing requests.
Other Frameworks For Stress Testing
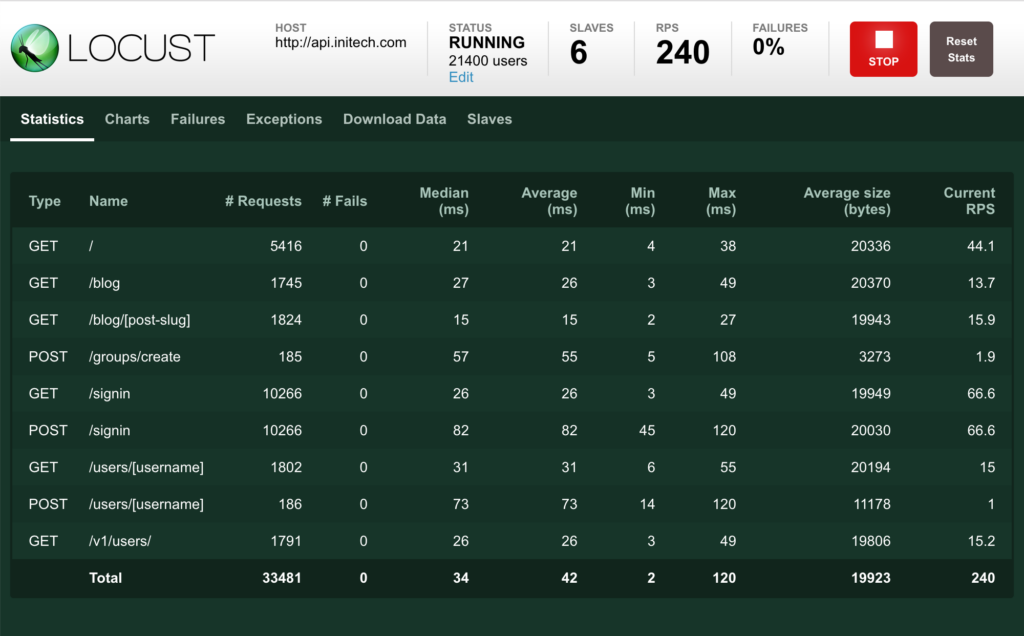
It must be noted that our code above got the job done for a simple load and performance testing in your server. If you want to implement and do more advanced things I recommend checking a framework like Locust IO. It’s feature rich and has a lot of aspects of what we talked about earlier and lets you build your own scripts with ease using Python. As an example I’d like to reference some code that is on their initial how to steps to demonstrate how easy it is to get this going.
from locust import HttpUser, between, task


class WebsiteUser(HttpUser):
    wait_time = between(5, 15)

    def on_start(self):
        self.client.post("/login", {
            "username": "test_user",
            "password": ""
        })

    @task
    def index(self):
        self.client.get("/")
        self.client.get("/static/assets.js")

    @task
    def about(self):
        self.client.get("/about/")
This basically lets you hit various endpoints above including some static javascript code that’s served in your host, this off course goes a bit beyond the point of testing an API but it may be something good to build into your framework if you want to test things such as caching and other aspects of Load testing.
Furthermore locust IO offers a nice graphical interface to let you monitor your requests as they are happening on the test script you have setup for running, this can be shown in the screenshot below.

Conclusion
We were able to successfully go over How To Stress Test REST API Using Python, hopefully I answered any questions you may have had and helped you get started on your quest of stress testing your API.
If you found this useful and you think it may have helped you please drop me a cheer below I would appreciate it.
If you have any questions, comments please post them below or send me a note on my twitter. I check periodically and try to answer them in the priority they come in. Also if you have any corrections please do let me know and I’ll update the article with new updates or mistakes I did.
Would you consider running a stress test in your API?
I personally use this extensively because I want to ensure my code works under load. There are many advantages that I mentioned earlier in the why I consider it important to stress and load test your API.
If you would like to find more articles related to API tasks with Python you can check the list below:
- How To Create REST API Using API Gateway
- Python Boto3 API Gateway: Post, Get, Lambda/EC2, Models, Auth
- How to do unit testing in Django Rest Framework (Python 3)
- Python RSS Feed Guide
You can find information about relevant projects referenced in this article in the list below:
- Django: https://www.djangoproject.com
- Flask: https://flask.palletsprojects.com
- Locust IO: https://locust.io/