
Introduction
Today we will discuss How To Run Postgres In Docker On Mac (2022).
Did you know that docker simplifies your Postgres setup?
Today I will break this down in the following way:
- Why Run Postgres In Docker
- How To Setup Docker On Mac
- How To Get The Docker Container
- How To Invoke The Docker Postgres Container
- How To Keep Postgres Persistent Data
I have used this setup successfully in various projects and it works very well and have saved me a ton of time getting a database server without altering anything on my host machine. Since it’s a docker container it simplifies the process of bundling it up too.
We will go point by point on getting you up and running in less than 5mins, you do not need to have any programming knowledge to use the tools we are going to be using here.
Why Run Postgres In Docker
You may find yourself what is the advantage of running Postgresql inside a docker container. This is a very valid question and the answer has various reasons some of which may or may not apply to you directly. To make this more specific I have assembled a list below. Offcourse the alternatives is running it natively in your machine which is beyond the scope of this article or running it on an external server and just interacting with it.
So our list below will be using those two points of reference when comparing things.
- Since it’s a docker container you can take with you and use it wherever you want
- You can keep a standard setup and configuration that’s consistent across the board
- Your pipeline integration later will be a breeze as you’d have everything ready to go and prebundled
- Any third party dependencies such as postgresql extensions can be turned only once in your docker container
- It’s easier to isolate it from the rest of your system applications
- It’s easier to start/stop and completely turn off or relaunch the container if needed
- You can easily snapshot your container and go back in time if needed to debug some issue
- You are guaranteed version consistency in the future if something changes in postgres
- It’s faster since it’s running locally
The list above even though it’s not as exhaustive it includes some of the reasons of why I like to run Postgresql in a docker container on my Mac.
How To Setup Docker In Mac
Now that we went over some of the reasoning of why it’s beneficial to run Postgresql in a Mac computer lets go over how you can get it running on your system.
The first thing you need to do to get started is to download the docker container in your machine. If you already have this setup you can skip to the next section below.
Navigate to the get docker url and download the flavor for Mac note the following guide can work on other machines too with slight adjustments so you can still follow it if you are using Windows or Linux.

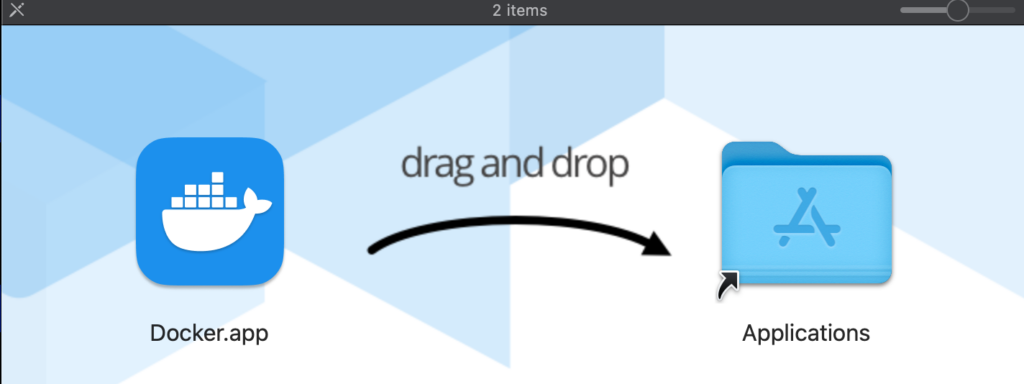
Once you download go ahead and do a quick install, on the Mac it’s simply copying over the executable file into your Applications folder as shown below. For other variants you may need to run an installer which could also require a reboot, if it does I recommend you perform a reboot as well to be sure it starts properly.
Once this is copied docker is successfully installed in your system and all you have to do is run it. This will bring up the user interface dashboard which is shown below.
If you see the dashboard above it means docker is successfully installed in your system. Note you can ignore the container that I’m running above this will be shown at a later step once we get it running on your system.
How To Get The Postgres Docker Container
Now that we have successfully installed docker in our system we want to go ahead and fetch the postgresql docker container for our machine. In order to do this we need to invoke a terminal application, I like to use iTerm2 but you can use the standard Mac terminal too. If you are in Linux or Windows you can use powershell or gnome-terminal to start invoking the commands we will demonstrate below.
The first command we will be issuing is to download the Postgresql docker container from the docker repository. This may require registration and an account in the docker hub which you can do online here.
Once you register and login either from the dashboard which we showed earlier or from the command line using the following command:
$ docker login SERVER_HERE
Now that you have successfully logged on to the docker hub we can go ahead and pull the Postgres image. The pull command for docker just means to download and register the image as available locally to start working with it. So you can think of it as a combination of two things:
- Download
- Register locally
In order to do this we need to specify also the Postgres docker image which in this case it’s simply Postgres. As shown below once you pull the command it will start getting the latest version from the docker hub server.
$ docker pull postgres
Using default tag: latest
latest: Pulling from library/postgres
60197a4c18d4: Pull complete
e2fad7962cc3: Pull complete
ac096a3cfeb6: Pull complete
6505ea08ff74: Pull complete
273081b4002f: Pull complete
7e1b3627e162: Pull complete
f56b0e9d7500: Pull complete
6db829696ec4: Pull complete
ea61b4d4558b: Pull complete
682e50b7dd31: Pull complete
07d44ce41d1a: Pull complete
908fe291a87e: Pull complete
62c216491082: Pull complete
Digest: sha256:3e2eba0a6efbeb396e086c332c5a85be06997d2cf573d34794764625f405df4e
Status: Downloaded newer image for postgres:latest
docker.io/library/postgres:latest
Once the pul lis successful you should be able to see the docker Postgres image in your docker dashboard image registry as shown below.
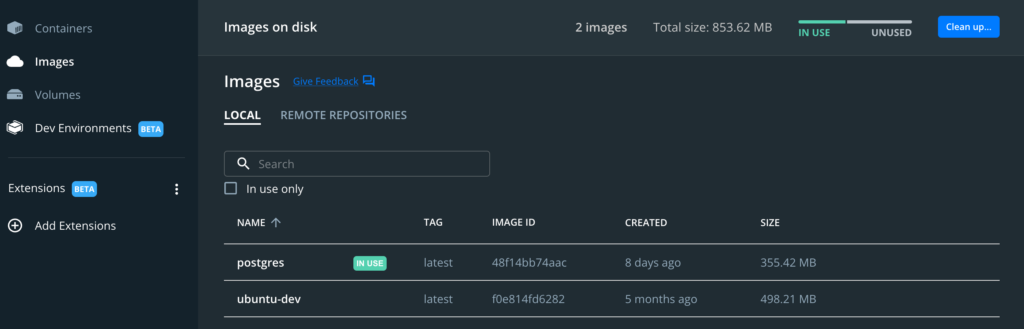
Basically this means the Postgres image is now ready to be used and spawned as a docker container and it was successfully pulled into your machine.
How To Invoke The Docker Postgres Container
We already covered how to get docker and download your Postgres container in your Mac, Windows or Linux computer. The next step in the process is running the Postgres Docker container in your machine. To do this we have to follow a list of steps that we will outline below:
- Start docker postgres container
- Find Postgres Docker IP
- How to Stop it
How To Start Docker Postgres Container
The first step which is what most people call the entry point of the process is to start up our container. To do this we will be leveraging the docker run command along with some parameters which we will explain below. The docker run essentially lets you use an image that you have previously downloaded in our case the Postgres image and make out of it a container instance. The container instance will be based on the pre-built Postgres image file.
Lets take a look at the docker run command line attributes which we will be using to start Docker Postgres in your Mac.
- rm: This automatically removes the container if it already exists. It’s useful if you are debugging and want to get rid of older container instances so you can re-use the name among other things. You don’t need to include it if you prune and maintain your containers manually.
- name: This is simply the name we will be using to refer to the docker container
- e: This allows us to pass some environment variables that are docker image related. More specifically in the case of the Postgres docker container we will be using the following ones:
- POSTGRES_USER: This is the username we want our docker Postgres container to start with, also make a note of this username as we will be using it later to connect to it via pgadmin4
- POSTGRS_PASS: Similar to above this is the initial password we will be using for the postgresql docker container instance
- p: This allows us to bind a specific IP address and port that’s exposed to the rest of the system. It’s useful to interact with the docker container locally for testing things and applications but also to manage it using an admin interface such as pgadmin which we will go over later in this article
- d: This demonizes and backgrounds the docker container as soon as it starts
- Finally we pass on the image name to use to start the docker container instance
Now that we have gone over everything we can go ahead and invoke the run command to see what happens.
$ docker run --rm --name docker-postgres -e POSTGRES_PASSWORD=unbiasedc -e POSTGRES_USER=unbiasedc -p 127.0.0.1:5432:5432 -d postgres
2117ea2d47fe18b2d12235d7951a5112dfa95f2f1069c1581107877e53d8ac04
As you can see above the run command returns an ID for the docker container instance. Using this ID you can identify this particular container and be able to use to maintain and connect to the instance.
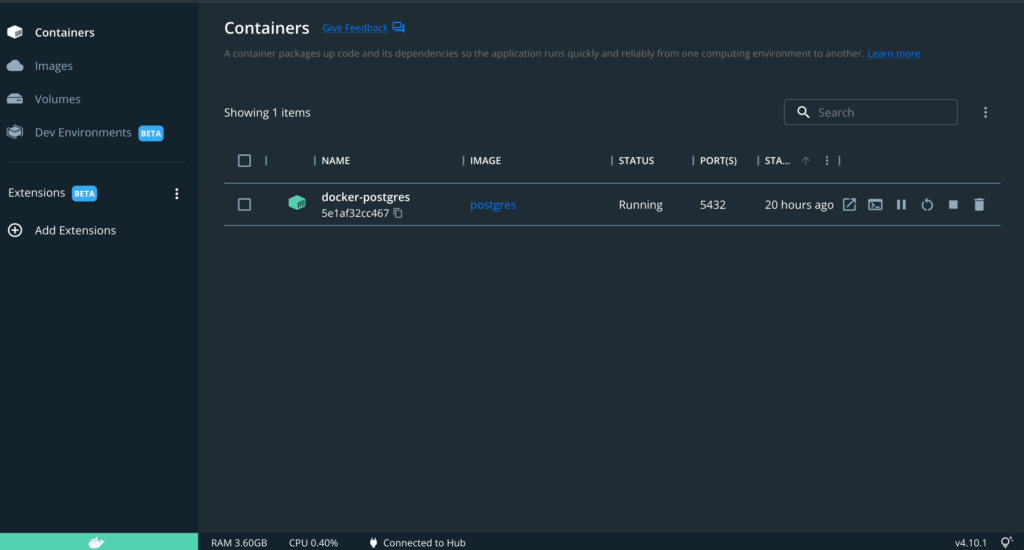
To verify the instance started and it’s on a good state we will be using the docker ps command. The docker ps command is very similar to the UNIX ps command it basically lets you list the running docker container instances. From the execution below we can see what’s running in our system.
$ docker ps
CONTAINER ID   IMAGE      COMMAND                  CREATED         STATUS         PORTS                      NAMES
2117ea2d47fe   postgres   "docker-entrypoint.s…"   4 seconds ago   Up 3 seconds   127.0.0.1:5432->5432/tcp   docker-postgres
We know our invocation succeeded because we can see our abbreviated version of our container ID matching the one we started. Further more the STATUS for the container is showing that it’s been up for 3 seconds and it’s functioning properly.
How To Find Postgres Docker IP Address
The next step we want to do is find out what IP address we have allocated internally so we can connect to it. To do this we will be using the docker inspect command to find the docker Postgresql IP address. The invocation is as simple as running docker inspect followed by the docker container ID we received previously. To avoid going through the long output of the command we will pipe this to a grep that looks specifically for the IP address of the instance. Putting it all together and invoking is shown below.
$ docker inspect 5e1af32cc467752a109a85e39c6ef9e3bd5355fa876d855cf0611414ca12a994|grep IPAddress
            "SecondaryIPAddresses": null,
            "IPAddress": "172.17.0.2",
             "IPAddress": "172.17.0.2"
In this case the command succeeded and showed us that the docker postgres instance received an IP of: 172.17.0.2. That IP is a private range IP and only exists within our docker infranet. In other words you can use it to connect to the Postgresql container instance.
How To Connect To Postgres Docker Container
Moving forward to do a final check we will be wanting to connect to the Postgres container instance itself. In order to do this we simply going to use the docker exec command that lets us execute a command in a running docker container. In this case we will simply invoke a shell command to start interacting with it. The -ti parameters tell docker that we want that command to be interactive.
$ docker exec -ti 2117ea2d47fe bash
root@2117ea2d47fe:/# sudo service postgres restart
root@2117ea2d47fe:/# ls /etc/init.d
hwclock.sh  postgresql
Executing this shows an active connection to the Postgres docker container. As you can see we can now execute commands as if that was running locally in our machine. Since it’s based off a linux distribution we can quickly use the service command to restart Postgres without restarting the whole docker container. This may be useful if you are doing configuration changes and want to quickly test them out. Furthermore it will allow you to restore a crashed server or even stop it completely to do maintenance such as backing up data.
How To Stop Postgres Docker Container
Finally we will go over how to stop the Postgres docker container. In order to do this we will be using the container command which has a sub-command called stop. That subcommand essentially lets us give it a container ID parameter and basically stop it. However there’s an extra step we need to follow here which is a clean-up process. If we do not intend to re-use that docker container we need to make sure we prune it from our system so it remains clean. If we fail to do this every run will create a new docker container and eventually our system will get flooded with a big list of them.
I demonstrate both the stop and prune command below to help you add it in your scripts.
$ docker container stop 2117ea2d47fe
2117ea2d47fe
$ docker container prune
WARNING! This will remove all stopped containers.
Are you sure you want to continue? [y/N] y
Total reclaimed space: 0B
$ docker ps
CONTAINER ID   IMAGE     COMMAND   CREATED   STATUS    PORTS     NAMES
Finally as you can see above we also execute the docker ps command again to verify that our docker Postgres container has been successfully stopped. Since it does not return any output this is a good indication that we have terminated the docker Postgres container.
How To Connect To Postgres In Docker
Now that we have found a way to interact with the docker container, start and stop it we will want to connect to manage it or use it with our web application service. In order to do this we will be using information found in previous sections such as:
- IP address
- Port number that we exposed
- Username and Password
Furthermore the tool we will be using to connect and test it out is pgadmin. Pgadmin is a feature rich application that has a lot of good things to let you manage your Postgres instance. If this works it means any client compatible with postgresql will be able to connect to the Postgres docker container we previously created. The first step to setup Pgadmin is to make a new connection.
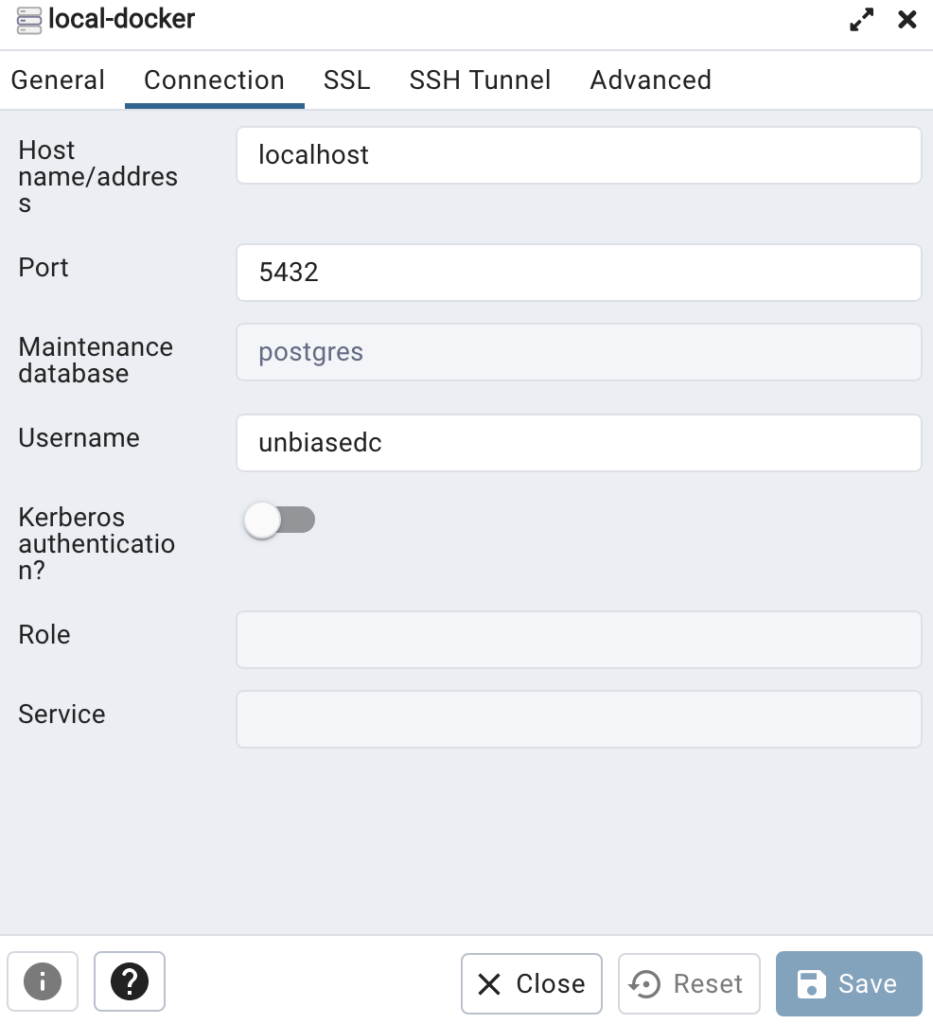
As shown below we make a new connection called local-docker and we fill in the details we previously found. Since this is running locally we don’t need to use explicitly the IP that was returned in our inspect and we can simply refer to it as localhost. The port we exposed in our run command was 5432 which is the standard postgresql port and the username and password which was also specified as environment variables in the run command is shown below.
The next step is to test out our connect and see if we can connect to the database. This is shown below once we click save and connect to it we see a list of information but the most important one for us is to see the tables and be able to run queries towards it.
In order to run a query in our docker Postgres instance we will be using the query tool that comes part of pgadmin. The screenshot below shows a query we running in the pg_stat_activity table which is pre-bundled with every Postgres installation.
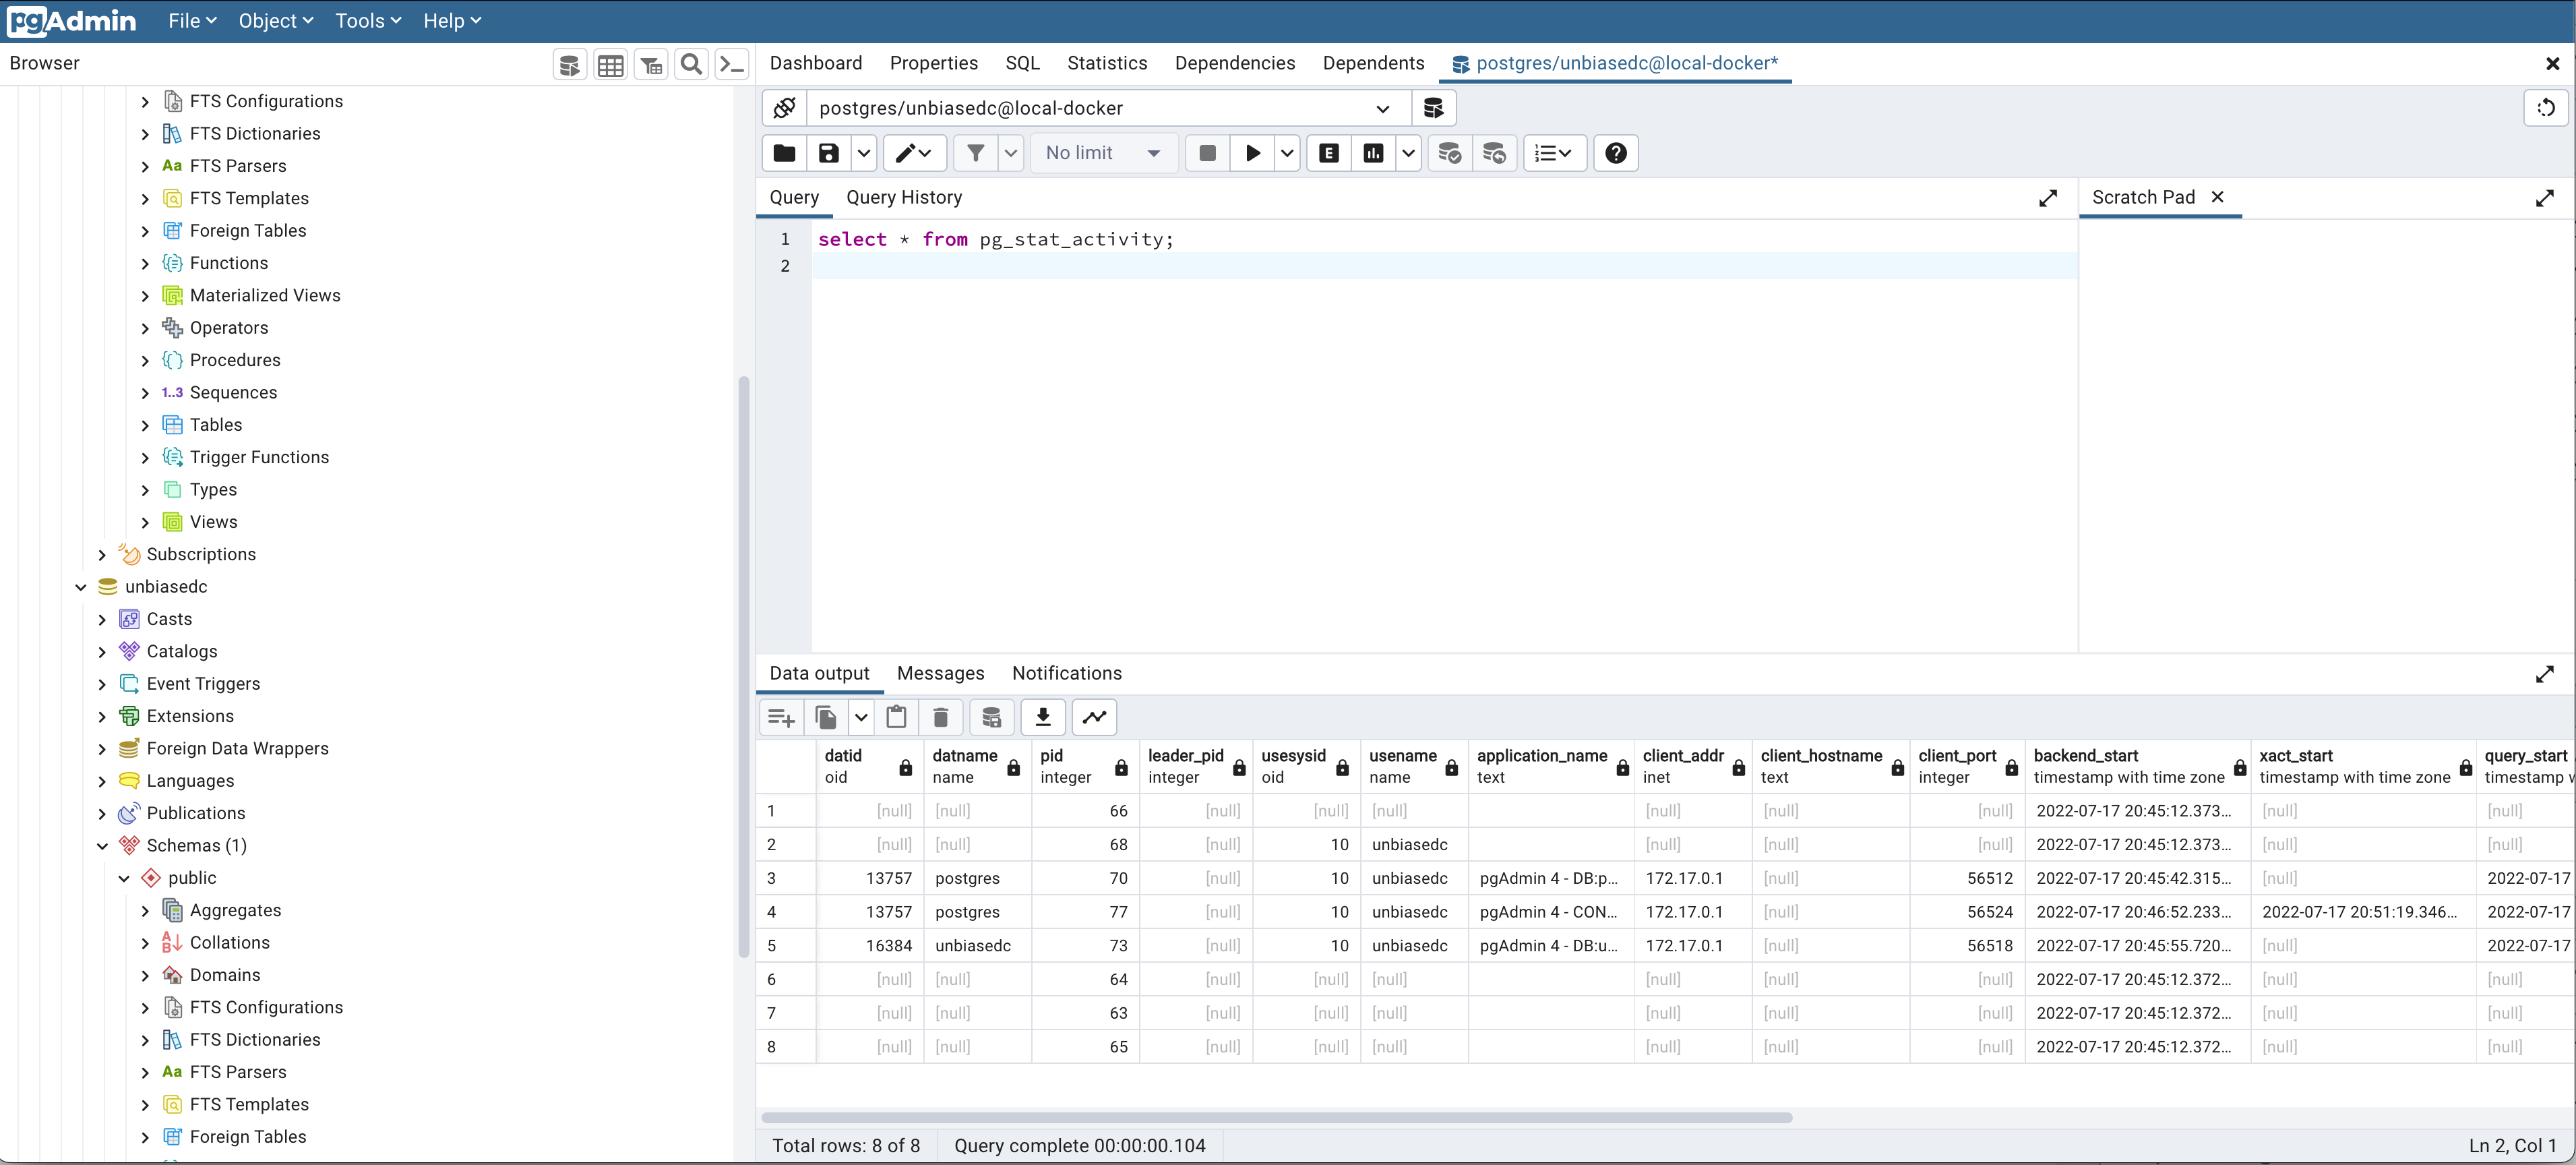
The result above shows us successful execution and we can see the contents of the table along with their values. This verifies our docker Postgres container was successfully deployed with the information we provided it with.
How To Keep Postgres Persistent Data
As a bonus I want to cover a way to make your data persistent across your docker runs. After all a database is only useful if the data persists across reboots, starting and stopping. Docker offers a feature that lets you exposed a predefined directory by binding it to the docker container. This directive essentially makes the data persist outside the docker environment which is destroyed and recreated every time you start and stop it.
In order to do this we need to append an additional parameter in our docker run command using the -v parameter. This would look like this:
-v /HOST_PATH:/CONTAINER_PATH
There’s two important paths here that we need to adjust based on your installation and system:
- HOST_PATH: This is basically the path in your host operating system (Mac/windows/linux) that contains the data you want. In our case we can use a simply empty directory so feel free to make this anywhere the docker instance has permissions on and point it to it. In my case it’s on: /Users/alex/docker/db/db_data
- CONTAINER_PATH: This is basically the path where your Postgres stores the data on. Based on your configuration this needs to be adjusted accordingly. By data I mean where the data folder for your database is inside the docker container. Traditionally this will be in /var/lib/pgsql/data so you can use this mapping unless you have something different defined in your config file.
Once you do this and start your instance you should have all your data persist across installations and you can freely tear down and restart your docker Postgres container.
Conclusion
If you found How To Run Postgres In Docker On Mac (2022) useful and you think it may have helped you please drop me a cheer below I would appreciate it.
If you have any questions, comments please post them below I check periodically and try to answer them in the priority they come in. Also if you have any corrections please do let me know and I’ll update the article with new updates or mistakes I did.
Do you like PostgreSQL locally or in a docker container?
I personally like to keep my setup in containers to avoid installing things natively on my Mac. I prefer to keep services and such separate for security and other reasons. Also I can have more control on tearing them down when I do not use them.
If you would like to learn more about docker related stuff, I have a few articles below:
- Podman VS Docker – In Depth Comparison
- How To Setup MongoDB In Docker
- How To Connect To LocalHost From Inside A Docker Container
- How to Include Files Outside of Docker – Build Context
You can find more information on docker here:
You can find more information on PostgreSQL here: