
Introduction
We will go over How To Store Global Environment Variables In AWS.
Did you know that AWS offers a modern and secure way to store global variables across all your environments?
Using an env file or the old approach of some external service to pull variables can be completely replaced by a new and really cool way called AWS System Manager Parameter Store (SSM).
We will break down this in the following sections:
- Why it is useful to use AWS SSM
- How To Create a new key pair to store
- How To Retrieve variables across environments from the SSM
- How To Use KMS to Encrypt Parameter Store variables
I have used this successfully in various projects and it works very well and has saved me a ton of time getting the outline draft for content creation. I also use it a lot to get inspired and find new ideas to write about.
We will go point by point on getting you up and running in less than 5mins, you do not need to have any programming knowledge to use the tool we are going to be developing here.
This is a complete guide and should cover all your questions on using AWS System Manager Parameter Store to store and retrieve your global variables per enviornment.
All code and examples on how to do this can be found in the Github link here.
Why Use AWS SSM
Before we dive into the code I would like to take a moment and go over why it’s so useful to use a service like SSM. As you know the goto standard for most people up to date was to use a combination of environment files and some external service that supports a key-pair encryption.
However there’s a lot of advantages of keeping everything in the AWS environment especially if you are in that ecosystem already. Below you will be find a list of reasons.
- You can stay in the AWS ecosystem and have configuration that’s environment specific without having to write any code or wrappers that detect it.
- You can leverage your existing encryption kms if you have one otherwise AWS SSM abstracts and creates one for you.
- You can securely store your global and environment variables.
- Everything is stored server side so multiple clients can consume it easily using an API or the SDK.
- Tagging can help you organize and manage your parameters.
- The code to access it already written and maintained by AWS so you don’t need to do any of that.
- It scales horizontally in the cloud so you can have a lot of consumers for it.
- It supports all the major data types such as lists, strings and secure values.
As you can see the list above is pretty extensive and there’s a lot of upsides of using AWS SSM to store your parameters.
How To Setup AWS SSM Boto3 Python
Now that we have provided some reasons as to why you may want to use AWS SSM we can go over on how to setup your AWS SSM Boto3 Python environment.
As shown below we will be doing three simple steps:
- Create a virtual environment, this assumes you have virtualenv installed if not you can just skip this step. Once you create it then you need to activate it.
- Install the requirements and dependencies we have on using this system, in our case just two.
- Boto3: The AWS SDK library to access SSM
- Dotenv: The library to turn on some environment variables locally where we store our access keys to access AWS
- Finally test out to ensure everything works
$ virtualenv venv
created virtual environment CPython3.9.12.final.0-64 in 183ms
  creator CPython3Posix(dest=/Users/alex/code/unbiased/python-aws-boto3-ssm/venv, clear=False, no_vcs_ignore=False, global=False)
  seeder FromAppData(download=False, pip=bundle, setuptools=bundle, wheel=bundle, via=copy, app_data_dir=/Users/alex/Library/Application Support/virtualenv)
    added seed packages: pip==22.0.4, setuptools==62.1.0, wheel==0.37.1
  activators BashActivator,CShellActivator,FishActivator,NushellActivator,PowerShellActivator,PythonActivator

$ source venv/bin/activate

$ pip install -r requirements.txt
Collecting boto3
  Downloading boto3-1.23.0-py3-none-any.whl (132 kB)
     ━━━━━━━━━━━━━━━━━━━━━━━━━━━━━━━━━━━━━━━━ 132.5/132.5 KB 2.0 MB/s eta 0:00:00
Collecting python-dotenv
  Using cached python_dotenv-0.20.0-py3-none-any.whl (17 kB)
Collecting jmespath<2.0.0,>=0.7.1
  Using cached jmespath-1.0.0-py3-none-any.whl (23 kB)
Collecting s3transfer<0.6.0,>=0.5.0
  Downloading s3transfer-0.5.2-py3-none-any.whl (79 kB)
     ━━━━━━━━━━━━━━━━━━━━━━━━━━━━━━━━━━━━━━━━ 79.5/79.5 KB 2.6 MB/s eta 0:00:00
Collecting botocore<1.27.0,>=1.26.0
  Downloading botocore-1.26.0-py3-none-any.whl (8.7 MB)
     ━━━━━━━━━━━━━━━━━━━━━━━━━━━━━━━━━━━━━━━━ 8.7/8.7 MB 11.1 MB/s eta 0:00:00
Collecting python-dateutil<3.0.0,>=2.1
  Using cached python_dateutil-2.8.2-py2.py3-none-any.whl (247 kB)
Collecting urllib3<1.27,>=1.25.4
  Using cached urllib3-1.26.9-py2.py3-none-any.whl (138 kB)
Collecting six>=1.5
  Using cached six-1.16.0-py2.py3-none-any.whl (11 kB)
Installing collected packages: urllib3, six, python-dotenv, jmespath, python-dateutil, botocore, s3transfer, boto3
Successfully installed boto3-1.23.0 botocore-1.26.0 jmespath-1.0.0 python-dateutil-2.8.2 python-dotenv-0.20.0 s3transfer-0.5.2 six-1.16.0 urllib3-1.26.9

$ ipython
In [1]: import boto3
In [2]: from dotenv import load_dotenv
As shown above we have successfully installed all of our dependencies and now we are ready to setup our AWS environment initially using the AWS console from the website.
How To Add AWS SSM Parameters From AWS Console
Before we start writing any code lets go ahead and populate some values to our System Manager Parameter store in the web console. As a first step we have to go ahead and add a new user to our system and give it the right permissions.
For this example we will be adding a user called unbiased-coder that has a programmatic access key so our code works for it.
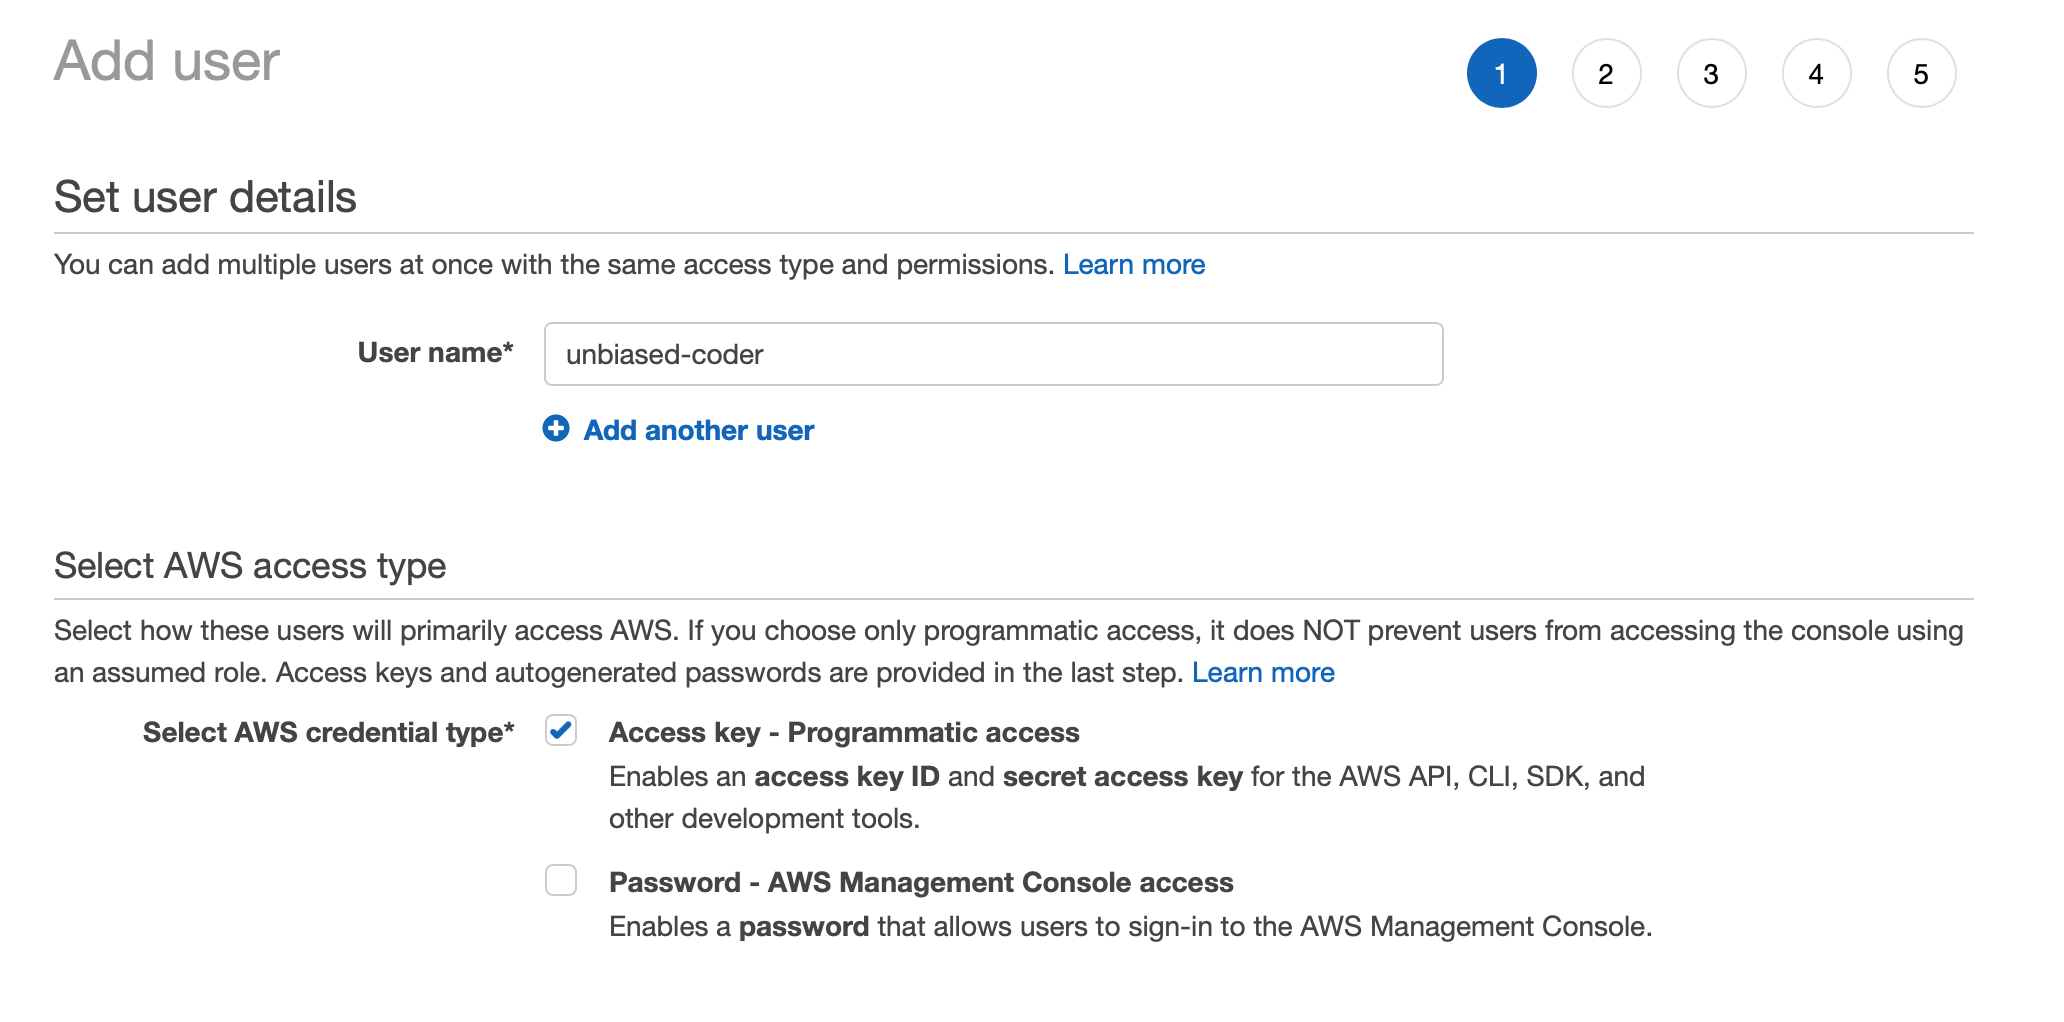
In the first step we need to specify what permissions we will be giving to the user. So selecting the right policy to associate with the role is important in order to work programmatically.
For simplicity we will be giving full SSM Full access permissions to the role. As shown in the list below you can see the name of that permission.
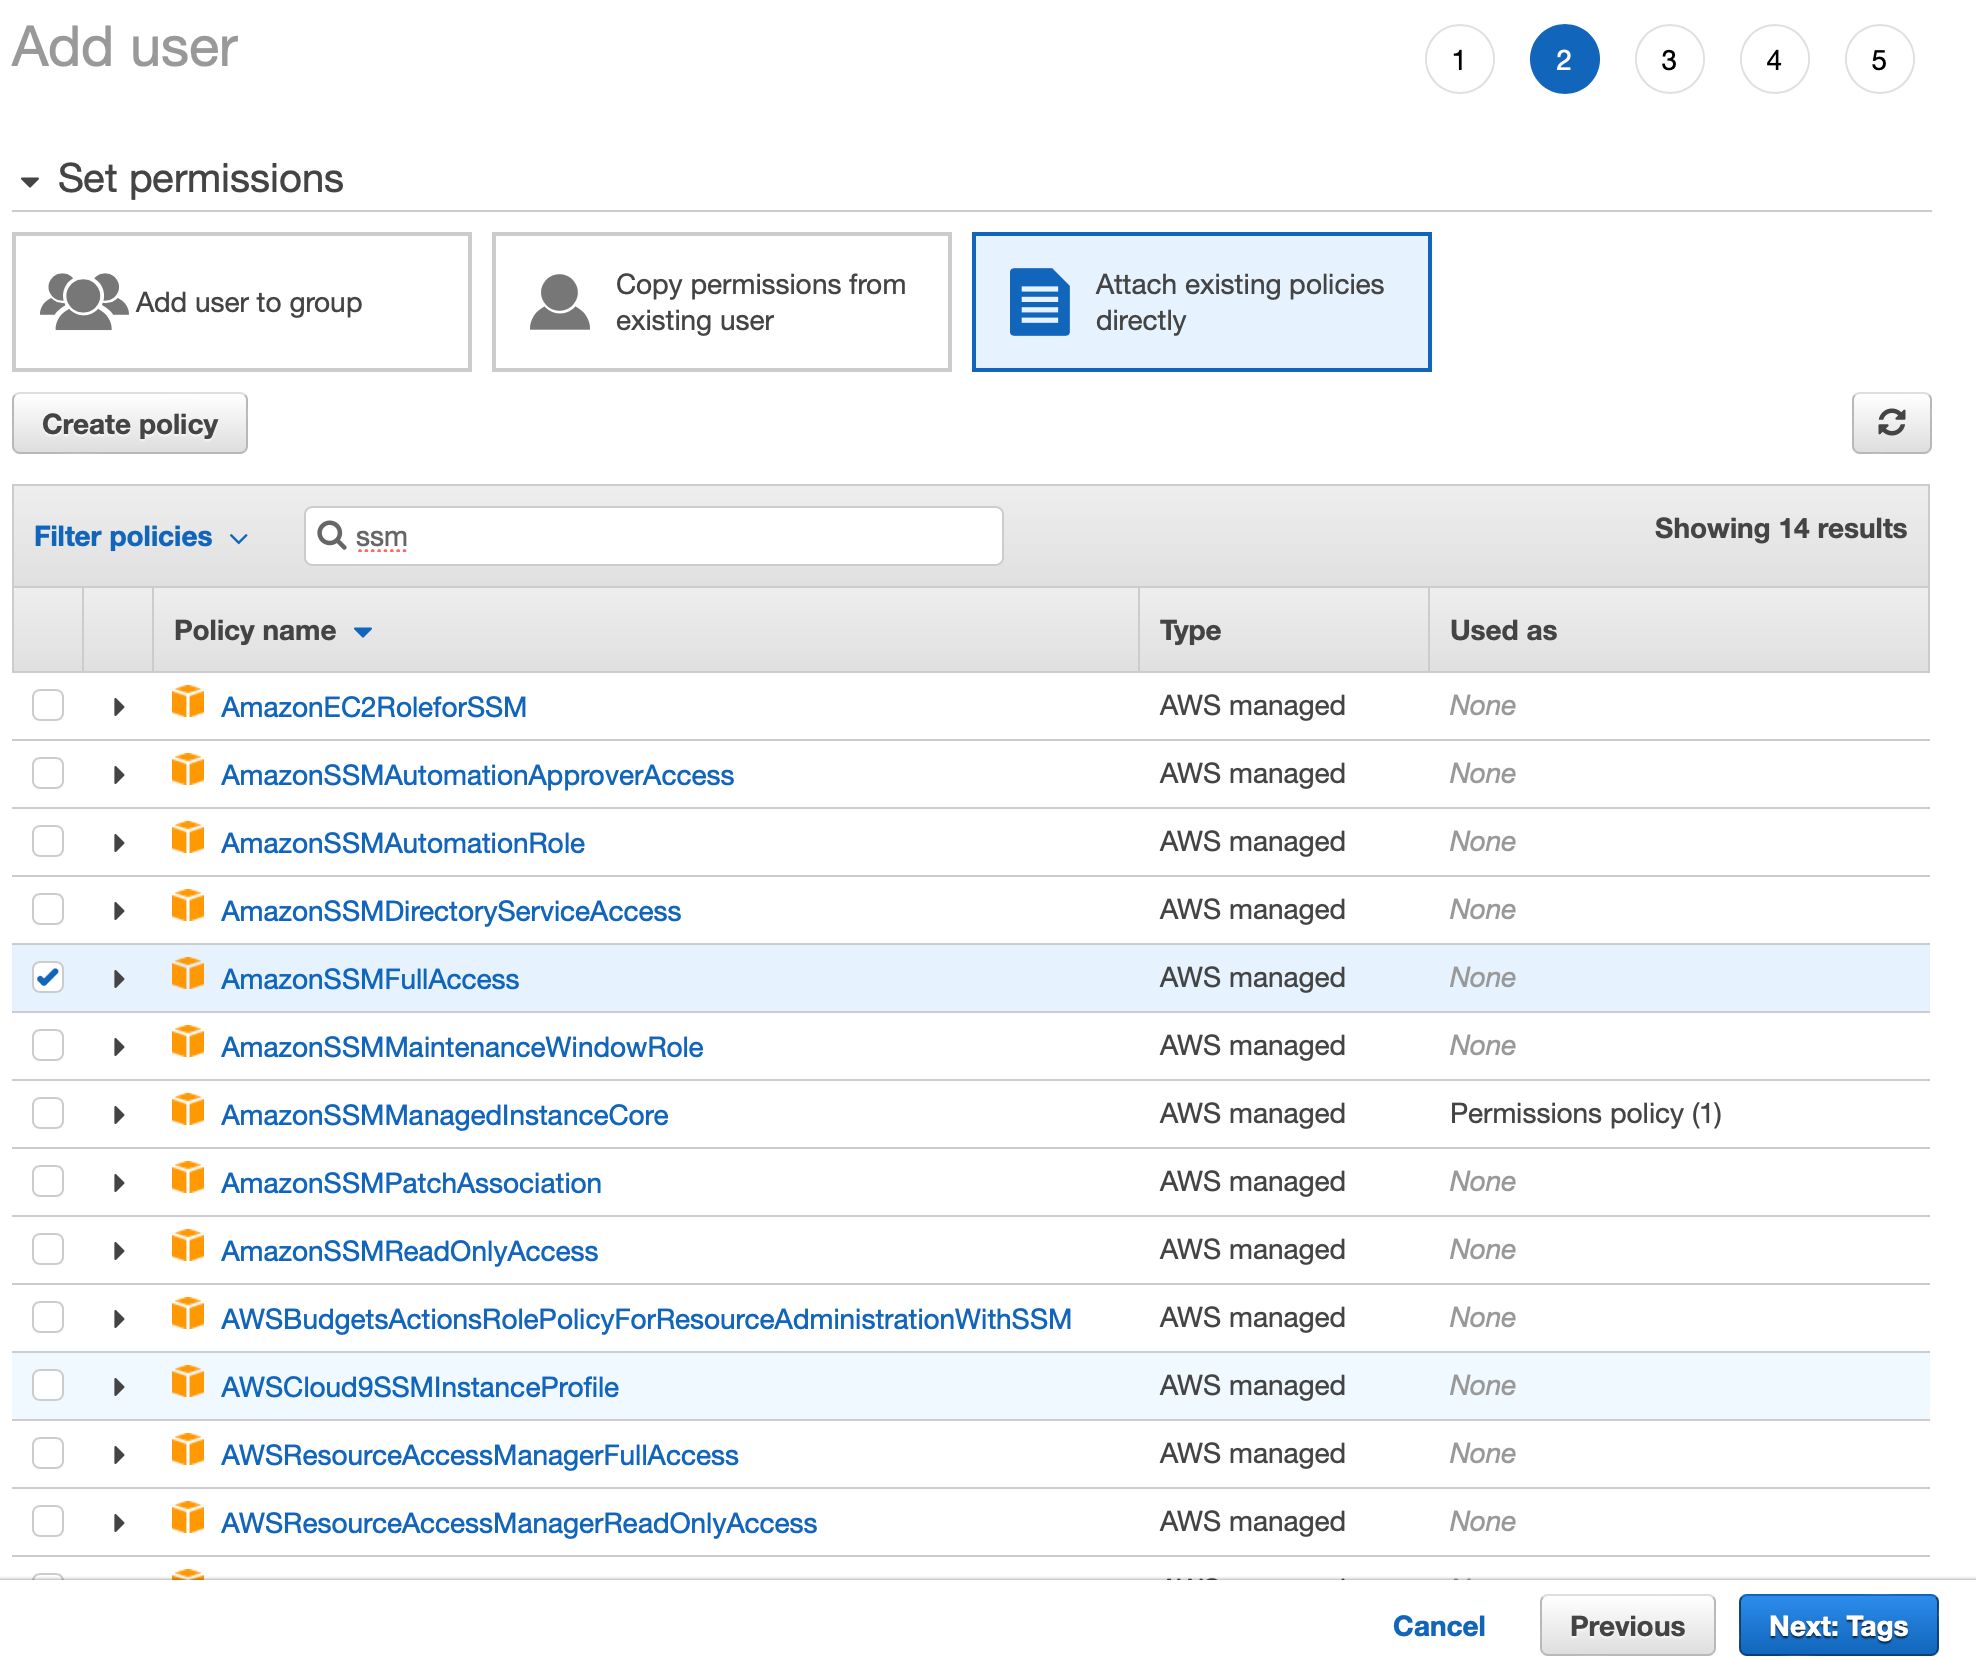
Proceed with this guide and save the user information. In the last screen you should see a confirmation along with the access and secret key. Save those and add them to our environment file.
I have written in detail about this in the article below if you’d like to find out more information:
Boto3 Session: Setup Profile, Create, Close and Mock sessions
Finally now we can go ahead and create/add a few parameters so we can start writing code to play along with it.
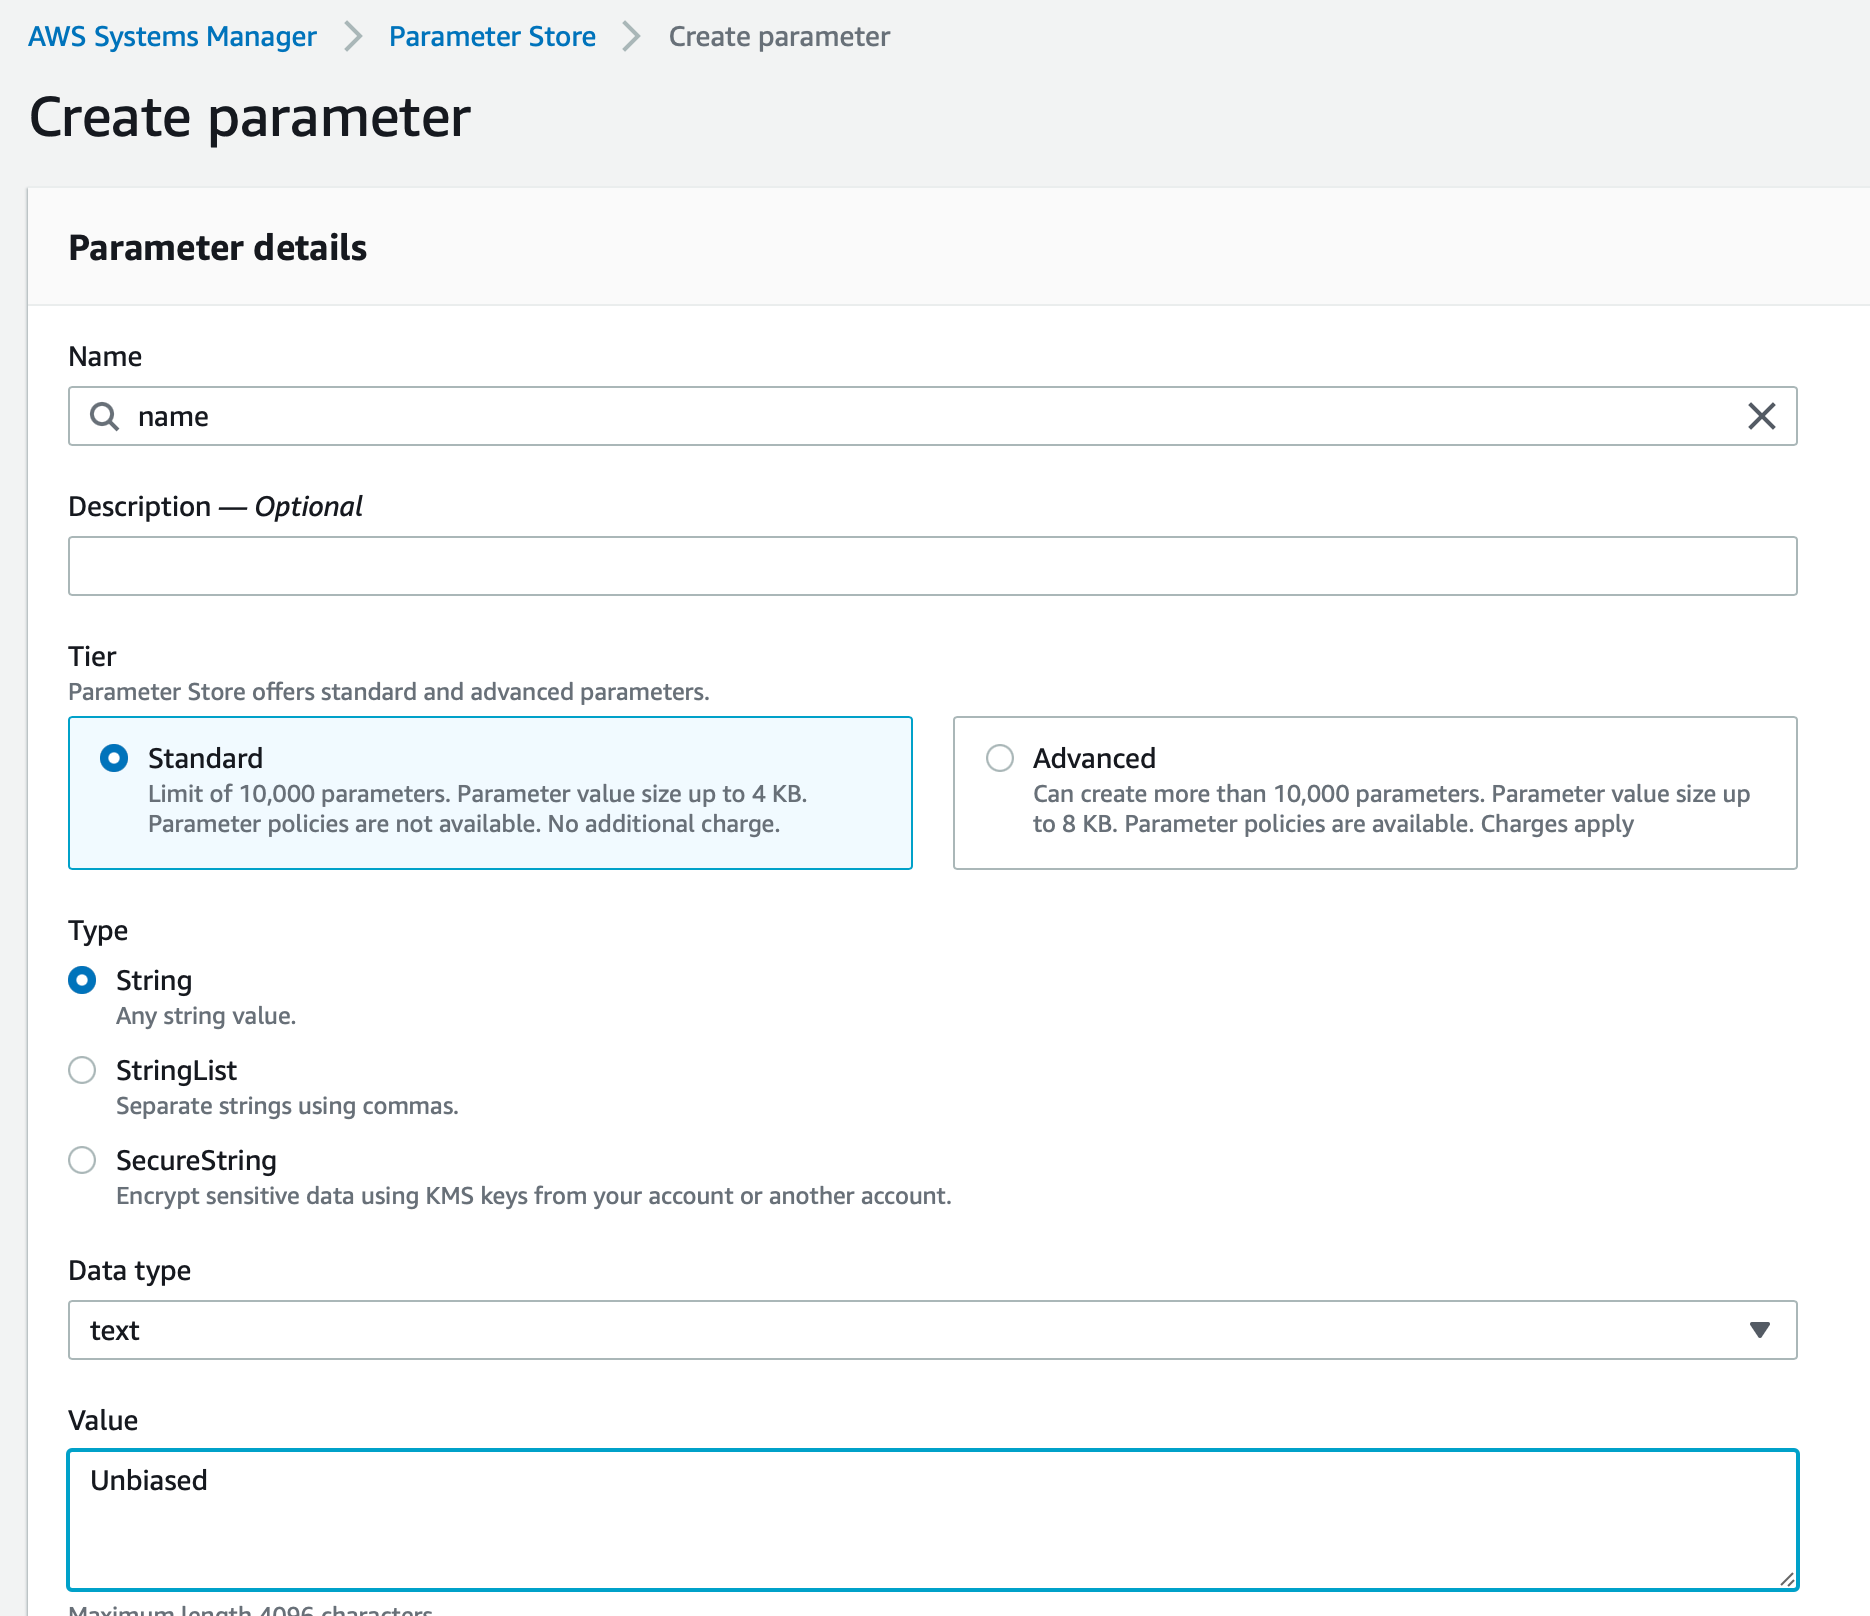
In the list above we are creating a parameter called name of type string. Similarly we are going to create a few more of the same type along with one that is of type secure and encrypted as shown below.
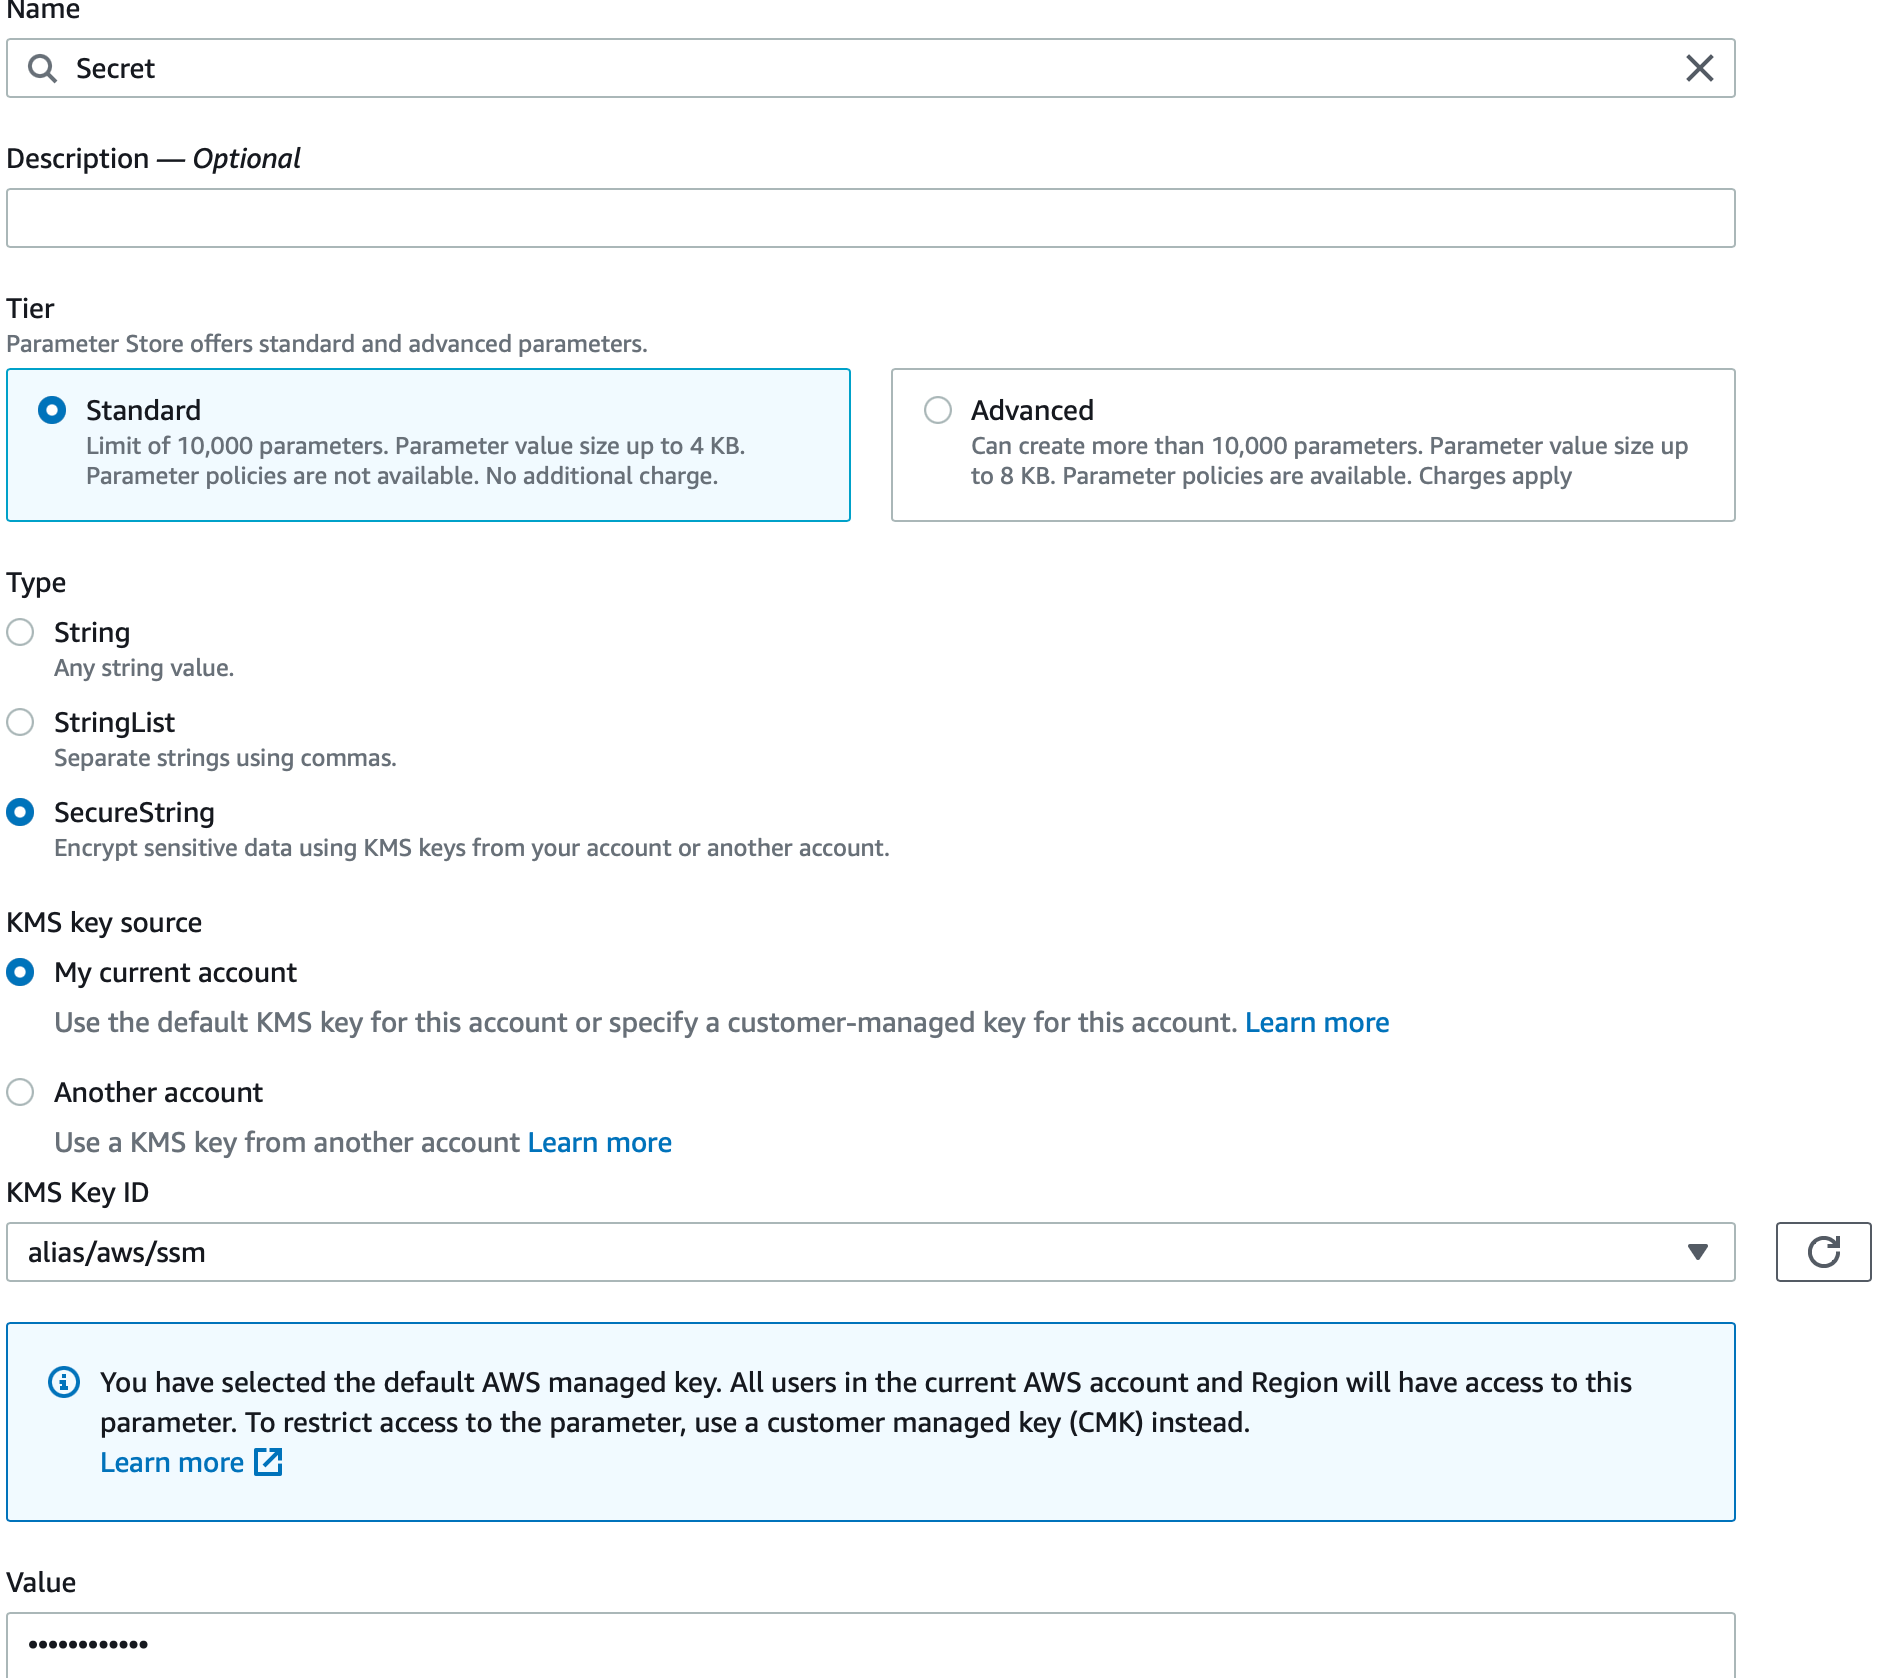
Note the value is not showing as it’s marked as securestring which is encrypted using KMS as we discussed earlier.
Finally lets go ahead and list all the parameters we added and see what we will be working with. One point here is that I will be renaming Secret to secure for simplicity later on.

Now that we have some parameters added and our environment is setup with a user lets go ahead and start coding some things. The first one we will be implementing is listing all the parameters as we have shown above in the AWS console.
How To List All Parameters In SSM Using Python
The first piece of code we will be demonstrating is as simple as listing all the SSM parameters in the AWS environment we are running on. As shown previously we have created a few for testing so lets go ahead and dive right into the code.
The code below does the following:
- Initializes an AWS boto3 session
- Acquires an AWS SSM client object
- Calls the describe_parameters function from AWS which lists all of the ones in our store
- Prints out the name and type of each of them
import pprint
from boto3_helper import init_aws_session

session = init_aws_session()
ssm = session.client('ssm')
params = ssm.describe_parameters()
for param in params['Parameters']:
    print (f'Name: {param["Name"]}, Type: {param["Type"]}')
Now that we have the code ready lets go ahead and execute it and see what we get back. The output should be very similar to the screen we saw earlier in the AWS web console.
$ python ./python_boto3_list_ssm.py
Name: secure, Type: SecureString
Name: name, Type: String
Name: surname, Type: String
As it can be seen above the output matches that of the AWS web console. We have successfully written code that lists all the SSM parameters in the AWS store.
How To Create Parameter In SSM Using Python
The next step we will be following is to try and create a new SSM parameter using Python. The code that will do this is very similar to the one that lists all of the SSM parameters. Lets go through the steps one by one and analyze it.
- Like before we first acquire an AWS Boto3 Session object to initialize our connection
- Once we get that we acquire the SSM client object
- Then we will be calling a function called put_parameter which basically puts a new parameter to the parameter store. It takes three arguments:
- Name: The name we will be using for it, in this case we add something called full_name
- Value: The value we will be giving to it, in our case that is Unbiased Coder
- Type: The data type that our key pair is, in this case a simple String
- Once this gets called we can check the return code to verify the put parameter was successfully sent to the AWS server
import pprint
from boto3_helper import init_aws_session

session = init_aws_session()
ssm = session.client('ssm')

print('Creating parameter: full_name')
full_name_param = ssm.put_parameter(Name='full_name', Value='Unbiased Coder', Type='String')

print ('Successfully added new parameter: full_name with value: Unbiased Coder')
Now that the code has been written we will go ahead and execute it so we can add the new SSM Parameter in our store.
$ python ./python_boto3_create_ssm_param.py
Creating parameter: full_name
Successfully added new parameter: full_name with value: Unbiased Coder

$ python ./python_boto3_list_ssm_params.py
Name: secure, Type: SecureString
Name: full_name, Type: String
Name: name, Type: String
Name: surname, Type: String
As it can be seen above the new SSM parameter was successfully added. We verify by running the previous script we wrote which basically lists all of them. The new entry of full_name was not previously showing in our list but now it does. This successfully verifies that the addition of a new SSM parameter works.
How To Get/Retrieve Parameter Values In SSM Using Python
The next step in the process is to implement a GET/Retrieve Parameter value from our SSM store. Again the code follows a similar pattern that we previously followed with a small variation on the function that pulls the value.
Let’s go through the steps:
- Initially we follow what we did earlier create an AWS Session object from and that get an SSM client
- Once we have this we will be calling a function called get_parameter which is very similar to put_parameter but with the difference that this one reads the value rather than adding it.
- To do this we will be running a few tests by reading multiple SSM store parameters and printing out their values. We will do this for the following:
- Name
- Surname
- Full_Name
import pprint
from boto3_helper import init_aws_session

session = init_aws_session()
ssm = session.client('ssm')

print('Retrieving parameter: name')
name_param = ssm.get_parameter(Name='name')['Parameter']['Value']

print('Retrieving parameter: surname')
surname_param = ssm.get_parameter(Name='surname')['Parameter']['Value']

print (f'Found Name Surname: {name_param} {surname_param}')

print('Retrieving parameter: full_name')
full_name_param = ssm.get_parameter(Name='full_name')['Parameter']['Value']

print (f'Found full_name: {full_name_param}')
Once we have the code ready we can go ahead and execute it to see the results.
$ python ./python_boto3_get_ssm_param.py
Retrieving parameter: name
Retrieving parameter: surname
Found Name Surname: Unbiased Coder
Found Full_Name: Unbiased Coder
As shown above it successfully pulled all of the results from our store and printed out their values. But you may ask what about the encrypted value we had previously added how do we get the value for that one? Well that’s a good question and we will be covering it in the section below.
How To Read Encrypted SSM Parameter Using Python
As mentioned earlier we left the gap of not printing out the encrypted SSM parameter we created earlier on in this guide. The parameter we skipped was called secure.
Luckily the code in this case is identical to the one we previously wrote for getting the parameters but with a small variation. The variation we will have here is that we need to pass on an additional keyword to our get_paramter function.
The get_parameter function takes a special keyword called WithDecryption. The WithDecryption keyword basically tells the SSM Store to decrypt the contents of the variable we are trying to retrieve (in this case secure).
import pprint
from boto3_helper import init_aws_session

session = init_aws_session()
ssm = session.client('ssm')

print('Retrieving parameter: secure')
secure_param = ssm.get_parameter(Name='secure', WithDecryption=True)['Parameter']['Value']

print (f'Got encrypted value for secure: {secure_param}')
Let’s go ahead and execute our code and see if this will print out the secret value we created via the AWS web console earlier in this guide.
$ python ./python_boto3_get_encrypted_ssm_param.py
Retrieving parameter: secure
Got encrypted value for secure: Unbiased Coder Loves Coding
As shown above the secret we had was indeed what’s shown above Unbiased Coder Loves Coding. This can also be seen in the web console the time you create it but past that it requires the KMS key ID you had used to encrypt it.
One thing to note here is that KMS and SSM only support symmetric encryption at the time of this writing. While this can be a bit of a limitation for some it’s still a decent protection against having completely clear text parameters stored in your server. If you would like to bring security of your application to the next level I recommend for the sensitive information that you use the secure string objects to store your key pairs.
Conclusion
We were able to successfully go over How To Store Global Environment Variables In AWS, hopefully I answered any questions you may have had and helped you get started on your quest on storing parameters in AWS.
If you found this useful and you think it may have helped you please drop me a cheer below I would appreciate it.
If you have any questions, comments please post them below or send me a note on my twitter. I check periodically and try to answer them in the priority they come in. Also if you have any corrections please do let me know and I’ll update the article with new updates or mistakes I did.
Would you consider move from env files to AWS SSM to simplify your code?
I personally still think it’s great besides the advantages it has that I mentioned earlier I think it’s built into the ecosystem and works work for what I need to do. If you are in a production/qa/dev environment it takes aways a lot of the hassle of maintaining everything separately. You just do the updates you want and you are set.
If you would like to visit the official AWS SSM documentation here.
If you would like to find more articles related to AWS services: