
Introduction
Today we will discuss on everything you need to know about Boto3 Session: Setup Profile, Create, Close and Mock sessions.
This is your ultimate source to quickly understand and get hands on, on how to implement Boto3 Sessions and why they are useful for your project.
More specifically we will discuss:
- Why Boto3 Sessions are useful
- Setting things up
- Creating, closing and mocking sessions
All the code and examples that will be provided below can be found in my git repo here.
I have been working in the Software industry for over 23 years now and I have been a software architect, manager, developer and engineer. I am a machine learning and crypto enthusiast with emphasis in security. I have experience in various industries such as entertainment, broadcasting, healthcare, security, education, retail and finance.
How to install Boto3 to use Sessions
We are going to begin on setting up our environment in particular installing any dependencies and packages necessary. I assume you already have Python 3 installed and running in your system. If you haven’t you can check the official website of Python to get that installed before proceeding forward. Furthermore I’m assuming you already have access to an AWS EC2 account and own an SDK key. If you do not you can sign up for free with Amazon here to get started. I’m also making the assumption you have the Python Package manager pip. If you haven’t you can look into this guide to learn more about installing it.
Now that we have the basic requirements out of the way we can dive in and start setting up the system. Also I want to note that all of the code you will find in this guide can be found in github here.
How to Create a Python virtual environment for Boto3 Session
- First install the virtual env using the python command: ‘pip install virtualenv’
- Then create a new virtual environment
- Finally you need to activate your virtual environment so we can start installing packages, please see below
main alex@DYNAMH ~/code/unbiased-coder/python-boto3-session-guide > virtualenv env
created virtual environment CPython3.8.6.final.0-64 in 3773ms
creator CPython3Posix(dest=/home/alex/code/unbiased-coder/python-boto3-ec2-guide/env, clear=False, no_vcs_ignore=False, global=False)
seeder FromAppData(download=False, pip=bundle, setuptools=bundle, wheel=bundle, via=copy, app_data_dir=/home/alex/.local/share/virtualenv)
added seed packages: pip==21.2.4, setuptools==57.4.0, wheel==0.37.0
activators BashActivator,CShellActivator,FishActivator,PowerShellActivator,PythonActivator
main alex@DYNAMH ~/code/unbiased-coder/python-boto3-session-guide > source env/bin/activate
How to Install pip dependencies for Boto3 Session
Next we need to go ahead and install the Python dependencies to be able to use the boto3 library. You can do this by running the pip tool as shown below. Keep in mind make sure your virtual environment is activated before you run this step. If you wish to use it without having a virtual environment which I do not recommend you can go ahead and simply install it globally in your user account.
main (env) alex@DYNAMH ~/code/unbiased-coder/python-boto3-session-guide > pip install boto3 python-dotenv
Collecting boto3
Downloading boto3-1.18.46-py3-none-any.whl (131 kB)
|████████████████████████████████| 131 kB 1.1 MB/s
Collecting s3transfer<0.6.0,>=0.5.0
Downloading s3transfer-0.5.0-py3-none-any.whl (79 kB)
|████████████████████████████████| 79 kB 2.8 MB/s
Collecting botocore<1.22.0,>=1.21.46
Downloading botocore-1.21.46.tar.gz (8.2 MB)
|████████████████████████████████| 8.2 MB 11.5 MB/s
Collecting jmespath<1.0.0,>=0.7.1
Downloading jmespath-0.10.0-py2.py3-none-any.whl (24 kB)
Collecting python-dateutil<3.0.0,>=2.1
Downloading python_dateutil-2.8.2-py2.py3-none-any.whl (247 kB)
|████████████████████████████████| 247 kB 10.1 MB/s
Collecting urllib3<1.27,>=1.25.4
Downloading urllib3-1.26.7-py2.py3-none-any.whl (138 kB)
|████████████████████████████████| 138 kB 9.9 MB/s
Collecting six>=1.5
Downloading six-1.16.0-py2.py3-none-any.whl (11 kB)
Building wheels for collected packages: botocore
Building wheel for botocore (setup.py) ... done
Created wheel for botocore: filename=botocore-1.21.46-py3-none-any.whl size=7933638 sha256=ee2d8a7f5bd91a7d2711b529706902a4a2a8fba97e69493757a8d1d461296d69
Stored in directory: /home/alex/.cache/pip/wheels/db/2a/b6/37624d07c0d7572bff3d08bd4bfd2c94b121f693278cd1ae77
Successfully built botocore
Collecting python-dotenv
Downloading python_dotenv-0.19.0-py2.py3-none-any.whl (17 kB)
Installing collected packages: six, urllib3, python-dateutil, jmespath, botocore, s3transfer, boto3, python-dotenv
Successfully installed boto3-1.18.46 botocore-1.21.46 jmespath-0.10.0 python-dateutil-2.8.2 s3transfer-0.5.0 six-1.16.0 urllib3-1.26.7 python-dotenv-0.19.0
The two packages we installed are:
- boto3: This is the core Python AWS library we will be using in this guide
- dotenv: We will use this library to pass in sensitive information to it that we do not want to have hardcoded in our code such as the AWS credentials
It must be noted that dotenv is optional and you can have alternatives to store your environment variables. For example if you are already in AWS you can use the AWS KMS service or even retrieve variables directly from SSM parameters. This makes your code a little more dynamically configurable and in some cases more secure.
Verifying it works
Now that we have setup our system we need to verify the library is installed properly and it works. You can do this by simply checking in a python shell using the following command shown below, if you encounter an error please delete your virtual environment and try again. If the problem still persists please drop me a line below and I will try to help you.
main ✚ (env) alex@DYNAMH ~/code/unbiased-coder/python-boto3-session-guide > python
Python 3.8.6 (default, Oct 23 2020, 14:59:35)
[GCC 9.3.0] on msys
Type "help", "copyright", "credits" or "license" for more information.
>>> import boto3
>>> boto3.__version__
'1.18.46'
>>> import dotenv
>>> quit()
As you can see above the boto3 library got loaded successfully and the version is 1.18.46. This is as of Late 2021 so this may be different in your system based on when you install it.
How to add an AWS user for Boto3 Session
Before we start writing code and communicating with our API we need to get the API and Secret key that we will use alongside with the boto3 library that we previously setup. This is basically setting up permissions for the user to be able to manipulate and connect to the AWS infrastructure. First navigate to the IAM section and click add user. This will invoke the dialog as shown below.
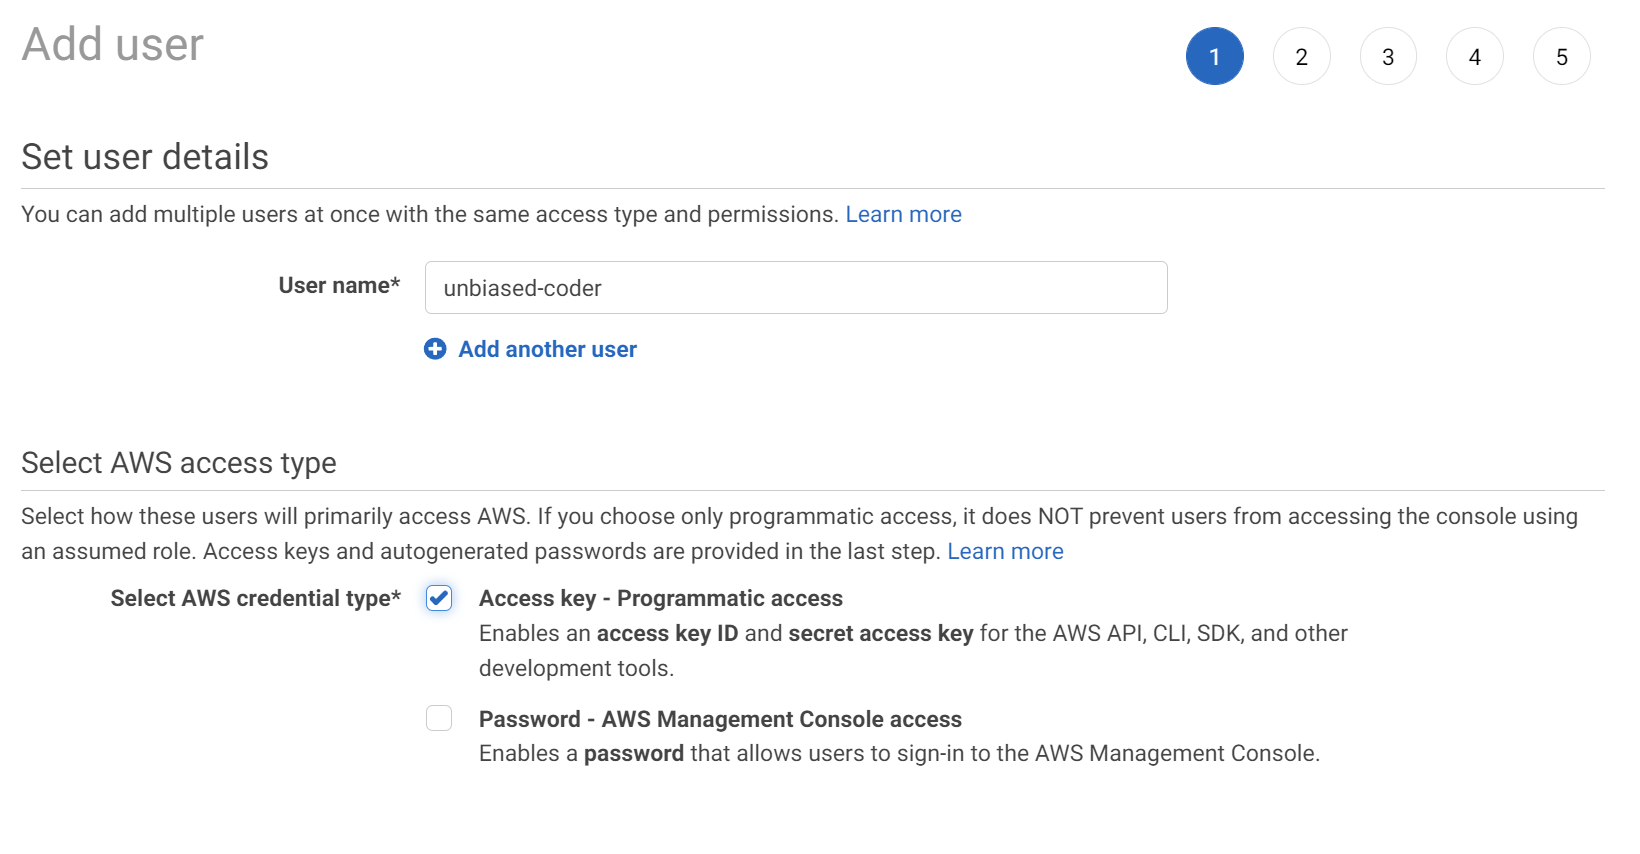
The important part we need to select is the Access key – Programmatic access. This will allow us to programmatically control things using our code. The next important part is setting the correct permissions in order to access AWS.
How to select an AWS policy
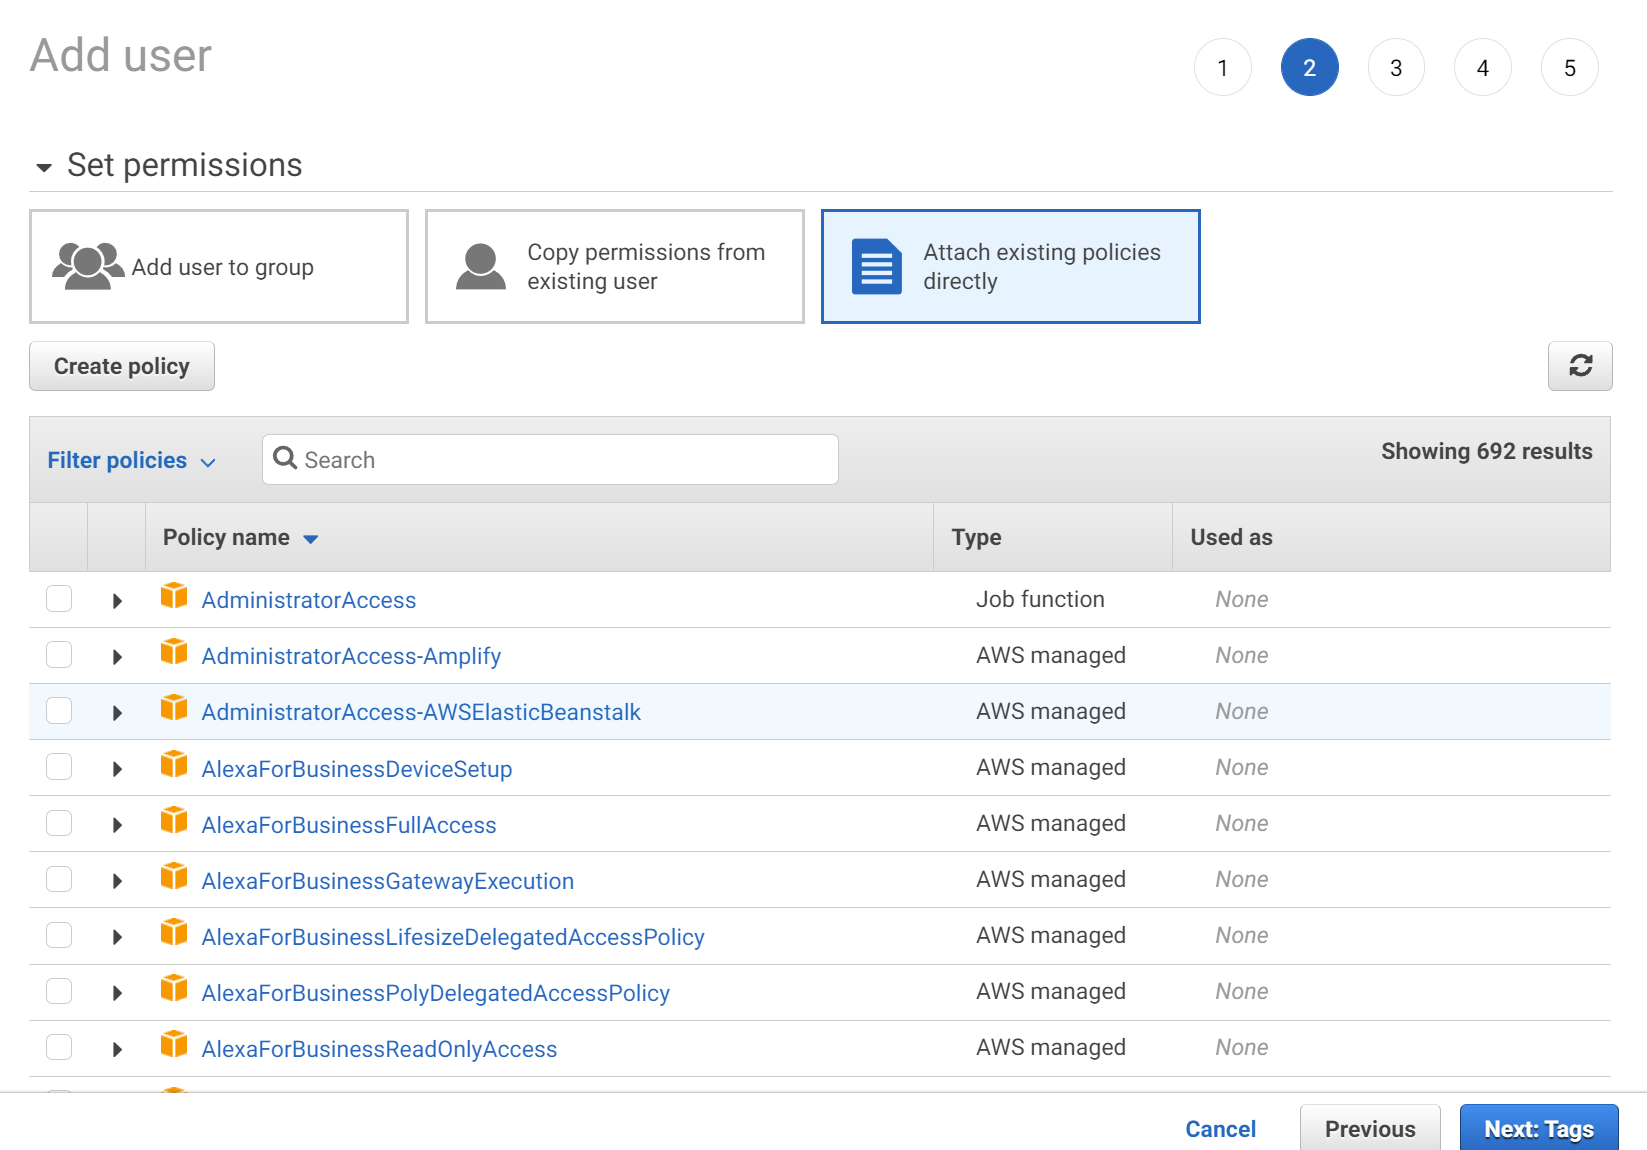
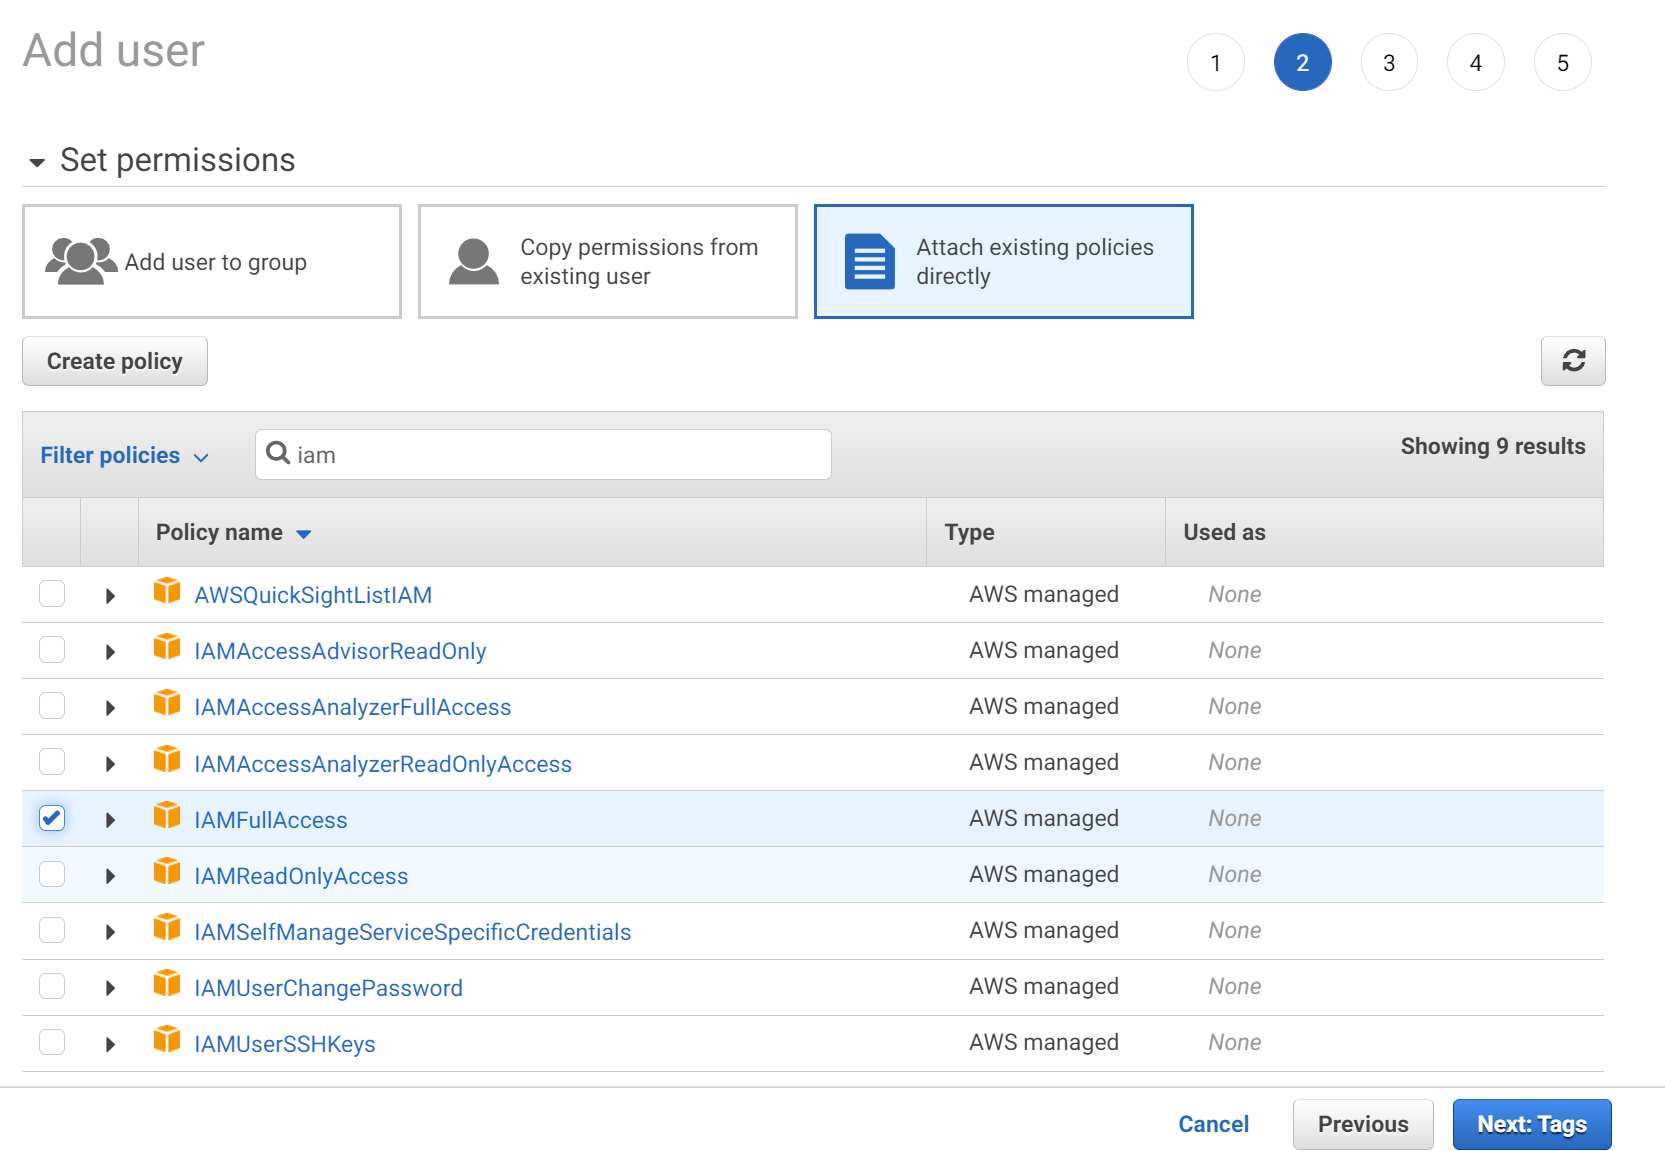
Since in our example we are not connecting to any particular service you can go ahead and select whatever service you would want to control using a Boto3 Session. In this example we will simply choose the IAM AWS service but this does not play any role in the code that we will be writing as we will not directly do anything with the service itself. I have written a lot of articles on how to control specific services that you can find the in my AWS section here.
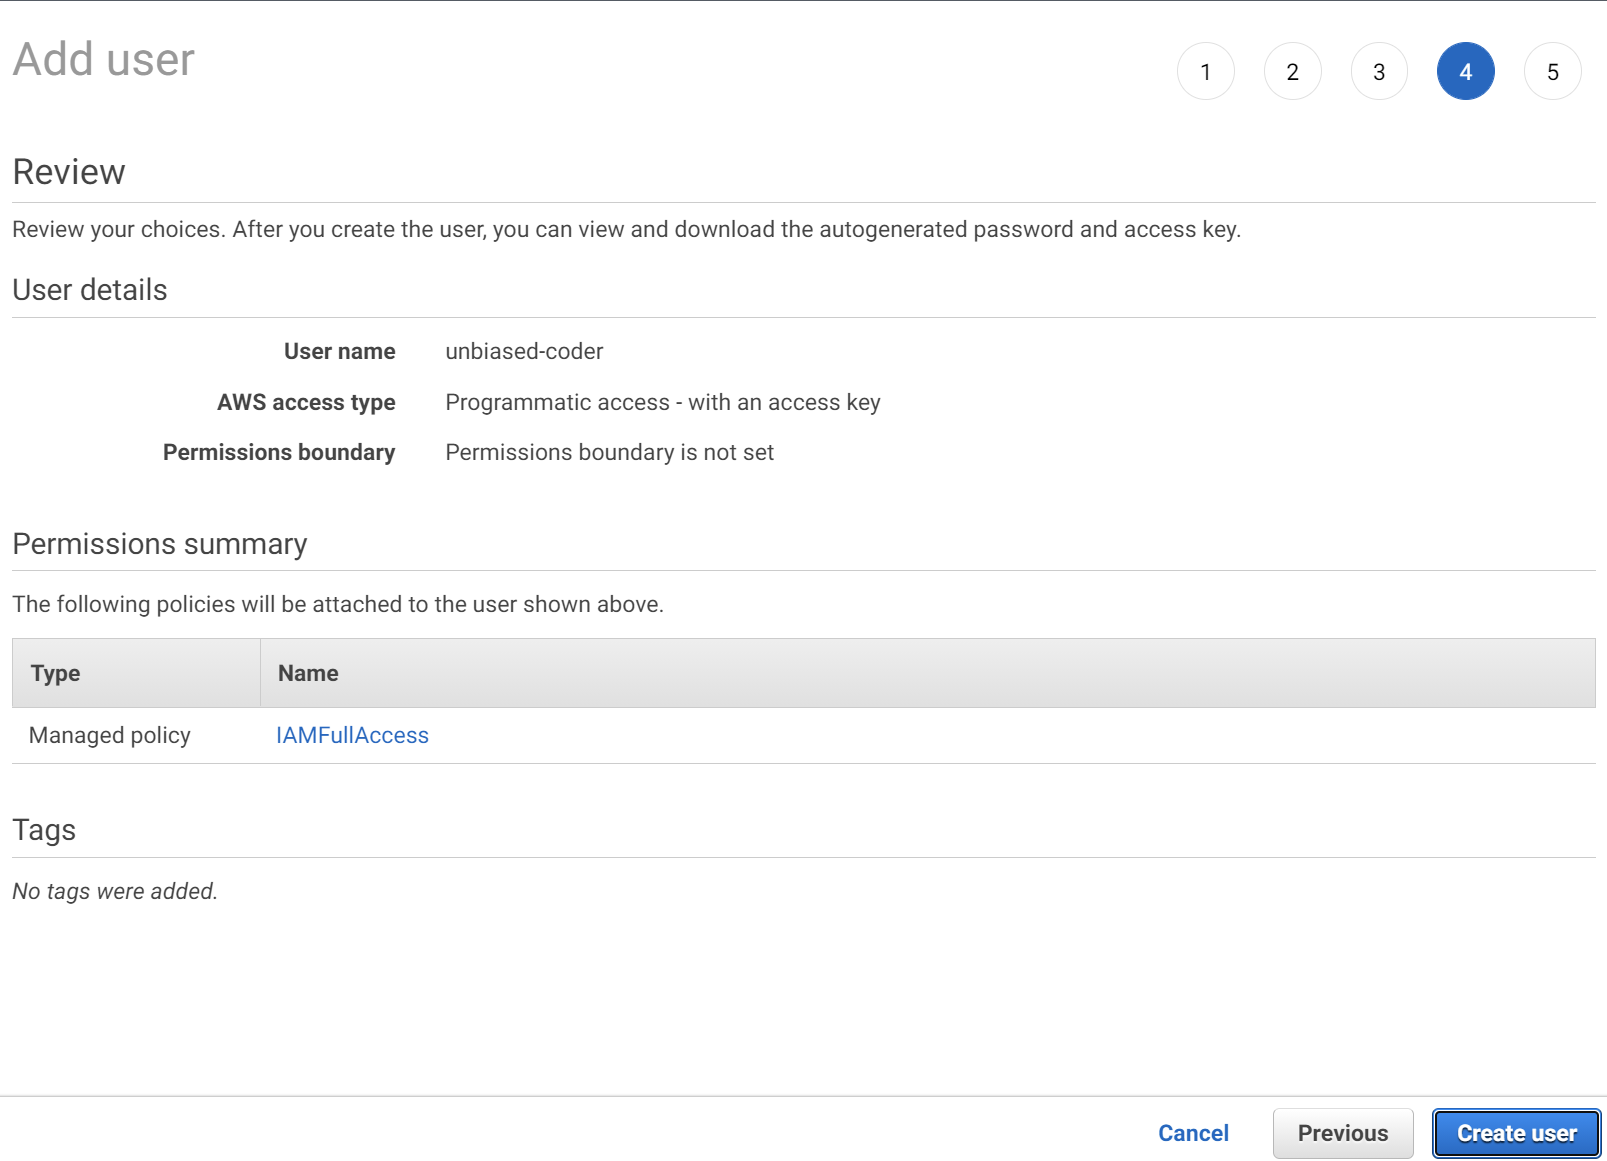
So you can go ahead and click next and on the next dialog select the Attach existing policies directly. From this tab we need to select full permissions for IAM as discussed earlier, this can be seen below.
How to get Boto3 Session credentials
Now that we have selected the permissions to attach to our profile we can go ahead and add the user.
Once the user is created you should get a confirmation screen as seen below with two important parts:
- API Key: This is similar to your username which your code will be using to authenticate itself to the AWS service (in this case the IAM service)
- Secret Key: This is similar to the password which will be used to give you the permissions necessary to access the AWS service
The confirmation screen below shows how this would look like.
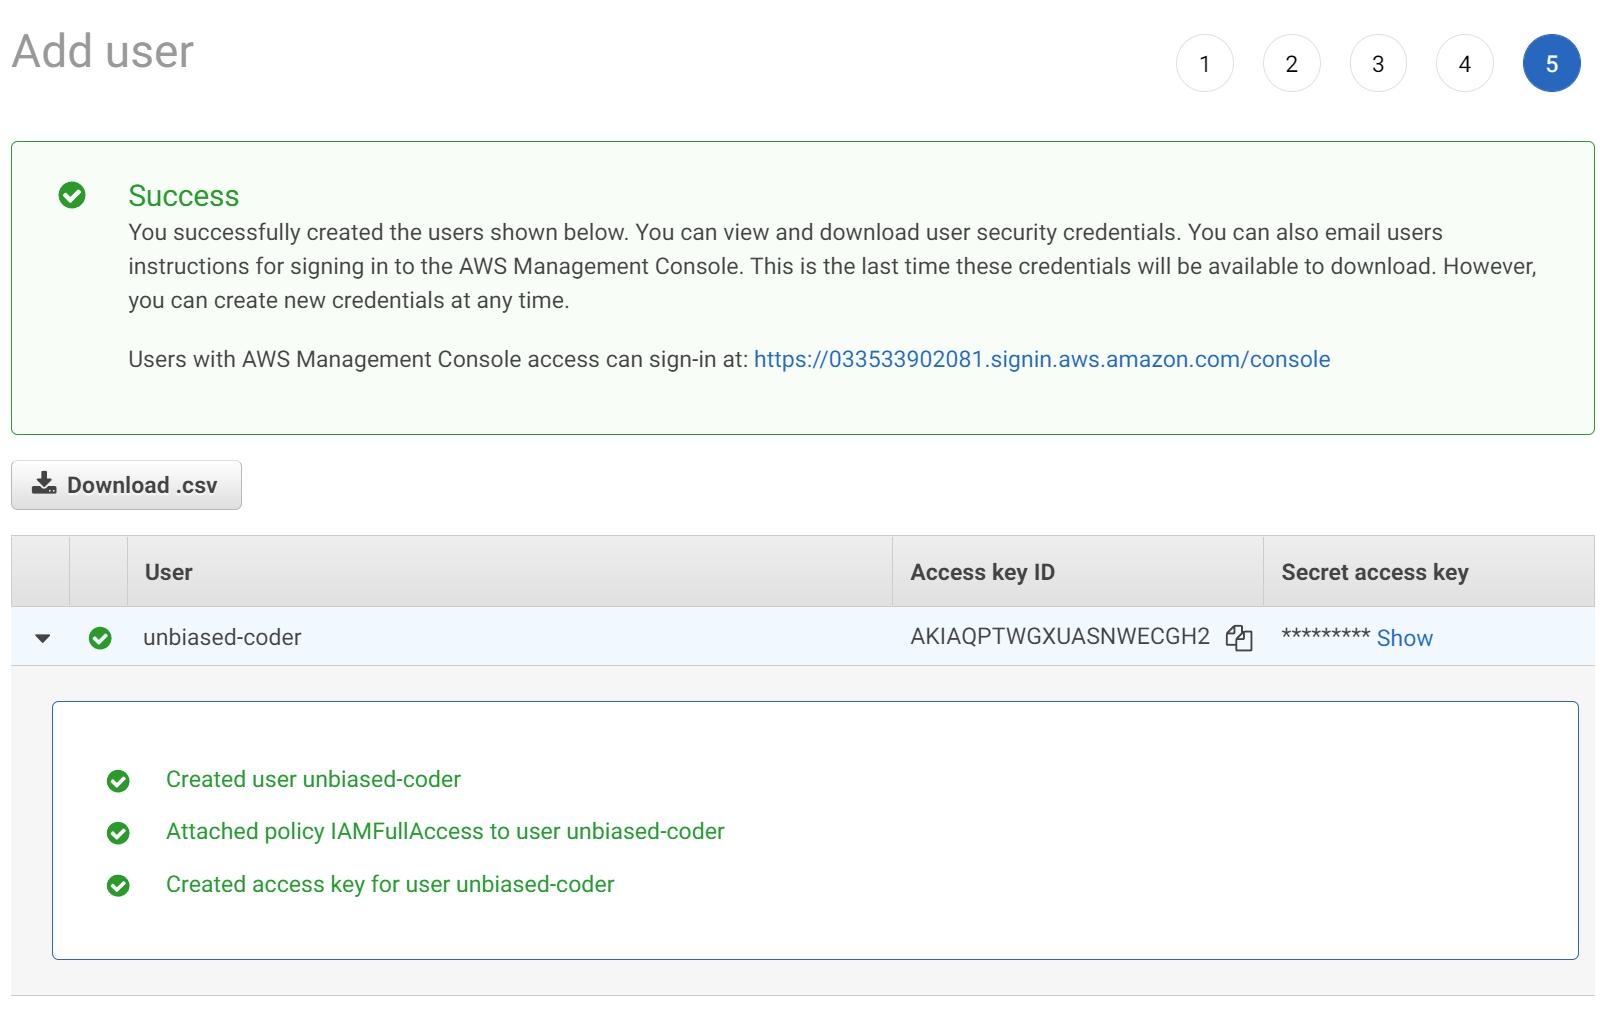
Once important thing to note here is that the Secret key is not shown but you will need to expand and save it now as we will be using it later in the document when we talk on how to setup an AWS Session.
How Setup a Boto3 Session Profile
For setting up our Boto3 session profile we will be using the DOTENV Python library that we discussed earlier on how to install. For this we can create an env file that looks similar to the one below.
AWS_ACCESS_KEY=ABCDE
AWS_SECRET_KEY=abcde
AWS_REGION=us-east-1
As shown above you can see three variables. The first two we already have from the setup we did earlier. So for the AWS_ACCESS_KEY and AWS_SECRET_KEY you can just fill in the information from the previous section.
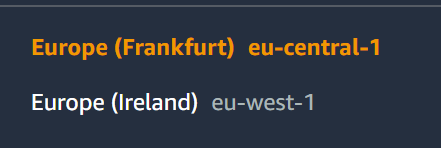
Finally for the region it will be the default region you used when setting up the key. If you do not know what that is you can log in the AWS console and see it in the top right (unless you changed it). This looks something like this:
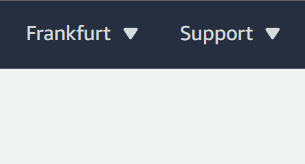
In my case it’s using Frankfurt which equates to eu-central-1. This can be easily seen if you expand the menu at the top where it shows the country.
Now that you have the region name you can fill it in your env file. The next step is to look into the code that lets us establish this connection and initialize the session.
How to Create an AWS Boto3 Session
In order to create an AWS Boto3 Session we need to create a simple Python file that leverages the Boto3 Session library object. Lets take a look at the code below that is named as boto3_helper.py in the GIT repo which I created for this project and you can find it here.
import os
import boto3
from dotenv import load_dotenv

def get_aws_keys():
    load_dotenv()
    return os.getenv('AWS_ACCESS_KEY'), os.getenv('AWS_SECRET_KEY')

def init_aws_session():
    access_key, secret_key = get_aws_keys()
    return boto3.Session(aws_access_key_id=access_key, aws_secret_access_key=secret_key, region_name=os.getenv('AWS_REGION'))
Let’s start analyzing what we wrote above before we move to executing it. There’s two helper functions:
- get_aws_key: It takes the data (access, secret key and region name) from our ENV file (as shown above) and reads it into the Python memory.
- init_aws_session: This helper function initializes the Boto3 Session and returns the object to the user.
Now that we have the boiler plate code written up we can proceed into making a simple program that uses it and tries to initialize an AWS Session.
How to get Boto3 Session Credentials Dynamically
In order to further demonstrate creating a session we will also solve the problem of being able to read the credentials dynamically from our session object. This will ensure the session was successfully created and everything worked. To do this we will be leveraging the code as shown below.
import boto3_helper

session = boto3_helper.init_aws_session()
creds = session.get_credentials()
print ('Access key: ', creds.access_key)
print ('Secret key: ', creds.secret_key)
print ('Region: ', session.region_name)
print ('Profile: ', session.profile_name)
In the case above we are simply importing the library we wrote (boto3_helper) and run the function that will get us the credentials. If we were to execute the above snipet we should be able to see the information that the AWS Boto3 library created and if the session was established. This can be seen below.
main ● (venv) alex@DYNAMH ~/code/unbiased-coder/python-boto3-session-guide > python ./boto3_session_create.py
Access key:  AKIAQPTWGXUASNWECGH2
Secret key:  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
Region:  eu-central-1
Profile:  default
There’s a few important considerations to see here. The output from the Access/Secret key is not from our env file. Rather this comes directly from the session object which was successfully initialized. Similarly the region name comes directly from that. The profile we are using here is going to be default as we did not name or specified anything in particular.
Now what would happen if we were to supply a wrong Access or Secret key. Lets re-adjust our ENV file temporarily and put something wrong. In my case I’m going to put an incorrect Secret Key but you can adjust any of the two.
The answer is nothing the code will still work and will have the same output. Before you ask why I’m going to give you a hint there. The reason that nothing changed is that because we did not try to do any action with our Boto3 Session.
How to Get the IAM User Using Boto3
In order to better demonstrate this we need to add some action so in this example we will get the username using the IAM AWS service. We will be leveraging the same code we wrote earlier however we need to add a few new lines to it that initializes a client object that gets an IAM instance to get the username. The code can be seen below.
import boto3_helper
session = boto3_helper.init_aws_session()
creds = session.get_credentials()
iam = session.client('iam')
print ('User: ', iam.get_user())
The print outs we had previously have been removed for now and we added the print out for the username for clarity. So lets go ahead and execute this with incorrect credentials and see what happens. As mentioned earlier we will be modifying the Secret Key with something that’s invalid.
main ● (venv) alex@DYNAMH ~/code/unbiased-coder/python-boto3-session-guide > python ./boto3_session_create.py
Traceback (most recent call last):
File "/home/alex/code/unbiased-coder/python-boto3-session-guide/./boto3_session_create.py", line 6, in
print ('User: ', iam.get_user())
File "/home/alex/code/unbiased-coder/python-boto3-session-guide/venv/lib/python3.9/site-packages/botocore/client.py", line 388, in _api_call
return self._make_api_call(operation_name, kwargs)
File "/home/alex/code/unbiased-coder/python-boto3-session-guide/venv/lib/python3.9/site-packages/botocore/client.py", line 708, in _make_api_call
raise error_class(parsed_response, operation_name)
botocore.exceptions.ClientError: An error occurred (SignatureDoesNotMatch) when calling the GetUser operation: The request signature we calculated does not match the signature you provided. Check your AWS Secret Access Key and signing method. Consult the service documentation for details.
So immediately we see the exception being raised by the Boto3 client as SignatureDoesNotMatch and the whole request is failing which is not letting us get the user of that’s making the request. If we go back to our ENV file and restore the Secret Key and re-execute the code now we should be able to see the user being printed out. The output of this is shown below.
main ● (venv) alex@DYNAMH ~/code/unbiased-coder/python-boto3-session-guide > python ./boto3_session_create.py
User:  {'User': {'Path': '/', 'UserName': 'unbiased-coder', 'UserId': 'AIDAQPTWGXUAZYKX5MAY2', 'Arn': 'arn:aws:iam::033533902081:user/unbiased-coder', 'CreateDate': datetime.datetime(2021, 10, 13, 8, 56, 34, tzinfo=tzutc())}, 'ResponseMetadata': {'RequestId': 'a910218d-b5d1-49c3-8ebb-2e1e2266c5d7', 'HTTPStatusCode': 200, 'HTTPHeaders': {'x-amzn-requestid': 'a910218d-b5d1-49c3-8ebb-2e1e2266c5d7', 'content-type': 'text/xml', 'content-length': '477', 'date': 'Wed, 13 Oct 2021 13:48:00 GMT'}, 'RetryAttempts': 0}}
How to Close Boto3 Session
The idea of closing a session in AWS does not exist. The way sessions work are by leveraging the API and Secret Key. Using those two then you can establish a connection to whatever service you want to use. If you are worried about it taking resources within Python you can de-allocate the object itself. So in Python this is done using the ‘del‘ method. Let’s see an example of how we can destroy the session object that we previously created.
import boto3_helper
session = boto3_helper.init_aws_session()
creds = session.get_credentials()
print ('Session object before deletion: ', session)
del session
print ('Session object after deletion: ', session)
So if we were to execute the above code we should be seeing as the first print out the session object memory space print out and in the second print out we should get the standard Python NameError exception as the object was destroyed from memory. This can be seen in the execution below.
main ● (venv) alex@DYNAMH ~/code/unbiased-coder/python-boto3-session-guide > python ./boto3_session_create.py
Session object before deletion:  Session(region_name='eu-central-1')
Traceback (most recent call last):
  File "/home/alex/code/unbiased-coder/python-boto3-session-guide/./boto3_session_create.py", line 8, in
    print ('Session object after deletion: ', session)
NameError: name 'session' is not defined
How to Mock Boto3 Session
In order to be able to do some unit testing you will need to have to mock up the Session object of Boto3. Depending on the service you will be using you will have to create fake classes for whatever you are returning. So for example if you would be returning something for the iam role and calling get_user then you need to make a mock class that returns an object as shown earlier for the get_user.
Lets start implementing some sample code to mock up our session. In order to do this we will be using the unittest python library which comes in by default with Python 3. More specifically the below code snipet accomplishes an initial mock.
from unittest import mock
import boto3

@mock.patch('boto3.session.Session')
def test_session_iam(test_val):
    mock_session_obj = mock.Mock()
    mock_iam_client = mock.Mock()
    creds = mock_session_obj.get_credentials()
    print ('Access key: ', creds.access_key)
    print ('Secret key: ', creds.secret_key)
    print ('Region: ', mock_session_obj.region_name)
    print ('Profile: ', mock_session_obj.profile_name)
    print ('User: ', mock_iam_client.get_user())

test_session_iam()
The important part to note in the code above is that the session is hot patched using Mock. Also I’m not setting any specific values for the overloaded classes this is something you would have to do based on your needs and what you are calling for example if you would like to have a return value for the get_user you can define a function that returns the object you need for the testing.
main ● (venv) alex@DYNAMH ~/code/unbiased-coder/python-boto3-session-guide > python ./boto3_session_mock.py
Access key:  mock name="mock.get_credentials().access_key" id="123145289159824"
Secret key:  mock name="mock.get_credentials().secret_key" id="123145289159776"
Region:  mock name="mock.region_name" id="123145289159872"
Profile:  mock name="mock.profile_name" id="123145289159968"
User:  mock name="mock.get_user()" id="123145289160208">
As it can be seen above the session is succeeding as we hot patched it so this should allow you to proceed with your unit tests.
Boto3 Session timeout
In order to control the timeout settings in your session you need to use the botocore portion of the Boto3 library. This will allow you to basically be able to have more fine control on things for example if you are uploading/downloading a large S3 file, if your connectivity may be poor at certain times etc.
The botocore module has a configuration function that lets you set some global settings that will be used subsequently in your code. There’s two settings that are of importance here (full reference here):
- connect_timeout (float or int) — The time in seconds till a timeout exception is thrown when attempting to make a connection. The default is 60 seconds.
- read_timeout (float or int) — The time in seconds till a timeout exception is thrown when attempting to read from a connection. The default is 60 seconds.
The first one lets you control the timeout when you making the initial connectivity to the AWS services and the second one lets you control the read timeout when you are having an active transfer in place either reading from a database or an S3 resource. Both are set to a very high amount and should be fine for most connections (60 seconds) but if you feel this should be increased you can do so with the code snipet I will provide below.
from botocore.client import Config
config = Config(connect_timeout=15, read_timeout=15)
If you were to add the code above it will override the default connect and read timeout and will basically set it to 15 Seconds instead of the 60 which is the default. Similarly you can increase this to higher values.
Boto3 Sessions vs Client
Session is practically an abstraction layer over the client which handles authentication and some other things. Once this is done then you can have access to the client object as we demonstrated in the code above which you can also find in the GIT repo here.
So you basically have two options if you are using the Boto3 client either use the abstracted layer of the Session or go directly with a client object and use a profile in your system for the authentication (or environment variables).
One thing to note here is that the client is basically a lower level object that works directly with the AWS infrastructure APIs. So using it directly is harmless if you want to have more fine gain control over what you are doing. I personally always prefer the resource if it’s available for the functionality I’m looking for.
I personally like to use sessions for a few other reasons which may not be applicable to your case so take them with a grain of salt but here’s my list which may match yours too:
- Credential Management: It’s easier to control your credentials using aws configure and storing them in files which just need to be loaded
- Regional management: For the same reasons as above each section can have a configuration region and your entire session follows this. This can be good if your AWS account is multi-region and you want an easy and flexible way to mange it.
- Sharing: By keeping things in sessions you basically have an easy way to share it among multiple clients in a consistent way. This can get out of hand if you have a lot of AWS accounts and logins to use. Typically a system administrator or even a devops person can take advantage of this. As a developer this may not be as useful to you.
Conclusion
If you found Boto3 Session: Setup Profile, Create, Close and Mock sessions useful and you think it may have helped you please drop me a cheer below I would appreciate it.
If you have any questions, comments please post them below I check periodically and try to answer them in the priority they come in.
Also if you have any corrections please do let me know and I’ll update the article with new updates or mistakes I did.
Do you think sessions are better than using the client object?
If you would like to learn more about AWS Boto3 interfaces please take a look at the articles below: