
Introduction
Today I’m going to walk you through on how to use the Python Boto3 EC2 Create, Launch, Stop, List and Connect to instances. We are going to do everything step by step starting from setting up your environment and any dependencies needed to getting a full working example. In the process I’m going to show you how this looks from the AWS console all the way to how the code can be adapted to be efficient. This simple task has small little tricks that you need to master when it comes to understanding the intricacies and other limitations which we will demonstrate below and how you can address them to accomplish what you want.
I have been working in the Software industry for over 23 years now and I have been a software architect, manager, developer and engineer. I am a machine learning and crypto enthusiast with emphasis in security. I have experience in various industries such as entertainment, broadcasting, healthcare, security, education, retail and finance. I have been using AWS since inception and I’m familiar with all the technologies it has. My experience is not limited to the architecture but also doing a lot of hands on code and understanding the limits of each product AWS offers.
Before we continue you can find all the code in this tutorial in the github repo here.
How to install Boto3 on EC2 or Locally
We are going to begin on setting up our environment in particular installing any dependencies and packages necessary. I assume you already have Python 3 installed and running in your system. If you haven’t you can check the official website of Python to get that installed before proceeding forward. Furthermore I’m assuming you already have access to an AWS EC2 account and own an SDK key. If you do not you can sign up for free with Amazon here to get started. I’m also making the assumption you have the Python Package manager pip. If you haven’t you can look into this guide to learn more about installing it.
Now that we have the basic requirements out of the way we can dive in and start setting up the system. Also I want to note that all of the code you will find in this guide can be found in github here.
How to Create a Python virtual environment for Boto3 EC2
- First install the virtual env using the python command: ‘pip install virtualenv’
- Then create a new virtual environment
- Finally you need to activate your virtual environment so we can start installing packages, please see below
main alex@DYNAMH ~/code/unbiased-coder/python-boto3-ec2-guide > virtualenv env
created virtual environment CPython3.8.6.final.0-64 in 3773ms
creator CPython3Posix(dest=/home/alex/code/unbiased-coder/python-boto3-ec2-guide/env, clear=False, no_vcs_ignore=False, global=False)
seeder FromAppData(download=False, pip=bundle, setuptools=bundle, wheel=bundle, via=copy, app_data_dir=/home/alex/.local/share/virtualenv)
added seed packages: pip==21.2.4, setuptools==57.4.0, wheel==0.37.0
activators BashActivator,CShellActivator,FishActivator,PowerShellActivator,PythonActivator
main alex@DYNAMH ~/code/unbiased-coder/python-boto3-ec2-guide > source env/bin/activate
How to Install pip dependencies for Boto3
Next we need to go ahead and install the Python dependencies to be able to use the boto3 library. You can do this by running the pip tool as shown below. Keep in mind make sure your virtual environment is activated before you run this step. If you wish to use it without having a virtual environment which I do not recommend you can go ahead and simply install it globally in your user account.
main (env) alex@DYNAMH ~/code/unbiased-coder/python-boto3-ec2-guide > pip install boto3 python-dotenv
Collecting boto3
Downloading boto3-1.18.46-py3-none-any.whl (131 kB)
|████████████████████████████████| 131 kB 1.1 MB/s
Collecting s3transfer<0.6.0,>=0.5.0
Downloading s3transfer-0.5.0-py3-none-any.whl (79 kB)
|████████████████████████████████| 79 kB 2.8 MB/s
Collecting botocore<1.22.0,>=1.21.46
Downloading botocore-1.21.46.tar.gz (8.2 MB)
|████████████████████████████████| 8.2 MB 11.5 MB/s
Collecting jmespath<1.0.0,>=0.7.1
Downloading jmespath-0.10.0-py2.py3-none-any.whl (24 kB)
Collecting python-dateutil<3.0.0,>=2.1
Downloading python_dateutil-2.8.2-py2.py3-none-any.whl (247 kB)
|████████████████████████████████| 247 kB 10.1 MB/s
Collecting urllib3<1.27,>=1.25.4
Downloading urllib3-1.26.7-py2.py3-none-any.whl (138 kB)
|████████████████████████████████| 138 kB 9.9 MB/s
Collecting six>=1.5
Downloading six-1.16.0-py2.py3-none-any.whl (11 kB)
Building wheels for collected packages: botocore
Building wheel for botocore (setup.py) ... done
Created wheel for botocore: filename=botocore-1.21.46-py3-none-any.whl size=7933638 sha256=ee2d8a7f5bd91a7d2711b529706902a4a2a8fba97e69493757a8d1d461296d69
Stored in directory: /home/alex/.cache/pip/wheels/db/2a/b6/37624d07c0d7572bff3d08bd4bfd2c94b121f693278cd1ae77
Successfully built botocore
Collecting python-dotenv
Downloading python_dotenv-0.19.0-py2.py3-none-any.whl (17 kB)
Installing collected packages: six, urllib3, python-dateutil, jmespath, botocore, s3transfer, boto3, python-dotenv
Successfully installed boto3-1.18.46 botocore-1.21.46 jmespath-0.10.0 python-dateutil-2.8.2 s3transfer-0.5.0 six-1.16.0 urllib3-1.26.7 python-dotenv-0.19.0
The two packages we installed are:
- boto3: This is the core Python AWS library we will be using in this guide
- dotenv: We will use this library to pass in sensitive information to it that we do not want to have hardcoded in our code such as the AWS credentials
Verifying it works
Now that we have setup our system we need to verify the library is installed properly and it works. You can do this by simply checking in a python shell using the following command shown below, if you encounter an error please delete your virtual environment and try again. If the problem still persists please drop me a line below and I will try to help you.
main ✚ (env) alex@DYNAMH ~/code/unbiased-coder/python-boto3-ec2-guide > python
Python 3.8.6 (default, Oct 23 2020, 14:59:35)
[GCC 9.3.0] on msys
Type "help", "copyright", "credits" or "license" for more information.
>>> import boto3
>>> boto3.__version__
'1.18.46'
>>> import dotenv
>>> quit()
As you can see above the boto3 library got loaded successfully and the version is 1.18.46. This is as of Late 2021 so this may be different in your system based on when you install it.
How to Create EC2 instance in AWS
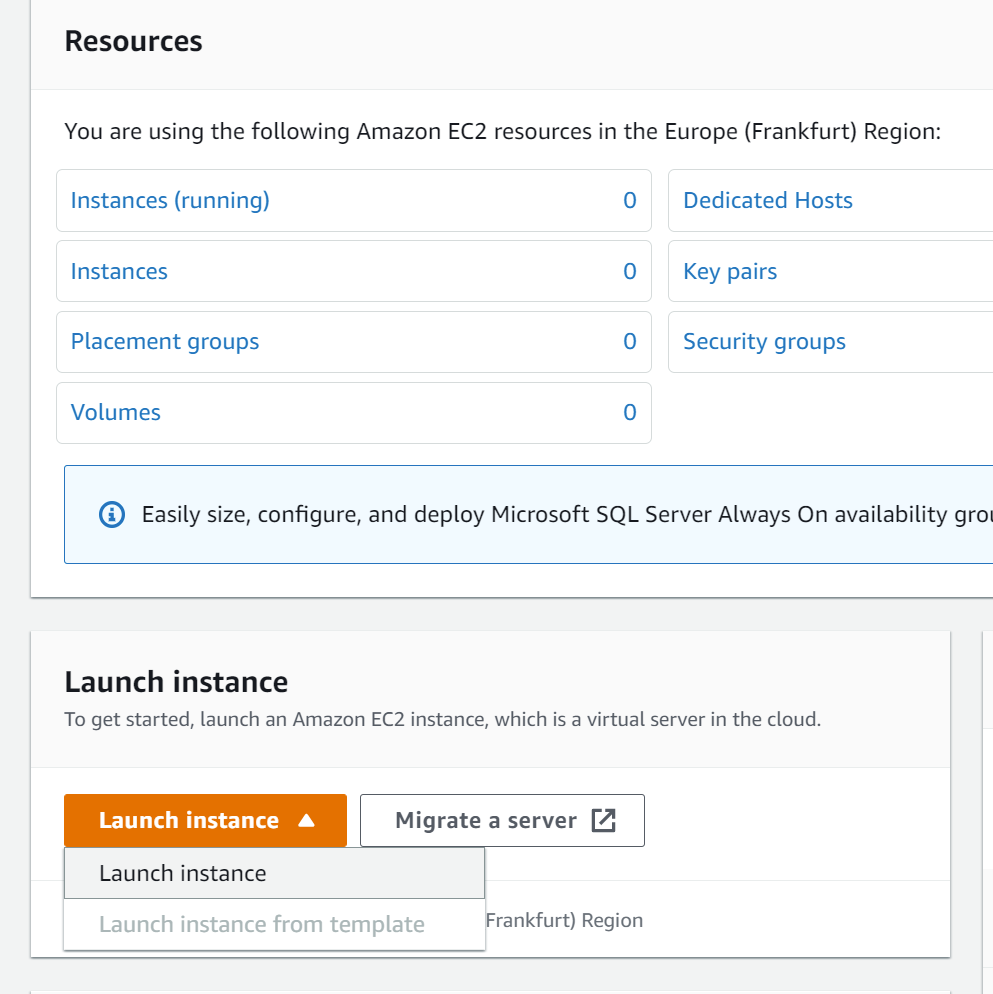
First we will create an EC2 instance from the AWS console so we can start experimenting with our code. To do this you simply need to invoke the Launch wizard
Once the wizard is initialized you will be prompted to select an AWS instance type, in this case we will simply use Ubuntu 20.04 but feel free to use whatever you want as long as it’s a Linux system. If you want to follow this guide and see the github code then everything will be tied to Ubuntu such as the install package commands.

The next step is to select your tier, again for this example you can go with a free tier if you are eligible if not you can go ahead and select the cheapest version you can as we will be destroying it at end of this guide.

For the next screens you can safely ignore them as they are not necessary or important. If you would like to customize the disk space or encryption go for it but not needed.
Finally we should be ready to launch our instance and create a keypair to connect to it.
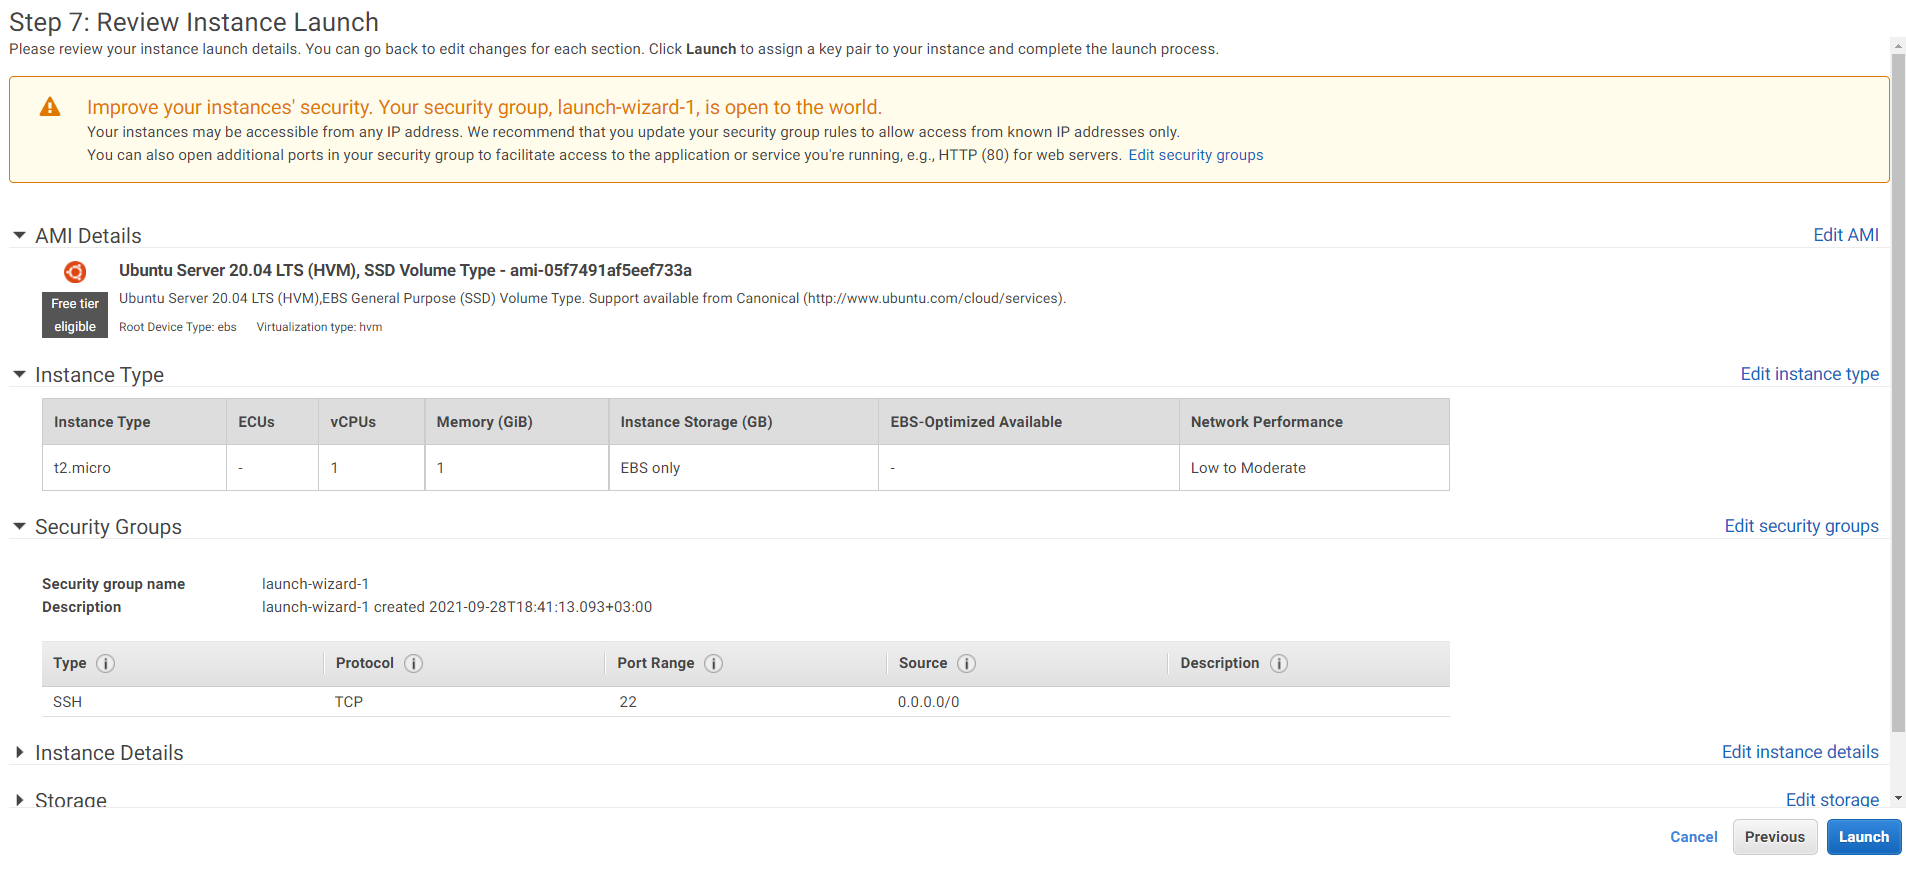
Before we finalize we need to create a key pair to connect to the instance. For this we will be using SSH to connect to it and run our commands as it will be shown later on. If you already have an SSH keypair previously created feel free to use it here.

So now that we have a keypair we can go ahead and provision our new EC2 instance. Once this is done you should see the screen below that the Instance State is showing as ‘Running‘.
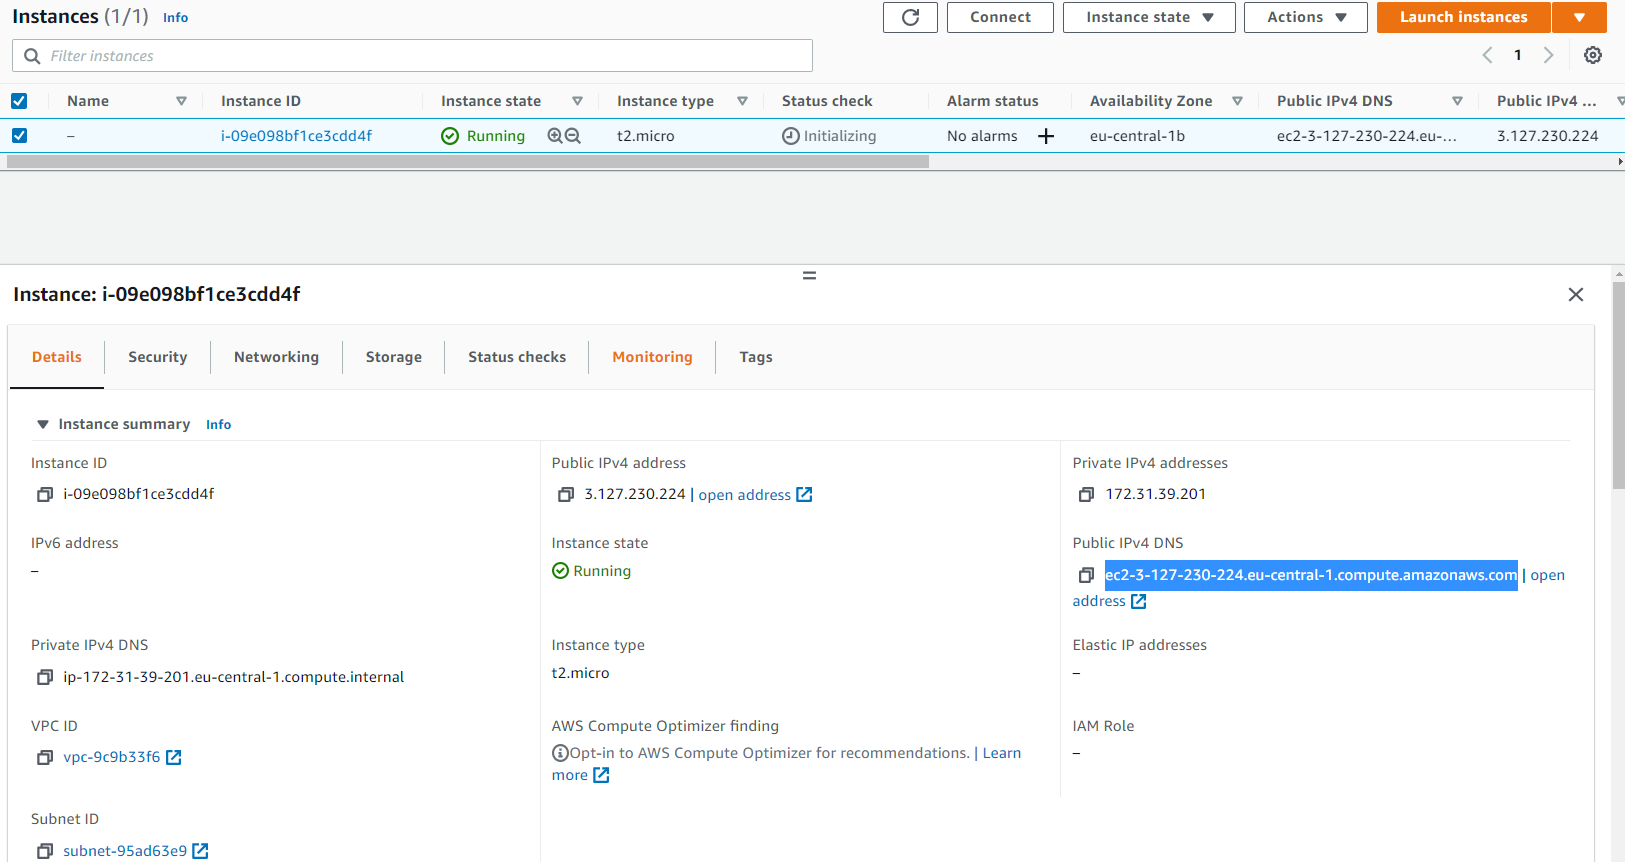
The important take away and what we will be using from this is the public IPv4 address that AWS allocated to our instance. Make sure you keep a note of that it can be found in the details section of the instance under the Public IPV4 section. Do not confuse this with the Private address as that will be inaccessible from your personal computer unless you create a bridge to the AWS VPC network (which we are not going to cover in this guide).
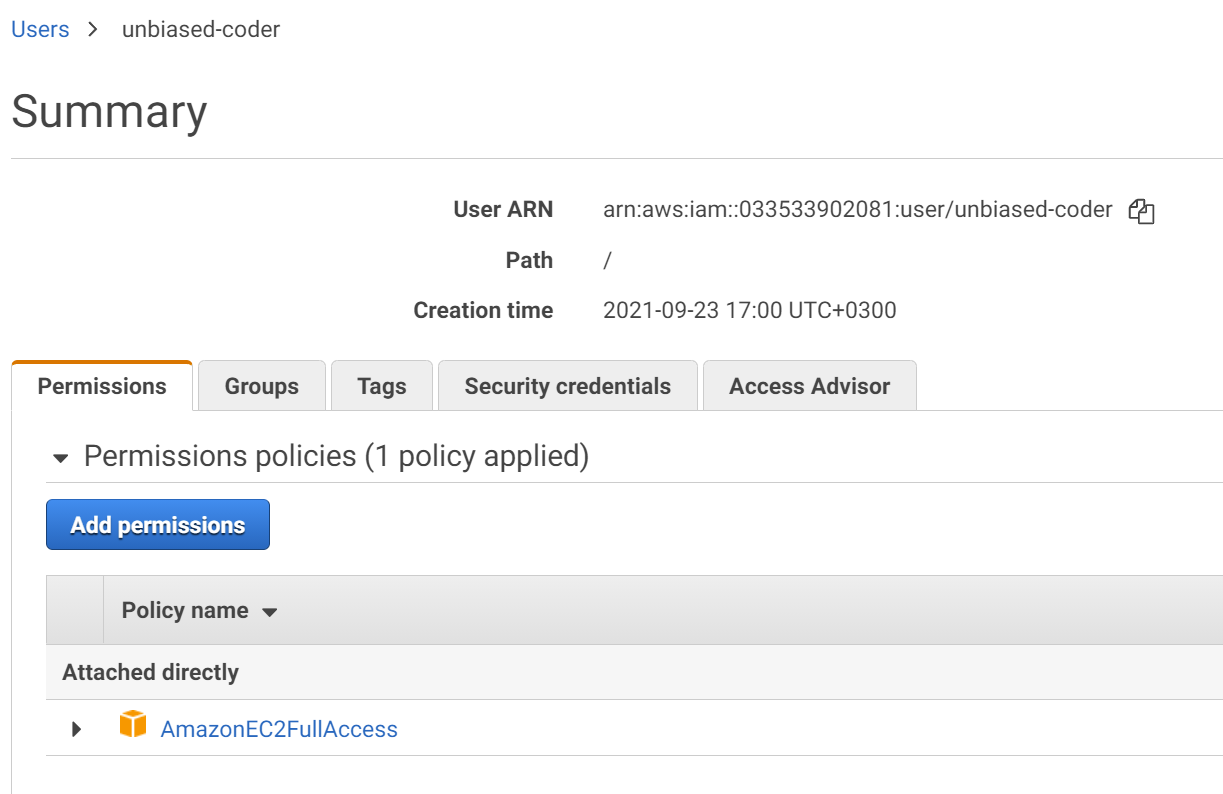
One last item is that we need to add a user to connect to the EC2 instance, I have detailed this in an elaborate way in my article here. But a screenshot of this looks like this:
How to SSH and run commands in EC2 using Boto3
Now that the instance has been provisioned and running we need to connect to it using SSH and start running commands. In order to do this you will need an SSH client. For Linux/Mac I personally use the simple out of the box OpenSSH client and for Windows I use putty or from a terminal you can also use OpenSSH in cygwin/msys2.
In this article I will be demonstrating the command line version of OpenSSH to connect to our EC2 instance as it’s easier to fine tune and it also runs in both Windows, Linux and Mac.
To connect to our EC2 instance you can issue the command as shown below:
main ● (venv) alex@DYNAMH ~/code/unbiased-coder/python-boto3-ec2-guide > ssh -i unbiased-coder-ec2-guide.pem [email protected]
The authenticity of host 'ec2-3-127-230-224.eu-central-1.compute.amazonaws.com (3.127.230.224)' can't be established.
ED25519 key fingerprint is SHA256:EIziB2eIVh9G1VuxYu+2vFf88oTQwJzbeVxRjWisLvg.
This key is not known by any other names
Are you sure you want to continue connecting (yes/no/[fingerprint])? yes
Warning: Permanently added 'ec2-3-127-230-224.eu-central-1.compute.amazonaws.com' (ED25519) to the list of known hosts.
Welcome to Ubuntu 20.04.2 LTS (GNU/Linux 5.4.0-1045-aws x86_64)
* Documentation: https://help.ubuntu.com
* Management: https://landscape.canonical.com
* Support: https://ubuntu.com/advantage
System information as of Tue Sep 28 16:17:52 UTC 2021
System load: 0.0 Processes: 100
Usage of /: 16.4% of 7.69GB Users logged in: 0
Memory usage: 22% IPv4 address for eth0: 172.31.39.201
Swap usage: 0%
1 update can be applied immediately.
To see these additional updates run: apt list --upgradable
The list of available updates is more than a week old.
To check for new updates run: sudo apt update
The programs included with the Ubuntu system are free software;
the exact distribution terms for each program are described in the
individual files in /usr/share/doc/*/copyright.
Ubuntu comes with ABSOLUTELY NO WARRANTY, to the extent permitted by
applicable law.
To run a command as administrator (user "root"), use "sudo As you can see this dropped us in a shell in the AWS EC2 environment which is similar to the terminal you would have in your Mac/Linux computer. In order to run commands you can simply do what we described earlier in section: How to install Boto3 on EC2 or Locally.
How to Create EC2 instance in AWS using Boto3
A few pre-requisites if you haven’t been following this guide from the beginning are:
- Have an access and secret key setup
- Installed boto3 and dotenv
- Know an AMI ID, to find this you can try to launch an instance from the interface it would look something like this:

We will start by using the boiler plate code that establishes a session with the AWS infrastructure and lets us issue the EC2 commands. Please make sure your key has full permissions for this tutorial you can use a more fine grained key later if you need too.
import os
import boto3
from dotenv import load_dotenv

def get_aws_keys():
    load_dotenv()
    return os.getenv('AWS_ACCESS_KEY'), os.getenv('AWS_SECRET_KEY')

def init_aws_session():
    access_key, secret_key = get_aws_keys()
    return boto3.Session(aws_access_key_id=access_key, aws_secret_access_key=secret_key)
This code simply gets the access key from our env file and loads it up so we can connect to the AWS connection. The next step is to write some code that leverages the code above and instantiates an EC2 resource object which we are going to use to issue the create EC2 instance command.
import boto3_helper

print ('Getting boto3 session...')
session = boto3_helper.init_aws_session()
print ('Getting EC2 resource object...')
ec2 = session.resource('ec2')
print ('Provisioning EC2 instance...')
ret = ec2.create_instances(ImageId='ami-05f7491af5eef733a', MinCount=1, MaxCount=5)
print ('Process completed')
print (ret)
The code above initializes the AWS session as discussed earlier and then it creates an instance with the AMI shown. In our case the AMI above is that of Ubuntu 20.04 so this will spin up an Ubuntu EC2 instance. If we investigate the output of this command and see the return value we should see a successful list result.
main ● (venv) alex@DYNAMH ~/code/unbiased-coder/python-boto3-ec2-guide > python ./boto3_create_ec2_instances.py
Getting boto3 session...
Getting EC2 resource object...
Provisioning EC2 instance...
Process completed
[ec2.Instance(id='i-0d808c8e59bee58a6'), ec2.Instance(id='i-0ba9e3583f342b41b'), ec2.Instance(id='i-019d643ae4014705c'), ec2.Instance(id='i-003c148b1438b47a4'), ec2.Instance(id='i-0a060a166beb5354a')]
One thing to note is that in our code we specified a minimum of 1 and a maximum of 5 so we should see 5 instances which is verified in the return code which is a list of the instance IDs that got created.
And to verify we can check our AWS EC2 console to see if the instances have been provisioned successfully (note it shows 6 because we created one manually earlier in this tutorial) so the output is accurate:

A few things to note here is that we did not specify any details about the instance type and as you can see it defauled to small similarly for the disk space and other information. All of these parameters can be passed into the create_instances boto3 function. A detailed list can be referenced from Amazon’s website here.
So for example if we wanted to provision a t2.micro instance like the one we created manually earlier we would add this parameter in our create_instances function: InstanceType=’t2.micro’. Similarly we can do this for every single attribute listed in the reference guide. Based on your criteria and what you want to do you can fine tune the parameters of your request.
How to List EC2 instances using Boto3
Now that we have created a few running instances to play with we can start working on the code that lists them. This will allow us to programmatically spin up and list instances based on conditions that our code will have or based on batch job timings or other business logic requested. This process is very powerful and time saving as it allows a user to bypass the AWS console and act using batch jobs. Furthermore if you are managing and need to scale a big array of EC2 instances you would want to do things in a programmatic way rather than performing tedious clicks and tasks in the web console.
For listing the interfaces we will be leveraging the client object from the Boto3 library. This is because the resource does not allow us to issue the low level commands we need to get the information.
The example with boto3 to list EC2 instances:
import boto3_helper

print ('Getting boto3 session...')
session = boto3_helper.init_aws_session()
print ('Getting EC2 client object...')
ec2 = session.client('ec2')
instance_list = ec2.describe_instances()
for reservation in instance_list['Reservations']:
    for instance in reservation['Instances']:
        print ('Instance: %s, type: %s, '%(instance['InstanceId'], instance['InstanceType']), end='')
        for network_interface in instance['NetworkInterfaces']:
            print ('IP: %s'%network_interface['Association']['PublicIp'])
The code above lets us list all the instances and view three things:
- Public IPs associated with the instance
- The instance type (ie micro, nano etc.)
- The instance ID (the identifier of our instance)
Iterating the objects initially we see that we have to traverse the Reservations and then drill down to the instance object. Once we have that each instance can have multiple Network Interfaces attached to it so we need to traverse that too and list all the IPs. The output of this would look something like this:
main ● (venv) alex@DYNAMH ~/code/unbiased-coder/python-boto3-ec2-guide > python ./boto3_list_ec2_instances.py
Getting boto3 session...
Getting EC2 client object...
Instance: i-09e098bf1ce3cddXX, type: t2.micro, IP: 3.127.230.XXX
Instance: i-003c148b1438b47XX, type: t2.small, IP: 18.196.53.XXX
Instance: i-019d643ae401470XX, type: t2.small, IP: 3.69.43.XX
Instance: i-0ba9e3583f342b4XX, type: t2.small, IP: 18.185.35.XX
Instance: i-0d808c8e59bee58XX, type: t2.small, IP: 3.66.192.XXX
Instance: i-0a060a166beb535XX, type: t2.small, IP: 3.68.119.XX
As you can see above this lists everything we were able to see previously from the AWS console in the instance listing.
How to Stop EC2 instance using Boto3
Now that we have listed our instances we can proceed into stopping them. To do this we need to re-use the code we wrote for listing them and simply add a stop call for each instance.
One differentiator here is that we will be calling the start_instances function of the Boto3 EC2 client to signal our instances to stop. This takes a list of instance-id’s which as demonstrated above we can get by enumerating all of our instances. Furthermore if we want to fine tune we can set certain conditions here by examining the tags or specific attributes about the instance such as an IP or a name if we are using static IPs.
The example with boto3 to stop EC2 instances:
import boto3_helper

print ('Getting boto3 session...')
session = boto3_helper.init_aws_session()
print ('Getting EC2 client object...')
ec2 = session.client('ec2')

instance_id_list = []

instance_list = ec2.describe_instances()
for reservation in instance_list['Reservations']:
    for instance in reservation['Instances']:
        instance_id_list.append(instance['InstanceId'])

print ('Stopping list of instances: ', instance_id_list)
ret = ec2.stop_instances(InstanceIds=instance_id_list)
print ('All instances were signaled to stop')
print (ret)
And the output we will get if we were to execute this command will be:
main ● (venv) alex@DYNAMH ~/code/unbiased-coder/python-boto3-ec2-guide > python ./boto3_stop_ec2_instances.py

Getting boto3 session...
Getting EC2 client object...
Stopping list of instances:  ['i-09e098bf1ce3cdd4f', 'i-003c148b1438b47a4', 'i-019d643ae4014705c', 'i-0ba9e3583f342b41b', 'i-0d808c8e59bee58a6', 'i-0a060a166beb5354a']
All instances were signaled to stop
{'StoppingInstances': [{'CurrentState': {'Code': 64, 'Name': 'stopping'}, 'InstanceId': 'i-09e098bf1ce3cdd4f', 'PreviousState': {'Code': 16, 'Name': 'running'}}, {'CurrentState': {'Code': 64, 'Name': 'stopping'}, 'InstanceId': 'i-0d808c8e59bee58a6', 'PreviousState': {'Code': 16, 'Name': 'running'}}, {'CurrentState': {'Code': 64, 'Name': 'stopping'}, 'InstanceId': 'i-0ba9e3583f342b41b', 'PreviousState': {'Code': 16, 'Name': 'running'}}, {'CurrentState': {'Code': 64, 'Name': 'stopping'}, 'InstanceId': 'i-019d643ae4014705c', 'PreviousState': {'Code': 16, 'Name': 'running'}}, {'CurrentState': {'Code': 64, 'Name': 'stopping'}, 'InstanceId': 'i-003c148b1438b47a4', 'PreviousState': {'Code': 16, 'Name': 'running'}}, {'CurrentState': {'Code': 64, 'Name': 'stopping'}, 'InstanceId': 'i-0a060a166beb5354a', 'PreviousState': {'Code': 16, 'Name': 'running'}}], 'ResponseMetadata': {'RequestId': 'b7e0df30-0d21-4561-91d4-98b564e264a9', 'HTTPStatusCode': 200, 'HTTPHeaders': {'x-amzn-requestid': 'b7e0df30-0d21-4561-91d4-98b564e264a9', 'cache-control': 'no-cache, no-store', 'strict-transport-security': 'max-age=31536000; includeSubDomains', 'vary': 'accept-encoding', 'content-type': 'text/xml;charset=UTF-8', 'content-length': '2274', 'date': 'Tue, 28 Sep 2021 20:51:33 GMT', 'server': 'AmazonEC2'}, 'RetryAttempts': 0}}
The important thing to note here is that the previous state was set to running which is accurate as all of our instances where running at the time. If we were to revisit our AWS EC2 console to see the new state of our instances this would look like this:
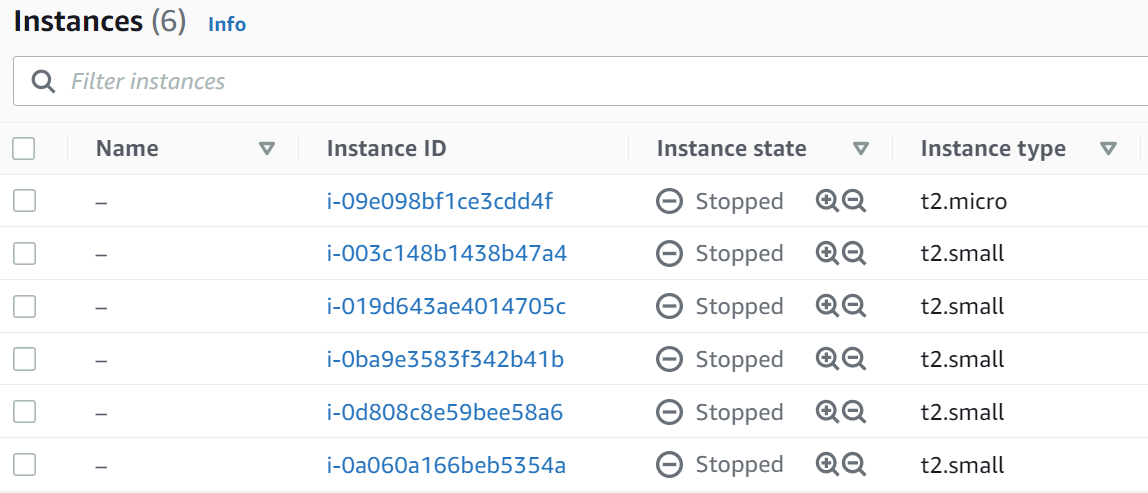
One thing to note here is that if you check too fast some of them may have the state set to as ‘Stopping‘ which just means they are in the process of shutting down. If you wait a few seconds and refresh this should eventually change to ‘Stopped‘.
How to Launch an EC2 instance using Boto3 (Starting)
Starting/Launching the EC2 instances using Boto3 is similar to stopping them instead of issuing the stop_instances command we just issue the start_instances command.
The example with boto3 to launch EC2 instances:
import boto3_helper

print ('Getting boto3 session...')
session = boto3_helper.init_aws_session()
print ('Getting EC2 client object...')
ec2 = session.client('ec2')

instance_id_list = []

instance_list = ec2.describe_instances()
for reservation in instance_list['Reservations']:
    for instance in reservation['Instances']:
        instance_id_list.append(instance['InstanceId'])

print ('Starting/Launching list of instances: ', instance_id_list)
ret = ec2.start_instances(InstanceIds=instance_id_list)
print ('All instances were signaled to launch/start')
print (ret)
The output will look something like this:
main ● (venv) alex@DYNAMH ~/code/unbiased-coder/python-boto3-ec2-guide > python ./boto3_launch_ec2_instances.py
Getting boto3 session...
Getting EC2 client object...
Starting/Launching list of instances:  ['i-09e098bf1ce3cdd4f', 'i-003c148b1438b47a4', 'i-019d643ae4014705c', 'i-0ba9e3583f342b41b', 'i-0d808c8e59bee58a6', 'i-0a060a166beb5354a']
All instances were signaled to launch/start
{'StartingInstances': [{'CurrentState': {'Code': 0, 'Name': 'pending'}, 'InstanceId': 'i-09e098bf1ce3cdd4f', 'PreviousState': {'Code': 80, 'Name': 'stopped'}}, {'CurrentState': {'Code': 0, 'Name': 'pending'}, 'InstanceId': 'i-0d808c8e59bee58a6', 'PreviousState': {'Code': 80, 'Name': 'stopped'}}, {'CurrentState': {'Code': 0, 'Name': 'pending'}, 'InstanceId': 'i-0ba9e3583f342b41b', 'PreviousState': {'Code': 80, 'Name': 'stopped'}}, {'CurrentState': {'Code': 0, 'Name': 'pending'}, 'InstanceId': 'i-019d643ae4014705c', 'PreviousState': {'Code': 80, 'Name': 'stopped'}}, {'CurrentState': {'Code': 0, 'Name': 'pending'}, 'InstanceId': 'i-003c148b1438b47a4', 'PreviousState': {'Code': 80, 'Name': 'stopped'}}, {'CurrentState': {'Code': 0, 'Name': 'pending'}, 'InstanceId': 'i-0a060a166beb5354a', 'PreviousState': {'Code': 80, 'Name': 'stopped'}}], 'ResponseMetadata': {'RequestId': '628bb403-79be-4cb5-9ee1-b151a7442a2d', 'HTTPStatusCode': 200, 'HTTPHeaders': {'x-amzn-requestid': '628bb403-79be-4cb5-9ee1-b151a7442a2d', 'cache-control': 'no-cache, no-store', 'strict-transport-security': 'max-age=31536000; includeSubDomains', 'vary': 'accept-encoding', 'content-type': 'text/xml;charset=UTF-8', 'content-length': '2264', 'date': 'Tue, 28 Sep 2021 20:44:57 GMT', 'server': 'AmazonEC2'}, 'RetryAttempts': 0}}
As you can see above it’s showing us the previous state of the instances were ‘Stopped’ which is accurate because we just recently stopped all of them. This changes their state to started. To verify we can also check the EC2 console the output will be similar to the screenshot shown above.
How to Terminate EC2 instance using Boto3
Terminating builds upon the previous tasks, the process here adds the part where we need to acquire both a client and a resource object in order to run the termination code. So first we will be getting a list of Instance IDs as we did previous in the listing, start and stopping sections and further to that we will call terminate in those instance IDs after we create an object.
The example with boto3 to terminate EC2 instances:
import boto3_helper

print ('Getting boto3 session...')
session = boto3_helper.init_aws_session()
print ('Getting EC2 client object...')
ec2 = session.client('ec2')

instance_id_list = []

instance_list = ec2.describe_instances()
for reservation in instance_list['Reservations']:
    for instance in reservation['Instances']:
        instance_id_list.append(instance['InstanceId'])

ec2_resource = session.resource('ec2')
for instance_id in instance_id_list:
    instance = ec2_resource.Instance(instance_id)
    ret = instance.terminate()
    print ('Terminating: %s'%instance_id)
    print (ret)

print ('Process completed')
If we were to execute our above code snipet we should terminate all of the instances in the EC2 account. Note filtering can be applied here as we explained previously based on tags, IPs or other attributes that are specific to an instance.
main ● (venv) alex@DYNAMH ~/code/unbiased-coder/python-boto3-ec2-guide > python ./boto3_terminate_ec2_instances.py
Getting boto3 session...
Getting EC2 client object...
Terminating: i-09e098bf1ce3cdd4f
{'TerminatingInstances': [{'CurrentState': {'Code': 48, 'Name': 'terminated'}, 'InstanceId': 'i-09e098bf1ce3cdd4f', 'PreviousState': {'Code': 80, 'Name': 'stopped'}}], 'ResponseMetadata': {'RequestId': 'bb1af698-5778-46b9-929c-1c49a16ba4bf', 'HTTPStatusCode': 200, 'HTTPHeaders': {'x-amzn-requestid': 'bb1af698-5778-46b9-929c-1c49a16ba4bf', 'cache-control': 'no-cache, no-store', 'strict-transport-security': 'max-age=31536000; includeSubDomains', 'vary': 'accept-encoding', 'content-type': 'text/xml;charset=UTF-8', 'transfer-encoding': 'chunked', 'date': 'Tue, 28 Sep 2021 21:01:09 GMT', 'server': 'AmazonEC2'}, 'RetryAttempts': 0}}
Terminating: i-003c148b1438b47a4
{'TerminatingInstances': [{'CurrentState': {'Code': 48, 'Name': 'terminated'}, 'InstanceId': 'i-003c148b1438b47a4', 'PreviousState': {'Code': 80, 'Name': 'stopped'}}], 'ResponseMetadata': {'RequestId': '20b96449-2d7a-456b-8a3d-37d1888e8ead', 'HTTPStatusCode': 200, 'HTTPHeaders': {'x-amzn-requestid': '20b96449-2d7a-456b-8a3d-37d1888e8ead', 'cache-control': 'no-cache, no-store', 'strict-transport-security': 'max-age=31536000; includeSubDomains', 'vary': 'accept-encoding', 'content-type': 'text/xml;charset=UTF-8', 'transfer-encoding': 'chunked', 'date': 'Tue, 28 Sep 2021 21:01:09 GMT', 'server': 'AmazonEC2'}, 'RetryAttempts': 0}}
Terminating: i-019d643ae4014705c
{'TerminatingInstances': [{'CurrentState': {'Code': 48, 'Name': 'terminated'}, 'InstanceId': 'i-019d643ae4014705c', 'PreviousState': {'Code': 80, 'Name': 'stopped'}}], 'ResponseMetadata': {'RequestId': 'd8e1424d-f86e-45df-b51e-e493880c5abc', 'HTTPStatusCode': 200, 'HTTPHeaders': {'x-amzn-requestid': 'd8e1424d-f86e-45df-b51e-e493880c5abc', 'cache-control': 'no-cache, no-store', 'strict-transport-security': 'max-age=31536000; includeSubDomains', 'vary': 'accept-encoding', 'content-type': 'text/xml;charset=UTF-8', 'transfer-encoding': 'chunked', 'date': 'Tue, 28 Sep 2021 21:01:09 GMT', 'server': 'AmazonEC2'}, 'RetryAttempts': 0}}
Terminating: i-0ba9e3583f342b41b
{'TerminatingInstances': [{'CurrentState': {'Code': 48, 'Name': 'terminated'}, 'InstanceId': 'i-0ba9e3583f342b41b', 'PreviousState': {'Code': 80, 'Name': 'stopped'}}], 'ResponseMetadata': {'RequestId': '8bf33dc5-a66a-4789-8439-e3be48493c93', 'HTTPStatusCode': 200, 'HTTPHeaders': {'x-amzn-requestid': '8bf33dc5-a66a-4789-8439-e3be48493c93', 'cache-control': 'no-cache, no-store', 'strict-transport-security': 'max-age=31536000; includeSubDomains', 'vary': 'accept-encoding', 'content-type': 'text/xml;charset=UTF-8', 'transfer-encoding': 'chunked', 'date': 'Tue, 28 Sep 2021 21:01:09 GMT', 'server': 'AmazonEC2'}, 'RetryAttempts': 0}}
Terminating: i-0d808c8e59bee58a6
{'TerminatingInstances': [{'CurrentState': {'Code': 48, 'Name': 'terminated'}, 'InstanceId': 'i-0d808c8e59bee58a6', 'PreviousState': {'Code': 80, 'Name': 'stopped'}}], 'ResponseMetadata': {'RequestId': 'a73b30e7-be75-4014-a307-bd81ed40a913', 'HTTPStatusCode': 200, 'HTTPHeaders': {'x-amzn-requestid': 'a73b30e7-be75-4014-a307-bd81ed40a913', 'cache-control': 'no-cache, no-store', 'strict-transport-security': 'max-age=31536000; includeSubDomains', 'vary': 'accept-encoding', 'content-type': 'text/xml;charset=UTF-8', 'transfer-encoding': 'chunked', 'date': 'Tue, 28 Sep 2021 21:01:09 GMT', 'server': 'AmazonEC2'}, 'RetryAttempts': 0}}
Terminating: i-0a060a166beb5354a
{'TerminatingInstances': [{'CurrentState': {'Code': 48, 'Name': 'terminated'}, 'InstanceId': 'i-0a060a166beb5354a', 'PreviousState': {'Code': 80, 'Name': 'stopped'}}], 'ResponseMetadata': {'RequestId': 'e2259648-44ad-44e8-88db-028a065454f5', 'HTTPStatusCode': 200, 'HTTPHeaders': {'x-amzn-requestid': 'e2259648-44ad-44e8-88db-028a065454f5', 'cache-control': 'no-cache, no-store', 'strict-transport-security': 'max-age=31536000; includeSubDomains', 'vary': 'accept-encoding', 'content-type': 'text/xml;charset=UTF-8', 'transfer-encoding': 'chunked', 'date': 'Tue, 28 Sep 2021 21:01:09 GMT', 'server': 'AmazonEC2'}, 'RetryAttempts': 0}}
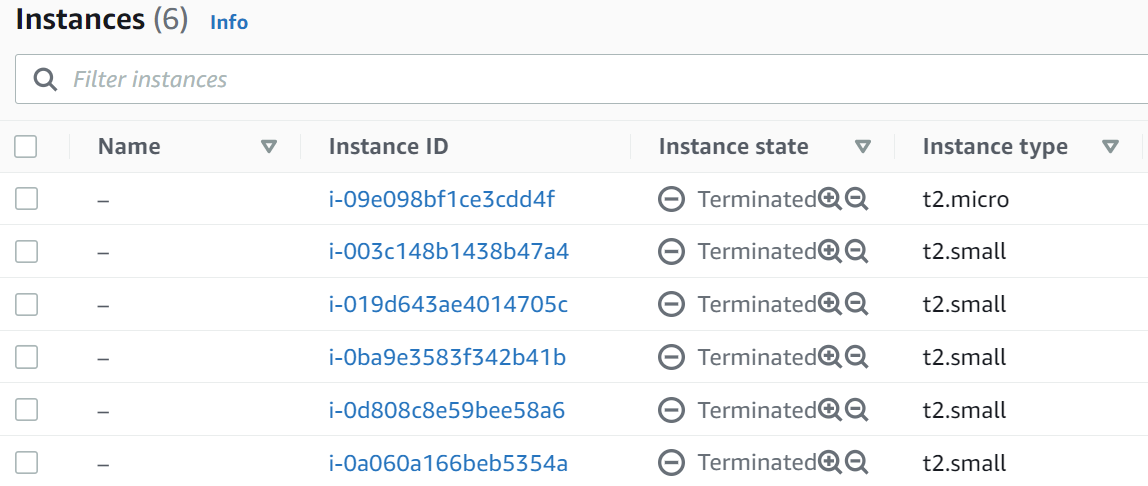
Process completedAs you can see above the new state is now terminated while the previous one was stopped. Again this process may take some time to complete and the result may not be instance but once it’s finished the EC2 instance list in the AWS console should now show all of our instances as terminated.
Conclusion
Overall I’m a big fan of doing things programmatically when it comes to AWS and I believe Amazon has provided a great library with a lot of flexibility but it does have it’s limitations as demonstrated above. The bigger problem here is that we need to be aware of those and be adaptable after all nothing in life is perfect!
If you found this article useful and you think it may have helped you please drop me a cheer below I would appreciate it.
If you have any questions, comments below I check periodically and try to answer them in the priority they come in.
Also if you have any corrections please do let me know and I’ll update the article with new updates or mistakes I did.
If you would like to learn more about AWS please take a look at my section here for more articles.
Here’s some articles I believe you will find interesting and they are similar:
- How to use Boto3 Pagination and Collections
- Boto3 S3 Upload, Download and List files (Python 3)
- How to Setup an AWS Lambda Python Function From Scratch
- Boto3 DynamoDB query, scan, get, put, delete, update items
- Boto3 Session: Setup Profile, Create, Close and Mock sessions
Do you prefer to use AWS lambdas or EC2?